Analysis of SYS_LOB* tables

When you are trying to manage your database size, you might see large SYS_LOB* tables on Oracle based systems.

Questions that will be answered in this blog are:

  • How can I find large SYS_LOB tables in my Oracle based SAP system?
  • How can I find the real table for the SYS_LOB?

Finding SYS_LOB table size

In DB02 select all segments larger than 1 GB with name SYS_LOB*:

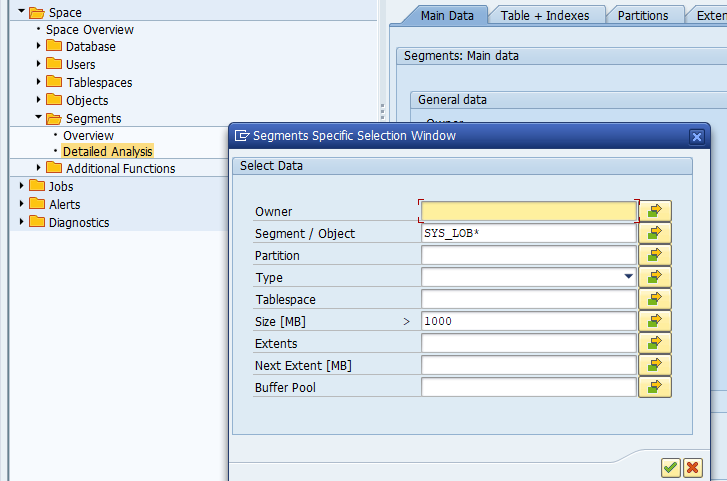
Output might be like this:

On the tab Lobs you can see the table:

From SYS_LOB name to table

Next to the direct view in DB02 as shown above, OSS note 2142497 – What to do for large lobsegment on Oracle database? describes several ways of determining the translation from the SYS_LOB label to the real table.

You can use ST04 SQL query and fire this query: replace the SYS_LOB number from the one in your own system:

SELECT OWNER, TABLE_NAME, COLUMN_NAME FROM DBA_LOBS
WHERE 'SYS_LOB0007061918C00006$$' IN (SEGMENT_NAME, INDEX_NAME);

Or in ST04, you launch the DBA view for DBA_LOBS:
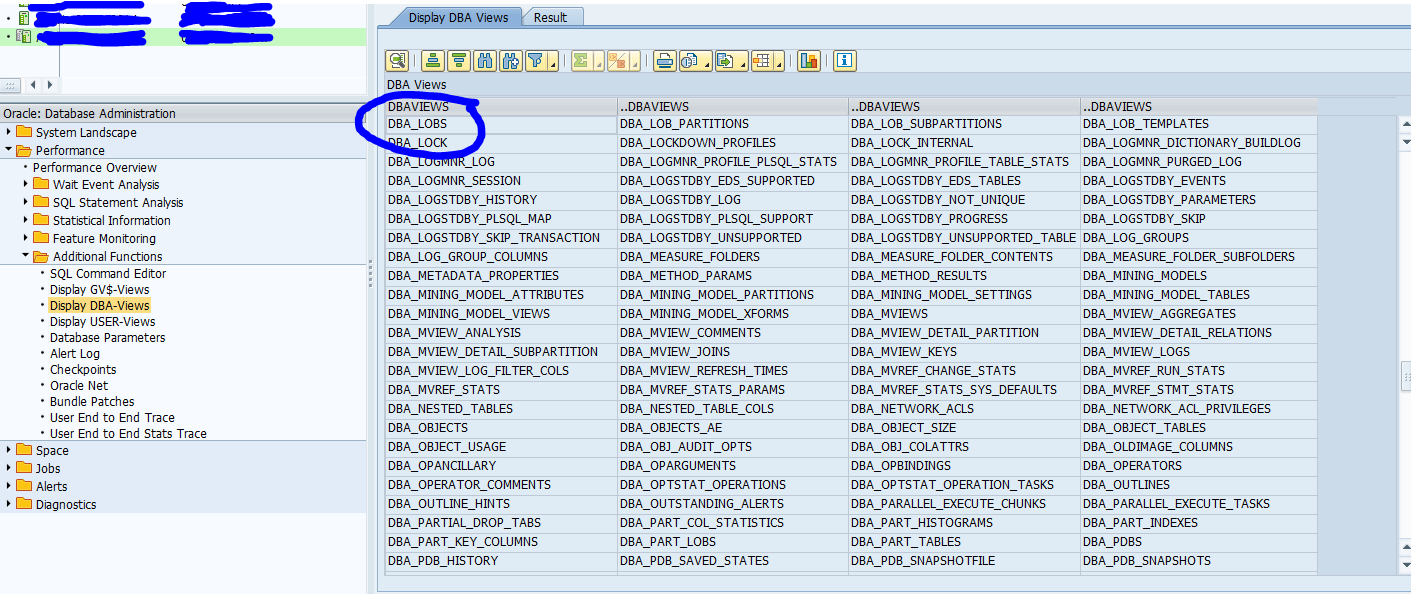
Result:

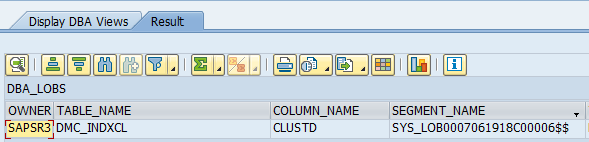
In this case table DMC_INDXCL is the source of the SYS_LOB. Knowing this it will easily lead you to OSS note 2704146 – How to delete data in DMC_INDXCL? – SLT for clean up.

Frequent SYS_LOB tables

Frequent SYS_LOB tables and solutions:

Integrate SO10 text in webdynpro

This blog will explain how to integrate SO10 standard text in webdynpro. It will also show how to use this to integrate it into page on the right after logon (see also this blog).

Setup SO10 text

Start transaction SO10 and create text for logon:

Now enter the text and save it:

We have entered text (as explained in SO10 blog). Important: add the <br/> tags to create the line break.

Setup webdynpro screen

We will now setup webdynpro screen into which we will integrate SO10 text above.

Go to SE80 and create webdynpro Z_LOGON_INFO and go to the main view context and create this structure:

This is the data container for the string to show on the screen.

In the Layout View add element for logon text of type FormattedTextView:

Bind the text from the data element:

And map the data source:

In the view go to the methods and fill the WDDOINIT method:

Full code:

METHOD wddoinit .

  DATA: lt_table    TYPE TABLE OF tline,
        ls_table    TYPE tline,
        iv_textname TYPE tdobname VALUE 'Z_TEXT_FOR_LOGON', "Text created in SO10.
        lv_string   TYPE string,
        ex_lines    TYPE string.

  DATA lo_nd_data TYPE REF TO if_wd_context_node.
  DATA lo_el_data TYPE REF TO if_wd_context_element.
  DATA ls_data TYPE wd_this->element_data.

  CONSTANTS: lc_txtid(4)   TYPE c VALUE 'ST',
             lc_txtobj(10) TYPE c VALUE 'TEXT'.

  CALL FUNCTION 'READ_TEXT'
    EXPORTING
      id       = lc_txtid
      name     = iv_textname
      language = sy-langu
      object   = lc_txtobj
    TABLES
      lines    = lt_table.

  LOOP AT lt_table INTO ls_table.
    CONCATENATE ex_lines ls_table-tdline INTO ex_lines SEPARATED BY space.
  ENDLOOP.

  lo_nd_data = wd_context->get_child_node( name = wd_this->wdctx_data ).
  lo_el_data = lo_nd_data->get_element( ).
  lo_el_data->set_attribute(
    name =  'SO10TEXT'
    value = ex_lines  ).

ENDMETHOD.

The code calls with function module READ_TEXT the text set into Z_TEXT_FOR_LOGON and binds it to the SO10TEXT element. Remark: the formatted text in webdynpro now processes the </BR> settings.

And create the webdynpro application:

And test it:

Restrictions

The formatted text is processed by class CL_WD_FORMATTED_TEXT. See help.sap.com on this. Restrictions are listed (like no use of commands), and list of allowed tags.

Adding URL

Adding a URL to the standard text and show it in webdypro is not possible (as far as known). To add a URL, add to LinkToUrl item in the webdynpro.

Insert as launch page

Now we follow the instructions from the blog on the logon text. Start transaction SM30_SSM_CUST and set the parameter SESS_URL:

Now log on again:

S4HANA conversion DTV tool (data transition validation)

When you are running S4HANA conversion, this will include financial data conversion. For compliancy reasons the FICO business will demand you run reports before and after the conversion to show that the data is converted ok.

To structure these checks the DTV tool (data transition validation tool) was developed by SAP.

How to install the DTV tool

Master note for the DTV tool is 3117879 – DTV Tool – Central Note.

DTV tool can be used for S4HANA 2021 and higher as target system. There is no installation needed there.

For the source system you need to be on the right support package or install via TCI delivery note 3103342 – DTV Tool Initial Delivery.

Technical reference blog from SAP: link.

How to run the DTV tool

Start of the tool is transaction code DVF:

The detailed steps are described high level in this SAP blog.

All detailed steps (including how to setup connections to source system) are explained in the SAP help file for the DTV tool.

FIORI app support

FIORI app support is a nice tool. With the tool, you can get support on app issues.

The tool can help with:

  • Getting specific version information for a FIORI app
  • Checking if the SICF services are active
  • Checking if the ODATA services are active
  • Checking for authorization errors

This blog will explain these topics and will explain how the setup of the function works.

How to use the FIORI app support

In any FIORI app (not the main launchpad), click on your person icon:

And open the app support from the menu:

Now the app support screen will first open with the version information:

Clicking on Front end server shows the front end server status for this app:

In this case you can already see there are issues with the backend:

You can download the logs by pressing the Download Logs button:

By clicking on all the checks and logs, you can quickly detect where any issue of the FIORI application might be.

How to setup the FIORI app support

FIORI app support needs to be setup. First activate these 2 SICF services;

  • /default_host/sap/bc/bsp/sap/sui_flp_app_sup
  • /default_host/sap/bc/ui5_ui5/sap/sui_flp_app_sup

And activate this ODATA service: sui_flp_app_sup_srv.

Start transaction /UI2/FLP_CONF_DEF to check this entry is present (and if not present, create it):

Now use transaction /UI2/FLP_CUS_CONF to check that this entry is set to active. If not, create the entry and set it to active:

Another option is via business catalog.

For both methods: read the SAP help file.

SAP references and OSS notes

SAP blog on FIORI app support: link.

Help file on App support: link.

S4HANA migration cockpit as successor of LSMW

LSMW is the old legacy system migration workbench. In S4HANA this is now replaced by S4HANA migration cockpit.

This blog will explain the basic configuration required to get the migration cockpit going.

Warning: in between versions SAP also released LTMC transaction. This will become obsolete. See OSS note 2988692 - SAP S/4HANA Migration Cockpit – Information about different versions.

Activation of the S4HANA migration cockpit

First action is to activate the S4HANA migration cockpit FIORI app. Reference data for the app can be found on the FIORI reference library. To activate run STC01 task list SAP_FIORI_CONTENT_ACTIVATION for business role SAP_BR_CONFIG_EXPERT_DATA_MIG. See this blog for full details on activation.

Checking the correct activation

After the activation add the SAP_BR_CONFIG_EXPERT_DATA_MIG role to the correct user ID’s. Now start the FIORI launchpad and you should be able to see the Data Migration tile:

Then you can create data migration projects:

How to run the migration

Many blogs exist on how to run the migration.

OSS note 2733253 – FAQ for SAP S/4HANA migration cockpit. Migration approach: Transfer / Migrate data using staging tables contains links to very extensive FAQ documents.

Tips and tricks can be found in this SAP blog.

Performance tips and tricks can be found in this OSS note: 3065607 – Performance tips & tricks for SAP S/4HANA Migration Cockpit: Migrate Data Using Staging Tables.

Master notes:

Data archiving: archiving infostructures

Several retrieval functions in SAP data archiving require the setup of archiving infostructures.

More on archiving data retrieval in general can be found in this blog.

Activation of infostructures

Using transaction SARJ you can configure the infostructures for archiving:

Using display, you can see the fields that are put in archiving infostructure:

On the first screen you can activate the infostructure by pushing the Activate button.

Activation is only activating the structure for future archive runs, not for past runs. For these you need to fill the structures first.

Filling the structures for existing archive files

Filling the structures for existing archive files is bit hidden. Goto transaction SARJ and select the object. Now choose menu Environment and choose Fill Structure.

In the next screen select the files you want to fill (these are normally yellow):

After selection, choose the Fill Structures button to start the batch job filling them. Don’t select too much. It is intense on reading the archive.

Green ones are done. Red ones have failed.

Most common cause for failures is that the variant for the WRITE program was set so the same document got archived twice into different archive files.

What can be done? If it is OK to have the same document in different files, you can ignore the archive session entries with error in SARI.

To avoid having duplicate keys in the infostructure in future, you can add the filename as an extra key field to the infostructure. This can be done as follows:

– SARJ ->Infostructure -> Display
– Technical data
– Change the field “File Name Processing” from ‘D’ to ‘K’

Archiving infostructure status

Use transaction SARI to check the status of the archiving infostructures:

From here you can go to the Status to check the status of the files.

Archive explorer jumps to SARE transaction for the explorer.

Customizing jumps to the SARJ transaction described above.

Data archiving: data retrieval

When you perform data archiving, from time to time you need to give support on data retrieval issues.

This blog will explain some of the general data retrieval concepts.

Questions that will be answered in this blog are:

  • How does single record retrieval work?
  • How can I use the archive explorer?
  • How can I get a list of data from the archive?

Single record retrieval

Single record retrieval is different per archiving object.

Some objects (like FI_DOCUMNT) are nicely integrated. In FB03 the system will check first database, then look into the archive inforecords to find if the document is archived. And then it will show the document in same layout.

Most objects have archive read program which you can find in SARA:

Now run the read program:

And fill out the record(s) you need:

Now you need to select the data files:

If you didn't label your files correctly, you need to select them all, which makes data retrieval slow.

Results are shown:

Results might look ok, or very basic. This is different per archiving object.

Use of archive explorer for table level

An alternative way is the use of the archive explorer. This will give details on table level.

Start transaction SARE:

Fill out the required object and archive infostructure. In this case we used change document. In the second screen fill the object:

Now you can see list of changes:

Double click on the record to see the tables:

Double clicking on the table will give the actual table line content.

Filling infostructures

More on infostructures can be read in this dedicated blog.

List transactions

Some transactions (especially in FICO domain) have integrated reporting with the data archive. We will use transaction FBL3N as example.

Start FBL3N:

Then click on Data Sources, include Archive, and select the needed files:

If you didn't label your files correctly, you need to select them all, which makes data retrieval slow.

How to check SE16N usage?

SE16, SE16N and SE16H are frequently used transactions. They can be used in positive way to quickly fetch data. They can also be a security risk, since it might lead to unwanted data display.

Questions that will be answered in this blog are:

  • Which users used SE16N?
  • How much data do the user pull using SE16N?
  • Which tables did the users read using SE16N?
  • How to check which changes were performed using SE16N?

Which users are using SE16?

Start transaction ST03 or ST03N, and create detailed settings for recording of SE16N:

Save the values and let the system collect the data.

Now in ST03 in the tree below Transaction Profile, the Details for SE16N are shown. Double clicking on the EXEC function will give details on the execution step:

The DB data is normally shown more to the right.

This will give you information on who used SE16N, and how much data transfer was happening.

Which tables were read using SE16N?

If you want to know which table was read during SE16N, you must first activate activity DU9 (generic table access) in the SAP audit log. Go to transaction RSAU_CONFIG and make sure this activity is on:

Now you can use audit log display the audit log with transaction RSAU_READ_LOG or RSAU_READ_LOG_ADM (this is the version without user ID and terminal):

Select DU9 only to make the report faster.

You can now see the tables accessed via SE16N:

In many analysis cases it is sufficient to see which tables are read, and how frequently.

Use RSAU_READ_LOG to see also user and terminal information.

The audit log is a powerful tool. Be aware of privacy related rules in your company.

SE16N performance

Notes on SE16N performance:

Changes done with SE16N

On ECC or S4HANA systems, changes to SE16N are recorded in tables SE16N_CD_DATA and SE16N_CD_KEY. You can display the changes done using report RKSE16N_CD_DISPLAY:

OSS notes for RKSE16N_CD_DISPLAY:

How to check RFC usage in your ABAP system?

Security teams might request to you as basis administrator: which RFC calls are being made to and from your ABAP system? And you need to know which users and applications are calling on RFC.

Questions that will be answered in this blog are:

  • Which users and systems are calling my ABAP system using RFC?
  • Which programs and processes are using RFC?
  • How much data is transferred using RFC?

If you need to check HTTP usage in your ABAP system: read this blog.

RFC statistics in ST03

Go to transaction ST03N or ST03, and open the total for this month. Then open the analysis view for RFC statistics. First check the WEB Client Statistics:

This already gives a lot of information: function modules and amount of data. On the tabs for Transaction, User and Remote destinations, Remote servers and Local servers you can get even more details you need for RFC transaction source.

On all 6 tabs on all 4 reports you can double click to get more details:

Tab PageMeaning
Function ModuleTransactionUserWhat workload is caused by the function modules, transactions, or users (depending on the selected RFC profile, as the RFC client or the RFC server)?
Remote DestinationRemote ServerLocal ServerWhere is the RFC workload created?

Reference OSS notes

OSS notes:

How to check HTTP usage in your ABAP system?

Security teams might request to you as basis administrator: which HTTP calls are being made to and from your ABAP system? Or you might be requested to switch off HTTP (allowing only HTTPs) and you need to know which users and applications are still calling on HTTP.

Questions that will be answered in this blog are:

  • Which users and systems are calling my ABAP system on HTTP?
  • Which systems does my ABAP system call using HTTP?
  • Which programs and processes are using HTTP?

If you need to check RFC usage in your system: read this blog.

Web statistics in ST03

Go to transaction ST03N or ST03, and open the total for this month. Then open the analysis view for web statistics. First check the WEB Client Statistics:

This already gives a lot of information: host and port information, amount of calls. On the tabs for Transaction, User and URL you can get even more details you need for transaction source, user and URL’s on HTTP.

On all 4 tabs on all 4 reports you can double click to get more details. After double-click both HTTPs and HTTP are show. Be sure to filter on HTTP:

StatisticsDescription
WEB Client StatisticsWorkload due to requests for which the system acts as a Web client
WEB Client Dest. StatisticsWorkload due to requests for which the system acts as a Web client, broken down by different client destinations
WEB Server StatisticsWorkload due to requests for which the system acts as a Web server
WEB Server Dest. StatisticsWorkload due to requests for which the system acts as a Web server, broken down by different server destinations

Common cases

Common cases you might want to check for HTTP use:

End users using HTTP

Most of the calls will work on HTTPs as well as HTTP. The most common problem is that end users will have bookmarked the HTTP version in their browser. They will need to be informed the HTTPs version (with a different port number). If you switch off HTTP in this case when a lot of people are still using HTTP you will get a lot of tickets and complaints. Use the web client statistics as explained above to see which entry URL’s they are using. Then mail them to use the new HTTPs entry URL’s with the appropriate port and ask them to switch. Repeat this a few times until the amount of stubborn users is low enough to disable HTTP.

Disabling HTTP check

In transaction SMICM go to the Services icon and then check there is nothing running with an HTTP port.

If you are using SAP Focused Run, read this blog to set up a Security and Configuration validation rule to execute a landscape wide scan on use of HTTP port.

Exit mobile version