This blog will explain you the ATC tool to manage your complete custom code base. The name ATC is bit misleading: officially the name is ABAP Test Cockpit, but the tool has nothing to do with test management. It is a code profiling tool.
This blog will answer questions like:
- How do I scan my complete custom ABAP code base for issues?
- Can I scan custom ABAP code for a complete project?
- What is my state of quality of my complete ABAP code base?
- The SCI SAP code inspector is nice, but how can I enforce it?
- How can I use ATC in the peer review process?
- How can I prevent an ABAP workbench from being released if the coding is not ok?
- Does the ATC tool replace a peer review?
- How do I organize the implementation of the ATC tool in my organization?
- How is ATC used in S4HANA migration?
Setting up the ATC tool
Setting up the ATC is quite simple. Just launch transaction code ATC:
Then choose the Configure ATC entry on the screen.
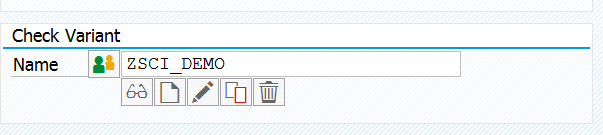
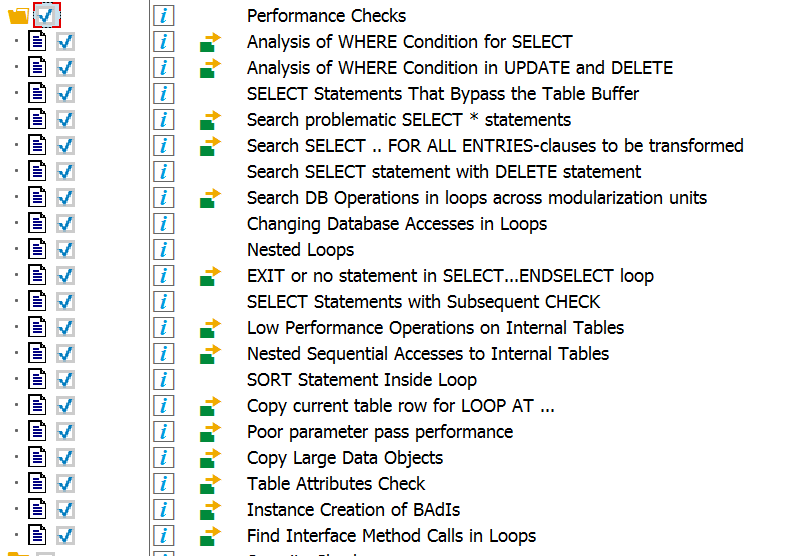
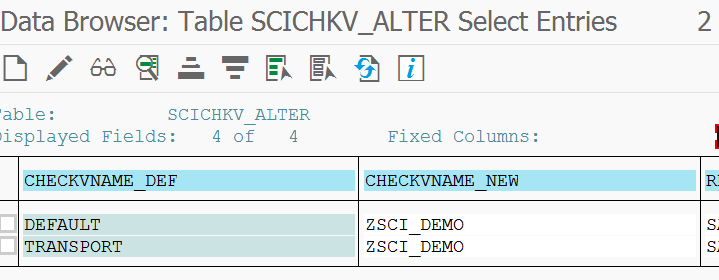
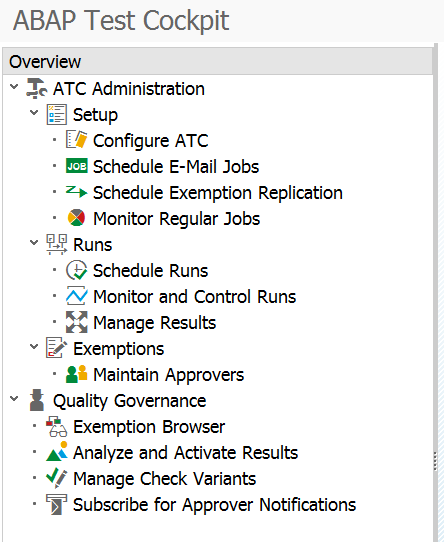
The ATC tool runs on top of the SAP code inspector (SCI). This must be setup first. Choose the variant you have created here as Global Check Variant.
To enable peer review set ATC exemptions to Yes.
If you want to integrate ATC with transport system: set the behavior on Release to either information or error. Be aware that if you set this setting to Error, the transport mechanism will run the ATC tool and will completely block release and transport if any prio 1 or 2 item is found! Only when the issues are solved or exempted, the transport will be released.
This is a great feature for enforcing code standards, but do not switch it on after you have some experience with the ATC tool and your developers are used to the process. Switching it on should also be clearly communicated to basis team and all consultants working on the system. They should be aware of the block coming when releasing transport in SE10 (the description of the block is bit cryptic):
![]()
Running the ATC tool
The ATC tool can be run in two different modes:
- Globally by development lead for complete custom code base
- Locally by developer for one or more of his objects
Running ATC tool globally
To run the ATC tool on all custom code you need to select the Schedule Runs in the ATC tool menu.
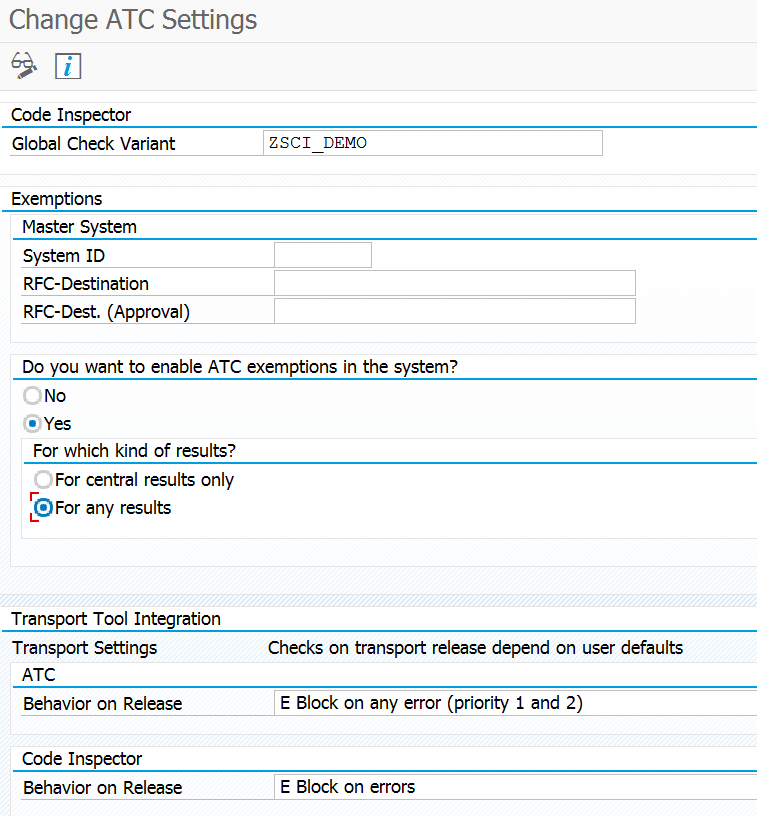
Before you can run the tool, you have to create a Run variant. In the setup of this variant it is very important to select the right packages. For custom code only put in Z* in the package selection. If you have projects doing development in separate packages, it is possible to setup a dedicated project variant for that Z project package only.
If you have chosen to use the exemptions and allow pragma’s to be used by the developers, do check the help text in Handling of pragma’s carefully before making a selection.
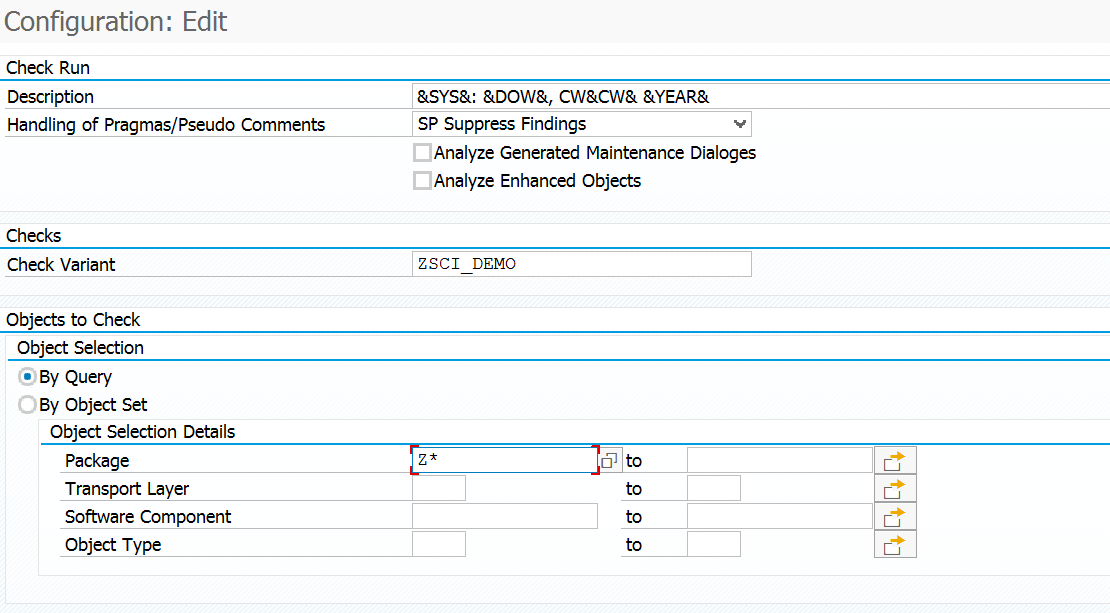
After the variant has been created, you can now select is and press the Schedule button:

In the next screen before hitting execute, please make sure you have checked the number of processes versus your system hardware. The default value of 10 is pretty aggressive and is assuming a large development system. Use transaction SM50 to check the amount of dialog processes on your system. Don’t fill in more than half the amount of DIA processes than your system has. If you do you might find an angry basis admin at your desk asking you why you are completely filling up your system….
After the executing starts a batch job is triggered, which will fire off as many dialog processes as you have indicated. The amount of time the job takes depends on:
- Amount of Z code in your system and selected in your variant
- Amount of processes chosen and infrastructure power you have
- Using HANA or not (complete code base scanning on HANA runs amazingly fast: full code base of 1000 Z objects with 10 parallel processes can finish under 10 minutes. Running same on slow non-HANA system can run over 8 hours in the night.)
You can use the ATC run monitor to see if your run has finished:
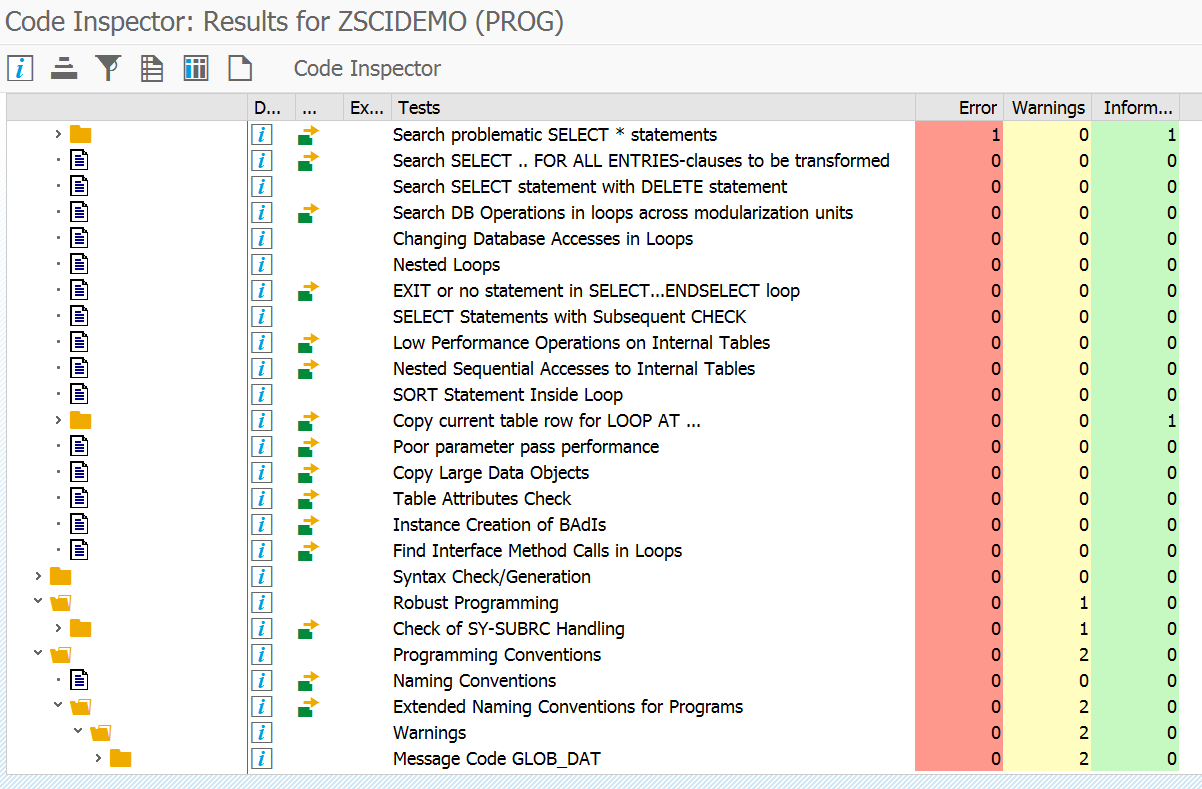
Result of ATC run
When the run is finished go to the Manage Results entry in the ATC menu.
Here you can see the results and the statistics of the results of your run.
![]()

If you are working in an agile devops environment this overview screen is very nice. If you run the ATC tool daily or weekly, this can immediately provide you with the needed code quality KPI statistics for the ongoing sprint.
If you select the run results you get a list sorted by priority. Selecting one of the findings will give you the details of the finding (code positing, explanation of reason of the finding):
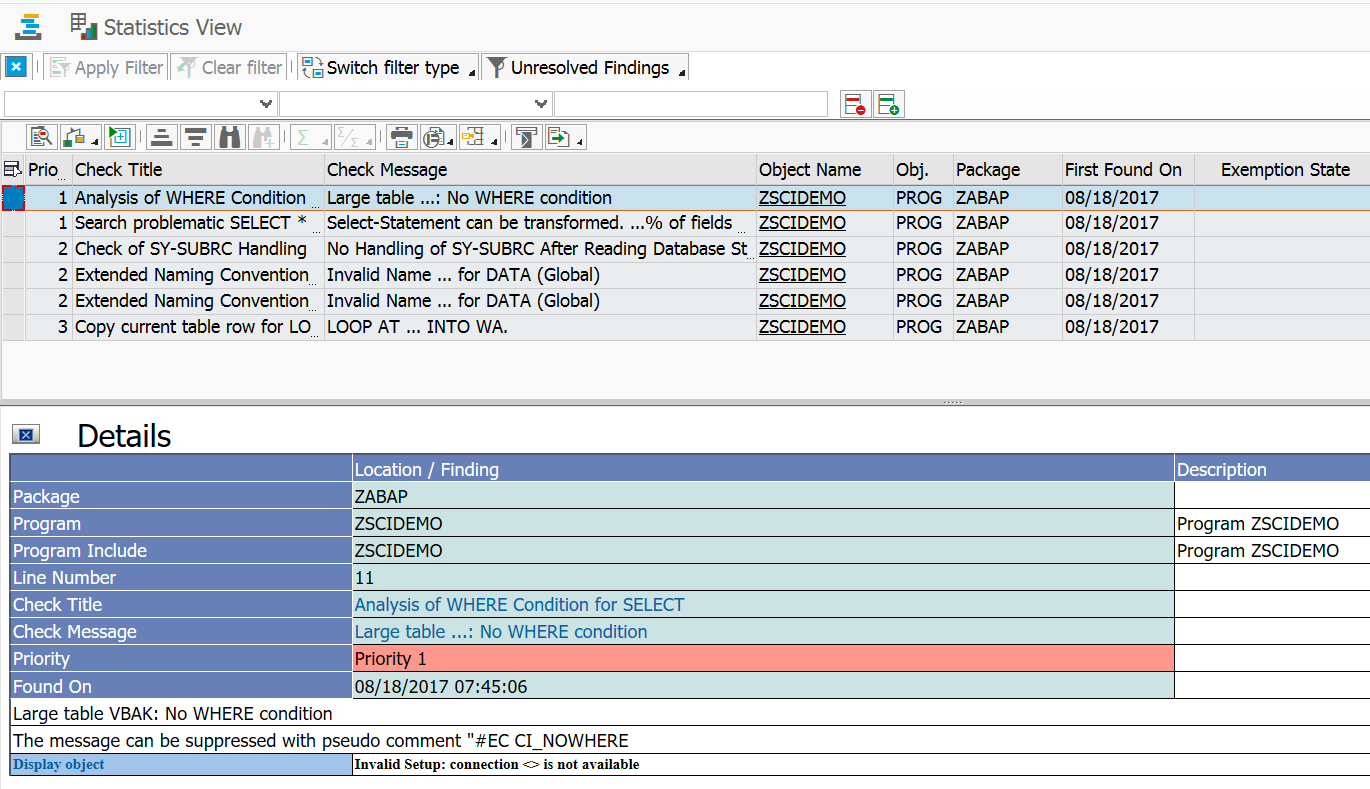
Double clicking on the object name will immediately jump you to the code program point where the finding is found.
Running the ATC tool locally
The other option is to run the ATC tool locally. In each editor you can call Program/Check/ABAP test cockpit to run the ATC for you specific program.
If you work in Eclipse, you can also run ATC by selecting Run/Run as/Abap test cockpit.
Fixing ATC issues
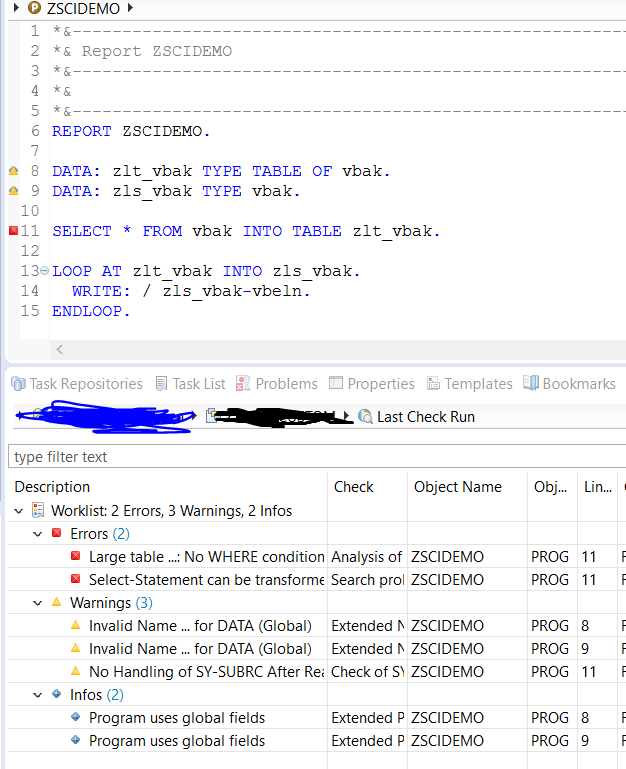
The easiest way of fixing ATC is simply taking away the root cause. In some cases this simply isn’t possible. Reason can be: you have to select data without full key and ATC is detecting this as error. If agreed upon, you can use the corresponding pragma to suppress the finding in the results. Best practice here is to add a comment line why the pragma was used.
![]()

Another sample program:
REPORT zpragma.

DATA: zgs_mara TYPE mara.

* need all for demo, suppress with pragma
SELECT MATNR FROM mara INTO zgs_mara. "#EC CI_NOWHERE
ENDSELECT.
The corresponding ATC result looks like this:
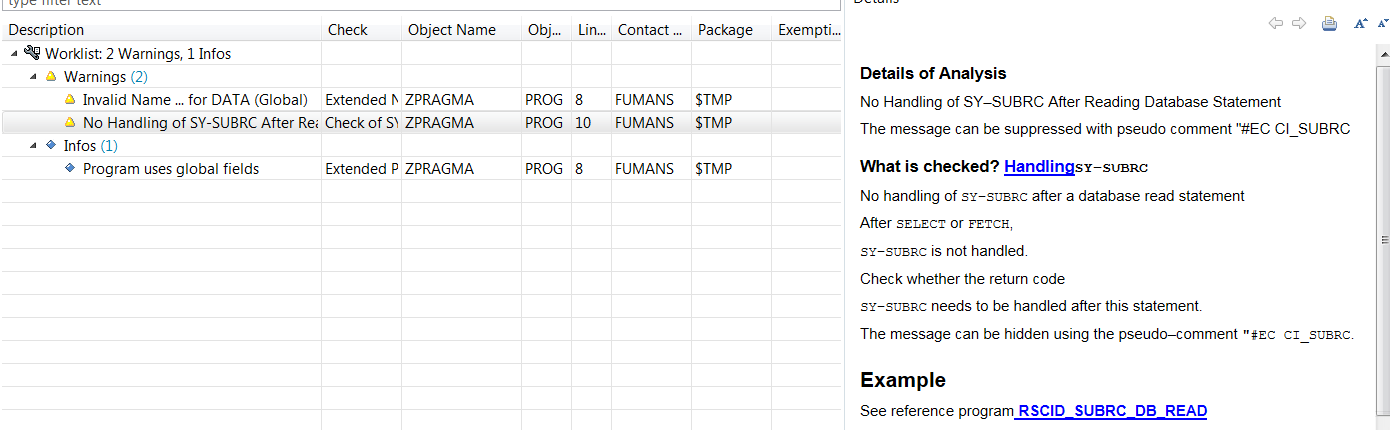
As you can see the error for having no selection clauses is not shown. It is suppressed with the #EC CI_NOWHERE pragma.
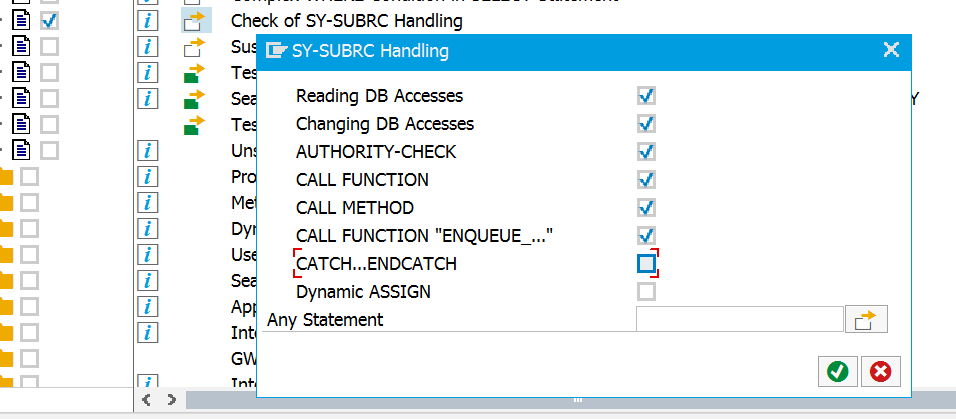
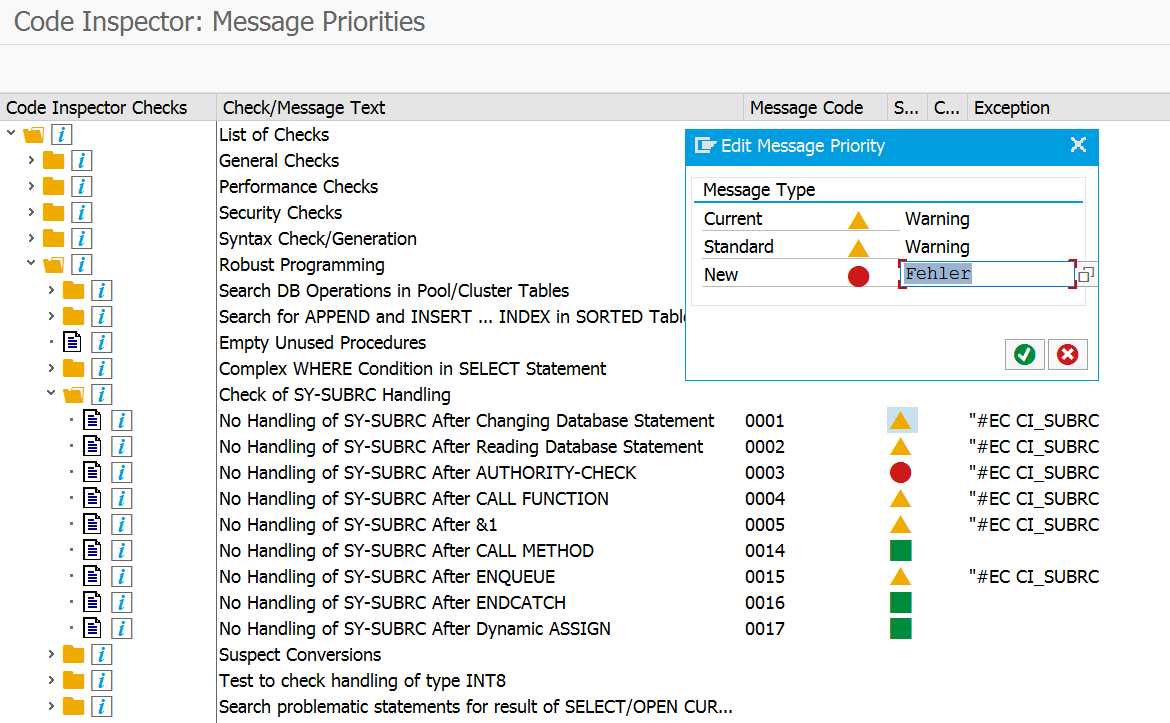
The ATC is still throwing issues: there is no check on SY-SUBRC. If needed the ATC tool suggests to use the #EC CI_SUBRC pragma.
Practical use of pragma’s
If you want to allow the pragma’s or not is up to you. The ATC result list can be configured to simply ignore the pragma’s. Best practice is to allow the use of pragma’s, but to demand comment line with explanation. Some pragma’s (like the previous example of not checking sy-subrc) you might suggest not to use at all.
Apply OSS note 3088590 – ATC: Offer default option to handle pseudocomments and pragmas to set default options for pragma handling.
Use of exemptions
If the issues in ATC cannot be solved by changing the code or using the pragma, the last resort it to request an exemption.
This can be done on the detailed screen of the ATC finding:

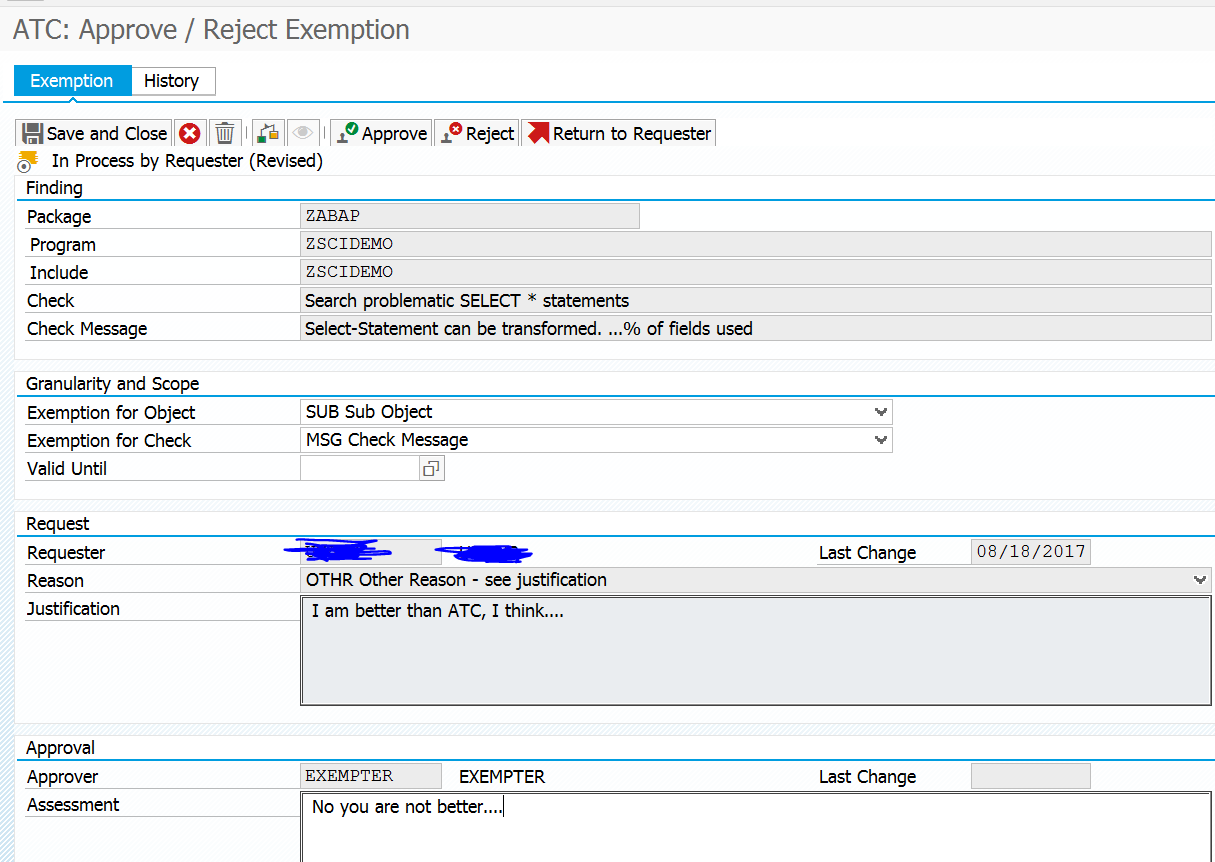
Upon requesting the system will ask you to fill out why the exemption is needed:
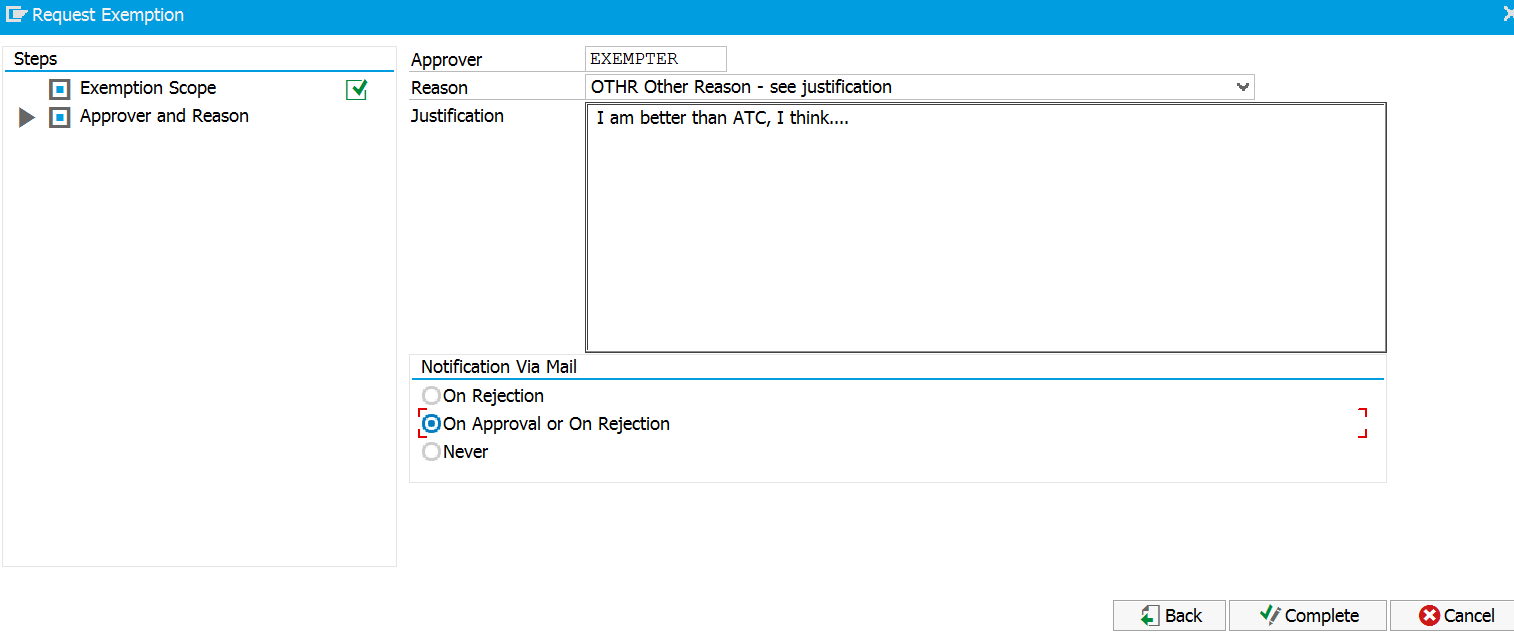
The approver need to be configured in the ATC overview screen. Only the exempters in that list will be shown here.
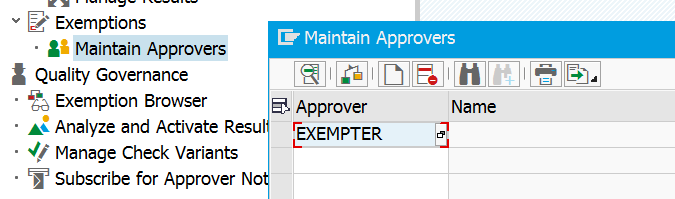
Unfortunately the ATC tool forces you now to enter a fixed name here. You cannot send the exemption to the group of approvers.
Judging the exemption
If the admin allows to setup mail on your development system you are lucky and get a mail (if configured in the ATC main configuration screen). If not, you either have to check regularly or ask the developers to tell you if they have submitted and exemption.
In the ATC main screen select the Exemption Browser select the exemptions for which you are the approver:
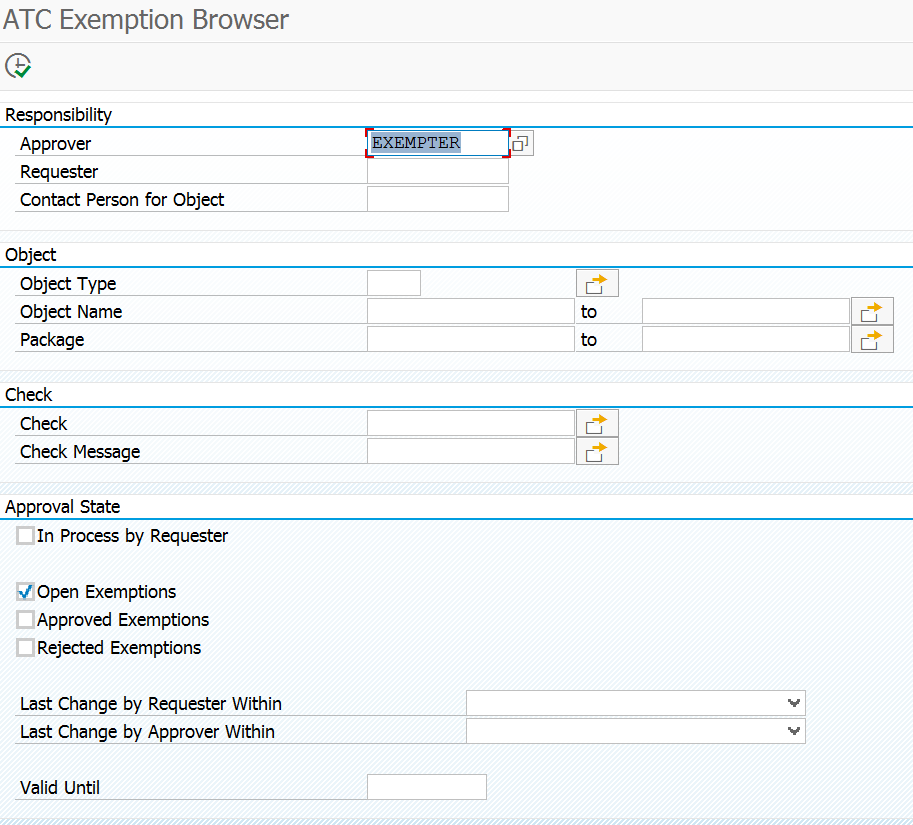
You get a list of items for you to approve, reject or return to the requester.
Again here: if you don’t have mail system, send a signal to the requester that you did an action.
Dealing with old ABAP code
If you have to perform a change to ABAP code that is created before you implemented the ATC tool, the tool might highlight a lot of issues that are in the old section of the code. Should you fix these issues as well? This depends on the size of the coding and the organizational agreements you make. Typically if the coding is very small (user exit with 20 lines) it is common just to fix it. If the coding is large, best practice is to ignore the findings of the ‘old’ code: it is simply too dangerous and too much work to fix it. Or you can work with the baseline option (see this dedicated blog).
ATC tool versus peer review
The ATC tool does not replace a peer review. It is a tool to speed up the peer review, since the tool takes away the burden of the more technical checks like naming conventions, checks of use of SY-SUBRC, are hard coded text replaced by text symbols etc.
Peer review tasks that cannot be done by the ATC tool:
- Judgement if the development itself makes any sense
- Judging use of comment lines (sufficient?)
- Judging if the coding is structured in readable way: future maintenance can be done easily
- Correct use of pragma’s
- ….
Implementation of the ATC tool in your organization
The ATC tool can be implemented in every organization.
Steps to do:
- Organize your code standards: have them documented and approved. This is the basis for the setup of the SCI variant you want to run in the ATC tool.
- Deploy the SCI tool in your developer community and make sure they understand and run the tool consistently. This is also the time you can fine tune the outcomes of the SCI tool.
- Now setup the ATC tool without Exemptions and without transport block. First run the tool globally only yourself to see and understand the ATC tool results and statistics. This will get you a feeling on how long the tool runs on your system and how many exceptions it will report.
- Consider if you want to use the pragma’s fully, partially or not.
- Set up the Exemption users and organizational agreements (like dealing with old code).
- Start to communicate the use of the ATC tool to your developers. If you didn’t think about the pragma’s and the exemption process you will very soon receive many questions from the developers.
- If the ATC process with exemptions is running stable, if you want you can now turn on the transport block to avoid any bad code from being released.
From step 1 to step 7 can take several months depending on the speed you can organize, agree and communicate the usage of the standards and tools. Don’t rush it without having the proper communication and organization.
Reorganization of ATC data
If you have large custom code base and run ATC often, the results table SATC_RT_RUN_EXE might get large and your system admin might complain to you about it. If this is the case you can schedule clean up program SATC_AC_REORG_REPOSITORY on weekly basis.
Running ATC central for more systems or against older versions: remote ATC
If you want to run ACT centrally for more development systems, or against an older SAP version not yet enabled for ATC: please read this blog on remote ATC.
ATC settings logging
The ATC setting changes are not logged. The logging is needed if you have a large crew of ABAP developers and apply the rules strictly (for example if you use the option to give an Error on transport release with ATC). To achieve this, switch on table logging for table TRCHECK.
Scope of ATC
ATC is capable of analyzing ABAP code.
For analyzing Smartforms, please make sure you have implemented the OSS notes listed in note 2715684 – Smartforms are not being checked by ATC.
For analyzing Adobe forms, please make sure you have implemented the OSS notes listed in note 2617401 – ATC: Enable ATC Checks for Adobe Forms.
It cannot analyze AMDP code. See OSS note 3086517 – AMDP method not checked by ATC.
S4HANA custom code migration
The ATC tool is a cornerstone tool in the S4HANA custom code migration. For more information, read this dedicated blog.
Running ATC on standard SAP or addon
For running ATC on standard SAP or on an addon, follow the instructions in this blog.
Running ATC on a transport
Running ATC on a transport is explained in OSS note 3250073 – How to perform ATC check of transport request.
ATC explanation notes
ATC explanation notes:
- 2360080 – SCI/ATC false positive messages in SAP standard code which is included in customer program
- 2403798 – Missing ATC and SCI check variants
- 2414437 – ATC – How to configure e-mail notification to approver
- 2736934 – “Tool failures possibly caused incomplete result” error happens in the ATC result
- 3218711 – ATC: Analyzing Check Failures Caused by Incompatible Checks
ATC bug fix OSS notes
ATC bug fix OSS notes:
- 2595081 – ATC results for logical database objects
- 2706147 – ATC: Check Run terminates with CX_SCA_RESOURCE_FAILURE Unsupported action code
- 2766934 – ATC: Option to Suppress Findings for Pseudo Comments Does Not Work
- 2846485 – ATC: Objects that should be checked might be ignored
- 2944794 – ATC: Error message when applying recommended quickfixes in enhancements
- 2945390 – ATC: Uncaught exception CX_SATC_AC_INVALID_PARAM on doubleclicking an ATC finding
- 2945457 – Runtime error when performing a ABAP Test Cockpit (ATC) run
- 2950665 – ATC: Runtime Error UNCAUGHT_EXCEPTION CX_SATC_CI_EXEMPT_RFC_ERROR
- 2951422 – ATC check of transport requests via ChaRM/Solution Manager might be incomplete
- 2952245 – ATC: Missing raising clause in method definition
- 2967266 – ATC: No Quickfixes in Enhancement Implementations
- 2968679 – ATC: No Check Failures for Incorrect Check Variant
- 2970235 – ATC: Unable to check Enhanement Implementations in local Check Scenario
- 2985080 – ATC: Too few tool failures or unjustified check title ‘Unavailable’
- 3000103 – ATC: Visibility of Parameter “Calculate Quick Fix Proposals”
-
3022875 – ATC Performance Improvement – Avoid Redundant Enhancement Checks
-
3026462 – ATC: Performance improvement for object providers with RFC destination NONE
- 3045902 – Code Inspector: Analysis of update statements with CLIENT clauses
-
3048533 – ATC findings for database views with subtracted field lists
-
3051486 – Missing messages during combined execution of cross-program tests
-
3052280 – Pseudo comment for exec sql findings in cl_ci_test_critical_statements
-
3052556 – Performance improvement for cl_ci_test_analyze_select_hana
- 3054114 – SLIN: Pseudo comment shown as pragma instead of correct pragma
-
3058968 – Smartforms are not checked during CI transport check
-
3059343 – Dump in GETWA_NOT_ASSIGNED in cl_ci_source_where_root or cl_ci_test_scan
-
3060802 – Table attributes checks yields false positive findings when appending views
-
3062094 – CX_SY_ASSIGN_CAST_ILLEGAL_CAST in CL_CI_PROVIDE_CHECKSUM
-
3070525 – ATC-check failure: RAISE_EXCEPTION: REFERENCE_IS_INITIAL
-
3071443 – ASSERTION_FAILED in cl_sca_ci_qfix_engine=>resolve_chain
- 3073128 – ATC: Long Loading Times in Result Browser in Eclipse / Latest RFC Stub Version
-
3083555 – ATC: Exclude Pseudocomments/Pragmas from quickfixes
-
3091155 – ATC: Runtime error UNCAUGHT_EXCEPTION in SATC_CI_CFG_SERIES_SCHEDULE
-
3094306 – Short Dump in check failure display in ATC result view
-
3096178 – ATC Problems view: ATC run for multiple packages is not displayed correctly
- 3097843 – ATC: Code Classification BAdI for classification of development objects
-
3108750 – ATC Check: Tool Failure due to Incomplete Analysis Data
- 3131892 – ATC Tool failures for program errors
- 3132483 – ATC-check cl_ci_test_no_order has problems with move-correponding exact
- 3136908 – False positives in cl_ci_test_no_order_by
- 3137846 – TIME_OUT or TSV_TNEW_PAGE_ALLOC_FAILED in cl_ci_source_where_root
- 3142782 – ATC: Titles of checks and check messages are missing
- 3148409 – Display of pseudo comments and pragmas for findings in objects without source code
- 3152107 – ATC: An ATC run terminates with runtime error RAISE_EXCEPTION in Postprocessing phase
- 3156805 – Missings findings in cl_ci_test_imud_taw_a
- 3192624 – False positives in cl_ci_test_select_taw_bybuf
- 3193098 – ATC – BDEF and ENHO handling
- 3198322 – Missing Object shown for PERFORM … IF FOUND
- 3198613 – Memory problem in quickfix context for ATC checks
- 3199091 – ATC: Failing or wrong navigation for links in finding details for recheck
- 3202485 – ASSERTION_FAILED in cl_ci_test_search_cds_priv_acc
- 3207637 – False positives of ATC-Check ‘Search problematic SELECT * statements’
- 3215485 – Easy way to analyze declarations with cl_ci_test_abap_comp_procs
- 3216064 – Corrections for Quick Fixes
- 3217665 – Findings in generated Gateway classes
- 3221688 – ATC reports findings in SAP Code of customer exit includes
- 3224198 – Correction cl_ci_test_analyze_select_hana: SELECT with FIELDS
- 3225564 – ATC: Adjust determination of object keys for WB requests
- 3225942 – cl_ci_test_scan: cds_ast not read
- 3226081 – Pseudo comment not working for cl_ci_test_no_order_by
- 3227279 – ATC: Improve performance of program “Push_Pull_Exemptions”
- 3227616 – Correction cl_ci_test_analyze_select_hana: FILTER
- 3235243 – Remote ATC: DOMA, TTYP, SHLP information
- 3236288 – Performance-Problem when calling function module SATC_CI_GET_CHECK_METADATA with check classes
- 3240262 – ATC/CI: Check ‘FOR_ALL_ENTRIES’ <CONTINUE in IF>
- 3244419 – More infos from cl_ci_test_abap_comp_procs=>get_select_stmt_infos
- 3245867 – Missing findings AMB_SINGLE for cl_ci_test_no_order_by
- 3247493 – False positives in SAP-coding for ATC-Check cl_ci_test_no_order_by
- 3276198 – False positives No-Order-Check: SELECT .. UP TO 1 ROWS/ (former) POOL/CLUSTER-tables
- 3291908 – Missing findings of ATC-Check cl_ci_test_no_order_by
- 3313518 – ATC Problems view shows links which do not work
- 3337402 – When checking an enhanced object, findings in the enhancements are displayed although, this option was not selected
- 3338048 – ATC: Enhanced objects are not analyzed when called from an external API
- 3338990 – ATC check does not show findings in enhancement implementations in ADT
- 3342420 – Checking of Modifications that are not supported by the Classification
- 3345837 – ATC check ‘Detect customer modifications’ does not find all modifications
- 3349341 – ATC check priority 2 error: Function module exception missing (1025)
- 3358907 – ATC-messages for cl_ci_test_analyze_select_hana
- 3360626 – ATC: Correct inconsistency message when saving a run series
- 3364256 – An exemption with scope finding is displayed for the wrong sub object (i.e. Include, Method )
- 3370294 – ATC-Check cl_ci_test_sysubrc has false positives
- 3375426 – ATC check for annotations in data definitions – include hidden annotations
- 3383593 – Baseline and exemptions for findings with object type INCL not working correctly
- 3388932 – ATC in ADT: Do not miss findings for object type INCL
- 3389891 – ATC: ADT/API Result Reader returns incorrect findings when include exempted findings
- 3392600 – ATC: Exemption is not considered in mass run
- 3433091 – No findings for ATC-Check