BRF+ transport issues

BRF+ rules are nice for developers to use, but can give you some serious issues at transport level.

Questions that will be answered in this blog are:

  • Which tools and analysis programs are available in case I have issues with BRF+ transports?
  • How to recognize BRF+ transport issues?
  • Which relevant OSS notes to check in case of transport issues?

BRF+ transport issue detection

BRF+ rules can cause both issues at export (RC-8) and at import (RC-8 or content not updated while transport shows RC-0 or RC-4). Check the transport for BRF+ rules: they start with FDT.

Troubleshooting BRF+ with FDT_HELPERS

The main basis troubleshooting transaction is FDT_HELPERS.

FDT helpers start screen

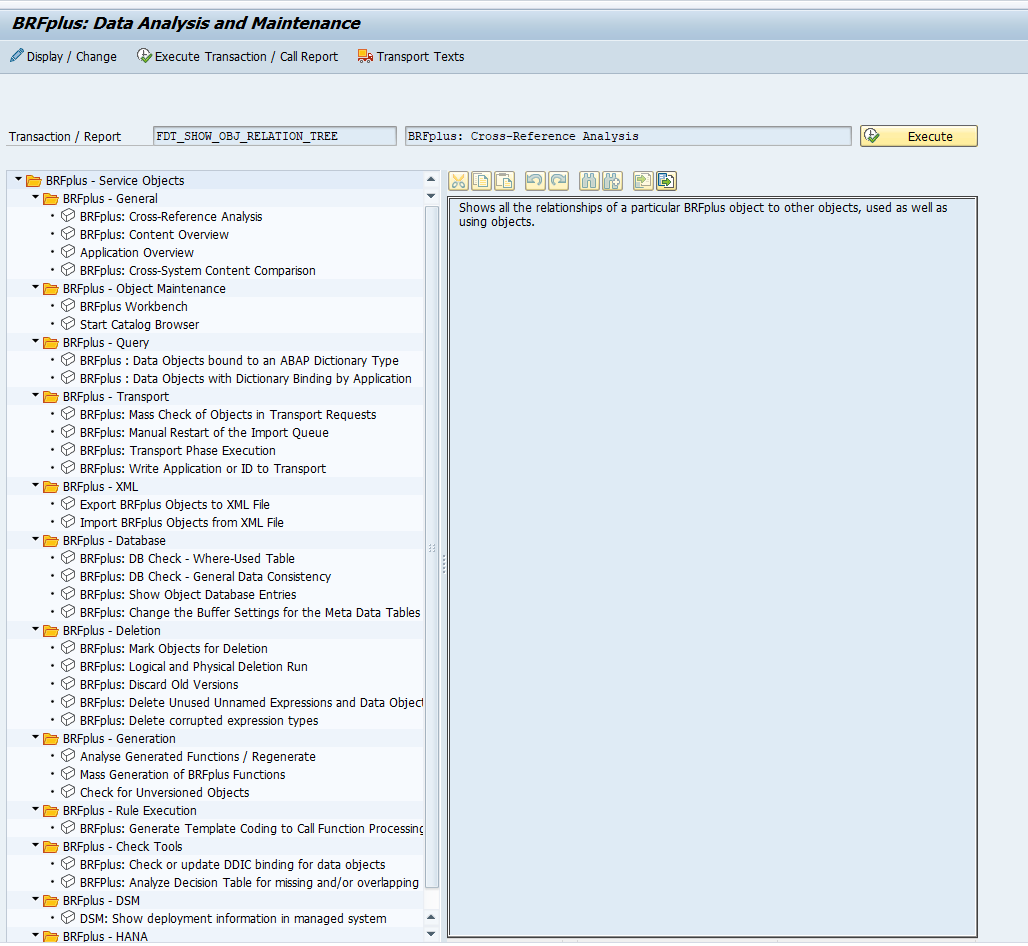
It contains many tools that can assist in issue solving.

BRF+ transport issue support programs

BRF+ versioning and transport information is not displayed by default. You have to switch to expert mode first. See OSS note 2830979 – Versioning and transport information missing in the BRF+ workbench.

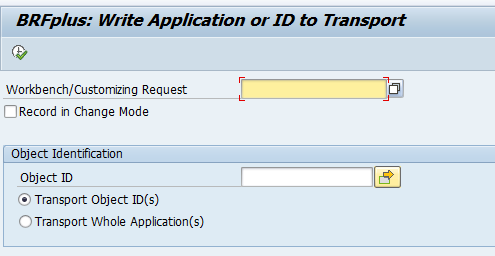
Support program FDT_TRANS can be used to put BRF+ rule into a transport (the person that runs this program must be owner of the transport as well):

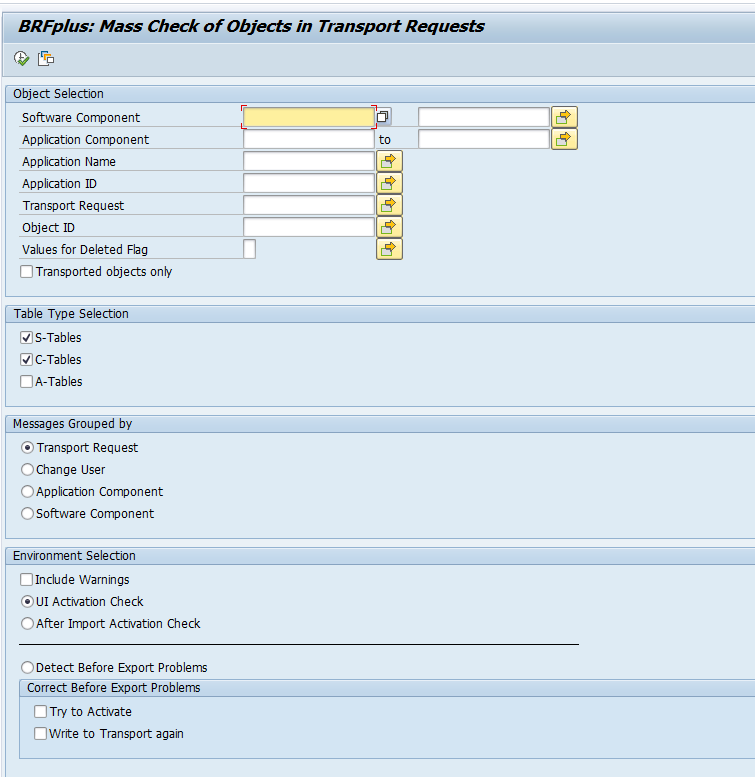
For mass checking run program FDT_TRANS_MASS_CHECK:

RC-8 upon export

If somebody is still in Edit mode in the BRF+ transport you want to release, then the transport export of the BRF+ transport will end in an RC-8. This is quite hard to detect in the RC-8 export log of the transport. So in case you are faced with export RC-8 of BRF+: ask everybody to go away from the BRF+ edit modes and re-export the transport.

Transport issue OSS notes

You can also check the following OSS notes:

EWA workspace

SAP Eearly Watch Alerts (EWA) has always been a primary tool delivered by SAP for system administrators to get an automated report on their SAP system.

The last few years SAP has been working very hard to get the EWA online as part of the support.sap.com pages. This development is now so far and good, that you can consider to switch using the online EWA workspace in stead of the EWA’s generated by your local solution manager system.

Questions that will be answered in this blog are:

  • How to access the online EWA workspace?
  • Can I still get my EWA in PDF or word format?
  • What are extra functions the online EWA workspace offers versus the traditional EWA?
  • Can I set up e-mails for EWA workspace to receive early watches?

EWA workspace

The EWA workspace can be reached on this URL: https://launchpad.support.sap.com/#/ewaworkspace.

The first page is the overview page:

By clicking on the tiles you can zoom in on the diverse topics.

EWA for single system

In the overall rating tile, you can click on the donut graph to goto the list of separate EWA’s:

Here you can open the word or PDF doc, or by clicking on the line goto the online EWA for the single system:

On each topic you can zoom in by clicking on the line:

Sending EWA data to SAP

To get the information to SAP still the local SAP solution manager system (or Focused Run, see this blog) is used to collect the data, and submit it to the SAP market place. In the past the sending was once per month. With the switch to the new backbone infrastructure this is now once per week. If the EWA is not received on SAP EWA workspace page, please check the reference OSS notes in OSS note 1684537 – EarlyWatch Alert not sent to SAP: troubleshooting guide.

Setting up mails on EWA workspace

Follow the instructions of OSS note 2530034 – How to set up e-mail, SMS, and/or launchpad notifications – SAP ONE Support Launchpad to setup mail notifications for the SAP early alert workspace. You can also read these instructions from the SAP Focused Run expert portal, which are very clear: link.

Background on EWA workspace

The primary background site about the EWA workspace can be found here.

A great start for first users is this blog on the effective use of EWA workspace.

One of the functions on EWA workspace that add value over the traditional EWA is the performance evaluation. Read more on this SAP blog.

EWA tips & tricks

More on EWA tips & tricks in this dedicated blog.

SAP logon user exit hack

In SAP there is a user exit just behind the logon of a user. This can be used correctly, but also used for hacking.

Questions that will be answered in this blog are:

  • How to switch on the user exit after logon?
  • What is good use of the user exit after logon?
  • How to use the user exit for hacking?

Activation of the user exit

In transaction SMOD you can call up user exit SUSR0001:

This exit has only one component:

Double click on the exit to go to the Z code include:

To activate the exit, create a project in CMOD and and include this enhancement. Then double click on the include code ZXUSRU01 to activate the code.

Good use of the user exit

The user exit itself is described in OSS note 37724 – Customer exits in SAP logon. Example of good use it to restrict multiple logons in case you cannot switch on parameter login/disable_multi_gui_login. See OSS note 142724 – Prevention of multiple SAPGUI logons.

The exit is also used a lot by GRC and firefighter type of tools.

For ITS webgui the calling of the logon user-exit can be skipped with a URL parameter. See OSS note 1465767 – Logon user exit SUSR0001 not called.

The user exit logon hack

In the user exit code, you can put in your own stuff.

As hacking example: copy function module PASSWORDCHECK and the screen that belongs to it to your own ZPASSWORDCHECK.

Modify the screen logic a bit. This is the original code:

Now change the code: the password is always reported back as ok. And the user input you catch in the field password is yours: you can mail it or store it somewhere for you to pick up later.

Put the altered code in the user-exit with logic:

IF SY-UNAME = 'target user name' and not capture before.    
  CALL Z function ZPASSWORDCHECK.    
  Store capturing.     
  Set capture flag.
ENDIF.

This looks as follows at runtime:

Many end users (and even auditors) will enter their password without thinking twice.

Alternatively you can use function module POPUP_GET_USER_PASSWORD as a basis for your copy: this has also clear text password:

The password field can be stored.

This has the following look and feel:

Detection and protection

It is wise to shield off this user exit from improper use and to yearly check the content of what is inside this user exit.

SAP pathfinder

SAP pathfinder is an SAP tool to give you insights into your system and let SAP tell you where they think you can improve, optimise and innovate.

Questions that will be answered in this blog are:

  • What is SAP pathfinder?
  • How do I run it?
  • Can I see a sample report of what I will get?

SAP pathfinder will most likely by succeeded by Signavio process insights. Read this blog for more information on Signavio process insights, discovery edition.

SAP pathfinder

SAP pathfinder is part of the innovation and value support part of SAP. The full background can be read on the SAP pathfinder site. This site includes video’s that explain everything.

On this site you can also find an example output report.

Background OSS notes:

How to run SAP pathfinder?

Apply 2 OSS notes: 2758146 and 2745851.

Move the OSS notes to your productive system and run program RC_VALUE_DISCOVERY_COLL_DATA:

Let the analysis run and then download the data. To do that start the program again and push the Download Analysis Data button.

You will need as well a PDF copy of your production system EWA.

If you have the files, upload them at the SAP site, confirm, and wait about 1 to 2 weeks before SAP has finished your report.

Main screen shot from the sample:

In case of issues you can read the troubleshooting guide: 2977422 – Process Discovery (evolution of SAP Business Scenario Recommendations) & SAP Pathfinder report – troubleshooting guide.

Read more in OSS note 2918818 – Usage and Performance Data Collection for Process Discovery (evolution of SAP Business Scenario Recommendations) and SAP Innovation and Optimization Pathfinder on Spotlight on the inclusion of usage and performance data.

Central user administration (CUA)

Central user administration (CUA) is a great tool. Despite the fact that SAP has tried to replace it with IDM tools (IDentity Management). CUA remains efficient and reliable.

Questions that will be answered in this blog are:

  • What are use cases for CUA?
  • How to setup CUA?
  • How to monitor CUA?
  • Is CUA working is S4HANA?

Use cases for central user administration

Use cases for central user administration:

  • Management of users in the entire landscape (including production servers)
  • Management of users in non-production (sandbox, development, acceptance)
  • Management of users in client 000

Suppose you have a larger landscape consisting of 100 SAP systems and a new basis person will join. Good luck creating 100 user accounts… With CUA connected this is done in one shot.

And every now and then you need to go to client 000. You have forgotten the password, or due to security settings you users is automatically locked there after xx amount of days. With CUA you can simply reset your password there and log on.

Check if you are using to use SAP-GRC access control. This might conflict with CUA.

Set up of central user administration

In the central CUA system (also called CUA master) you need to set up a logical system for each CUA child system. Use transaction BD54 to create them.

Also setup 1 RFC in SM59 to each child system with this naming convention:

<SID>CLNT<MANDT>

Use a non-expiring background user, with the appropriate rights, in this RFC. Make sure you update the whitelist for CUA in the RFC, otherwise you might get RFC callback error. See this blog.

Now start transaction SCUA:

Create a new model view and add the child system:

Do check that the RFC status is fine.

Save and activate the CUA model view:

Check in the master CUA system that the distribution model is created correctly. Start transaction BD64 and look for the CUA model:

Check in WE20 in the master CUA system that the partner profiles are correctly generated towards the child system:

Check that the outbound settings are set to collect the idocs.

If you have a user base up to 1000 users, you could set the idocs to immediately. With larger user bases: set to collect. Reason is that CUA will daily compare the child and master. It will generate 1 idoc per user. This will clog the child system if you do not set to collect. 

Check on the CUA child system that the WE20 partner profiles are also created correctly:

Also here, set the processing to collect in stead of process immediately.

In transaction SCUM you can make a very detailed configuration per field on which fields are globally maintained in the CUA master, and which local:

First synchronisation

After the first setup you need to do an initial synchronisation.

Start transaction SCUG:

First synchronise the Company address. Then synchronise the users. During user synchronisation you will get errors due to user groups. Each user group in the CUA child system needs to be defined in the CUA master system as well.

Transaction SCUL can be used to check the logging:

For text comparison a traffic light shows whether the child system supports it or not. See SAP note 1642106 – CUA|PFCG: Automatic text comparison of roles for central system. This note explains to update table USR_CUST:

For issues remaining with first setup, read OSS note 333441 – CUA: Tips for problem analysis.

Regular batch jobs

In the CUA master system plan the following batch jobs:

  • RSCCUSND (Send user master data to child systems), daily
  • SUSR_ZBV_GET_RECEIVER_PROFILES (text comparison between child and central), daily
  • RSEOUT00 (Send idocs to child systems), every 5 minutes

In the CUA child system plan the following batch jobs:

  • SUSR_ZBV_GET_RECEIVER_PROFILES (text comparison between central and child), daily
  • RBDAPP01 (Process idocs from the master system), every 5 minutes
Due to the jobs, a change in CUA master can take up to 10 minutes to be effective in the child system.

In the central system the next standard jobs are scheduled:

  • BAT_CUA_USER_MASTER_DATA
  • BAT_CUA_SEND_IDOCS
  • BAT_CUA_COMPARISON_PROFILES
  • BAT_CUA_SEND_IDOC_ERRORS

In the child systems the next standard jobs are scheduled:

  • BAT_CUA_PROCESS_IDOCS     
  • BAT_CUA_COMPARISON_PROFILES

More background information can be found in OSS note 399271 – CUA: Tips for optimizing ALE distribution performance.

CUA in action

If you goto SU01 in the master system, you see there is an extra tab called systems. And you have to specify the system for each role you assign to a user:

Copying a user can be done for multiple systems.

Also password resets can now be done for multiple systems in one shot.

Emergency cases

There might be emergency cases when CUA master is down or is having maintenance or issues, you might need to temporarily disconnect CUA.

Read OSS note 320449 – Deactivating the CUA temporarily. Run program RSDELCUA in the child system.

CUA and S4HANA

Despite several rumors, CUA is fully supported with S4HANA. See help.sap.com on CUA in S4HANA 2021.

Background information

More background information:

SAIS_MONI: Generic audit report about system changes

SAIS_MONI is a central audit report about system changes. It collect changes from client opening, audit log, change log, transport log and more, in one central place.

Questions that will be answered in this blog are:

  • How to install the SAIS_MONI tool?
  • How to run the SAIS_MONI tool?

How to install the SAIS_MONI tool?

The SAIS_MONI tool is installed via OSS note 2423576 – SAIS | Generic audit report about system changes. Or it is standard as of the basis support package stated in this note.

Bug fix notes:

How to run the SAIS_MONI tool?

You start the tool with transaction SAIS_MONI:

Depending on your input the output will be shown as ALV output.

For a full description of each option, read OSS note 2915635 – SAIS | Generic audit report about system changes.

Logging for users is described in OSS note 139418 – Logging of user actions (ABAP server).

Bug fix OSS notes

Bug fix notes:

Content server migration of documents

If you have configured attachments of document info records to be stored in the content server, you still might have a lot of old document stored into the SAP database.

This blog will explain how to migrate these documents from the database to the content server.

Questions that will be answered are:

  • How to migrate documents from database to content server?
  • What are relevant background OSS notes?

Running the migration

The main OSS note is 389366 – Relocation of documents. This basically tells you to run program RSIRPIRL. The exact use is explained in OSS note 2459712 – How to use report RSIRPIRL.

To run start transaction SE38 and start program RSIRPIRL and fill out the required data:

Select a time frame that has little documents in a test environment first. Check how long it takes and that it ends correctly. After the relocation is done you get a list of technical ID’s migrated. When confident in a test environment, run in production environment, and monitor the storage of the content server (so it does not fill up to 100%).

New modification note for delayed deletion: 2991944 – Introducing the Delay mode in report RSIRPIRL.

Migration of GOS objects

The program RSIRPIRL does not have many selection criteria. You might also find out that the time to migrate takes too long. If you need to migrate GOS document (global object services attachments), you can use program RSGOS_RELOCATE_ATTA:

This program migrates the GOS documents specified per type and page. GOS documents are normally the bulk of the documents. This way you can migrate most of the documents before running the full run with RSIRPIRL. Full background of program RSGOS_RELOCATE_ATTA can be found in OSS note 2293171 – RSGOS_RELOCATE_ATTA: Relocating attachments from generic object services.

Copying content repository

If you want to copy content from a content repository to another (not re-locate), install the program Z_DOC_COPY from OSS note 2774469 – Program to copy SAP content repositories.

Relevant OSS notes

OSS notes:

APC: Abap push channel

The ABAP push channel (APC) is the ABAP implementation of websockets. It’s goal is to enable the ABAP stack to send push messages to registered web clients.

This blog will answer the following questions:

  • How to setup an ABAP push channel?
  • How to implement the ABAP push channel?
  • How to test the ABAP push channel?
  • Where to find more background and examples on ABAP push channel?

Setting up an ABAP push channel

To setup an ABAP push channel go to transaction SE80 and right click, select create / connectivity / ABAP push channel notification.

Now press the Generate Class and Service button. The classes and services will now be generated as placeholders. Save your work.

If you try to activate the service at this point in time you get this error message:

The reason is that we didn’t implement two methods of the new class yet: the ON_START and ON_MESSAGE.

Implementing the actual APC class

To do this, we go to SE24 and lookup the generated class and we select the ON_START method:

Press the redefine button to redefine the method.

Use this code in the method:

TRY.
* send the message on WebSocket connection
DATA(lo_message) = i_message_manager->create_message( ).        lo_message->set_text( |ON_START has been successfully executed !| ).
i_message_manager->send( lo_message ).
CATCH cx_apc_error INTO DATA(lx_apc_error).
MESSAGE lx_apc_error->get_text( ) TYPE 'E'.
ENDTRY.

This basically confirms the push channel registration.

Now redefine the ON_MESSAGE method:

TRY.
* create the message object
DATA(lo_message) = i_message_manager->create_message( ).
* send message
lo_message->set_text( |Hello World !| ).
i_message_manager->send( lo_message ).
CATCH cx_apc_error INTO DATA(lx_apc_error).
MESSAGE lx_apc_error->get_text( ) TYPE 'E'.
ENDTRY.

It simply pushes the message: ‘Hello World’.

Save and generate the class in SE24.

Now we can go back to the SE80 ABAP push channel we have created and activate it as well. You can run the consistency check to see all is fine:

Testing the ABAP push channel

Now you can test the ABAP push channel by hitting the test button in the SE80 screen of the ABAP push channel. The test service will launch an ABAP webdynpro screen.

If the ABAP webdynpro screen does not launch, activate in SCIF transaction the following 2 nodes: WDR_TEST_APC and WDR_TEST_APC_WSP.

Test result:

As an alternative to SE80 you can also use transaction SAPC:

Background information

Excellent blogs on ABAP push channels are:

Chat bots via SAP conversational AI

This blog will explain how simple you can set up a chat bot via SAP conversational AI.

Questions that will be answered in this blog are:

  • How can I set up a test chat bot with SAP conversational AI?
  • How can I test the chat bot?

Setting up the chat bot

SAP conversational AI is the technology behind the chat bots of SAP. It only runs in the cloud. It does not run on premise.

You can register for a free test account at https://cai.tools.sap/.

After registration you can create your first bot:

Here we choose Perform Actions and press the CREATE A BOT button:

Continue with the wizard:

Now create the bot.

First thing to add is an intent:

And enter the detailed words (expressions) for the intent:

When the user keys in one of these words, it will trigger the bot.

But this is only the trigger. There is no action yet. Goto the build tab and create a skill first:

Now open the skill. In the skill you can goto the details to add a trigger:

Here we use our test intent we created before as trigger.

Now goto the Actions tab and create the wanted action:

In our simple case, we respond back with a text saying “Me too!”.

Testing the chat bot

Now we will test our chat bot. Test result:

First thing we say is “tell a joke”. Then the bot will tell a joke.

Then we ask: I need a holiday. Since we have set the word “holiday” as an intent, the bot responds with the action and says “Me too!”. The same for I need beer. Any response question that is not in the chat bot script it goes to fallback.

OpenSAP course

SAP has a nice OpenSAP training on chatbot building. Follow this link.

Data archiving: reducing amount of parallel batch jobs

When executing data archiving you have to be acting careful. The data archiving write and delete processes can be consuming a lot of CPU power from the database. Also, if you are not careful you might, by accident, claim all background processes. This blog will explain how to limit the amount of batch jobs used for data archiving. The data archiving run process itself is described in this blog.

Questions that will be answered in this blog are:

  • How can I limit the amount of deletion jobs?
  • How can I restrict the archiving jobs to run on a specific application server only?

Limit amount of deletion jobs

When the write run of data archiving is finished, this can have delivered many files. If you are not careful with the deletion, you select all files and each file will start a deletion run. This will consume a lot of CPU power on database level, since the deletion run will fire many DELETE statements to the database in rapid sequence. Also you might consume all batch jobs, leaving no room for any business batch job.

In stead of running the deletion from SARA, you can also run the deletion via program RSARCHD:

With this example, MM_EKKO files will be deleted. Maximum of 50 files from 1 archiving run will be processed, with a maximum of 2 deletion batch jobs running at the same time.

The general OSS note for this program is 133707 – Data archiving outside transaction SARA.

Relevant OSS notes bug fix notes:

General application server restrictions via batch job server group

In SM61 you can setup a special batch job server group. Here can assign a single application server for you data archiving batch job processing. We assume here you created a group called DATA_ARCH.

In SARA you can now goto the general data archiving settings:

Now you can link the batch job server group:

With the button JobClasses you can specify the job priorities per data archiving function:

A = high priority, C = low priority. The above screen shot is an example.

The second part of OSS note 2269004 – How to reduce parallel archiving jobs on Integration Engine describes the procedure as well. The first part of the note is only relevant for SAP PI.

Exit mobile version