SAP interfacing: exposing web services

In the previous blog we have created a test RFC module. We now will expose this test RFC module as web service. This blog assumes the basic SOAP web service runtime has been done according to the manual in this blog.

If you are looking for information on how to consume a web service in the ABAP stack: read this blog.

Questions that will be answered are:

  • How can I generate a web service design time based on an RFC module?
  • How do I activate the web service runtime via SOAMANAGER?
  • How do I test my web service?

Creating the web service based on RFC module

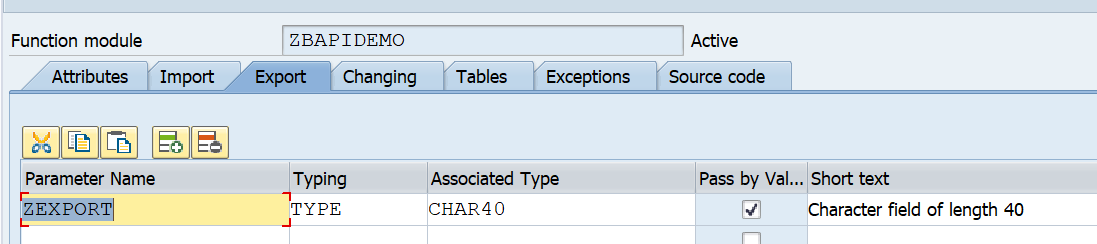
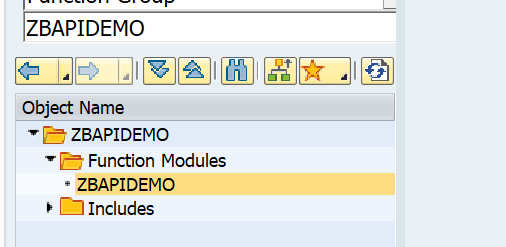
Goto transaction SE80 and search for the test BAPI:

Now right click on the name ZBAPIDEMO function module and select the option Create / Enterprise Service:

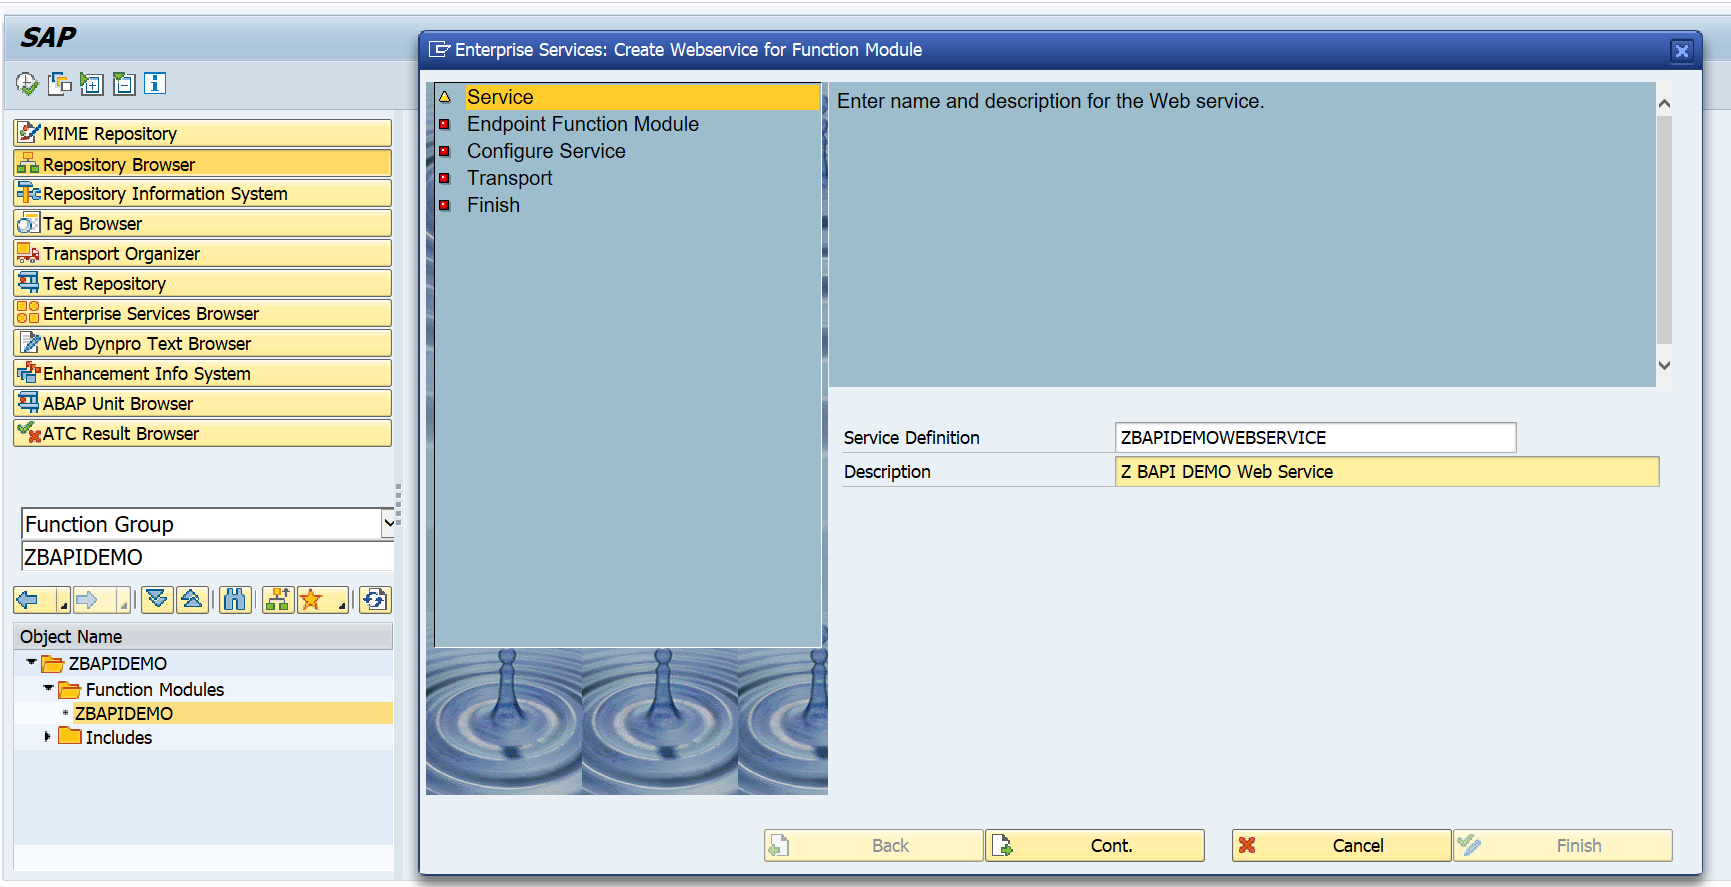
Fill out the name for the service definition and the description. Press Cont. to continue to the next screen:

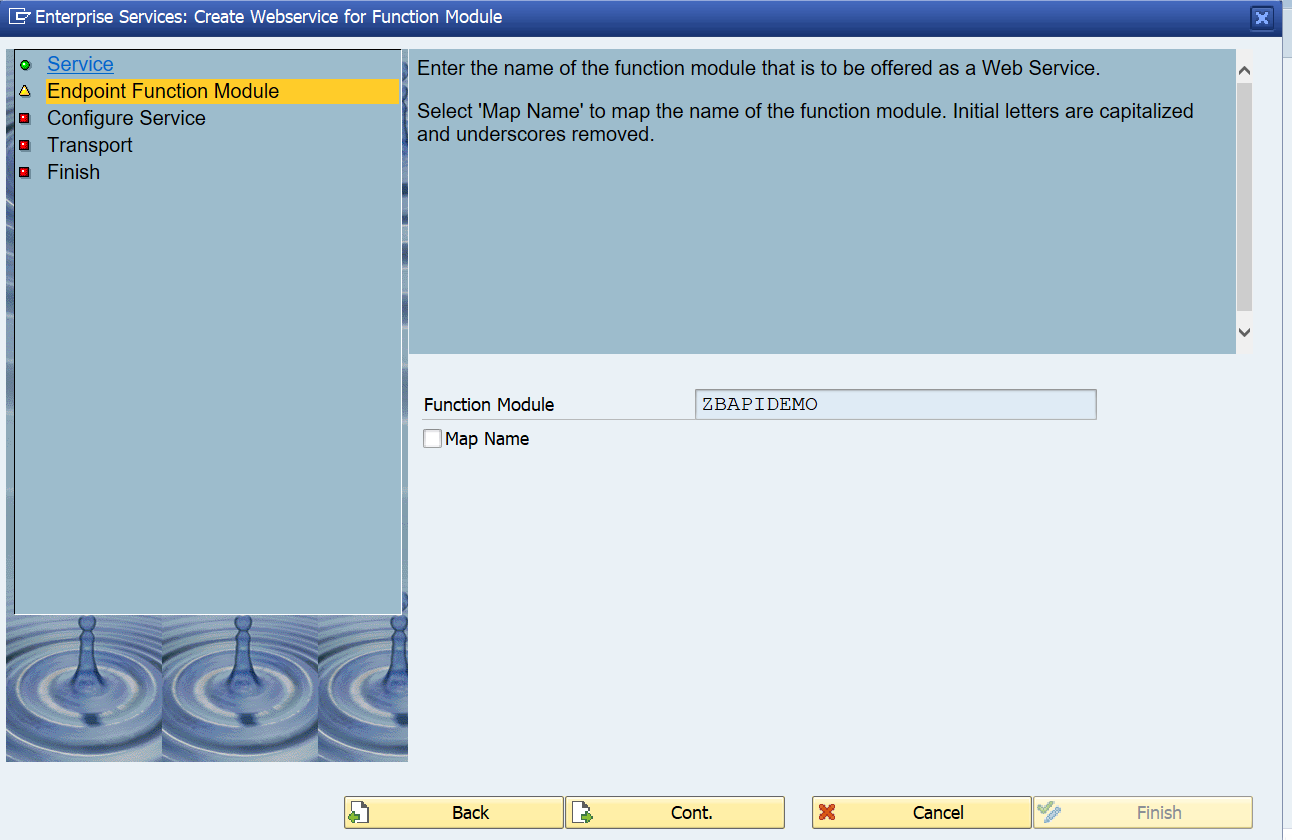
Press Cont to go to the next step:

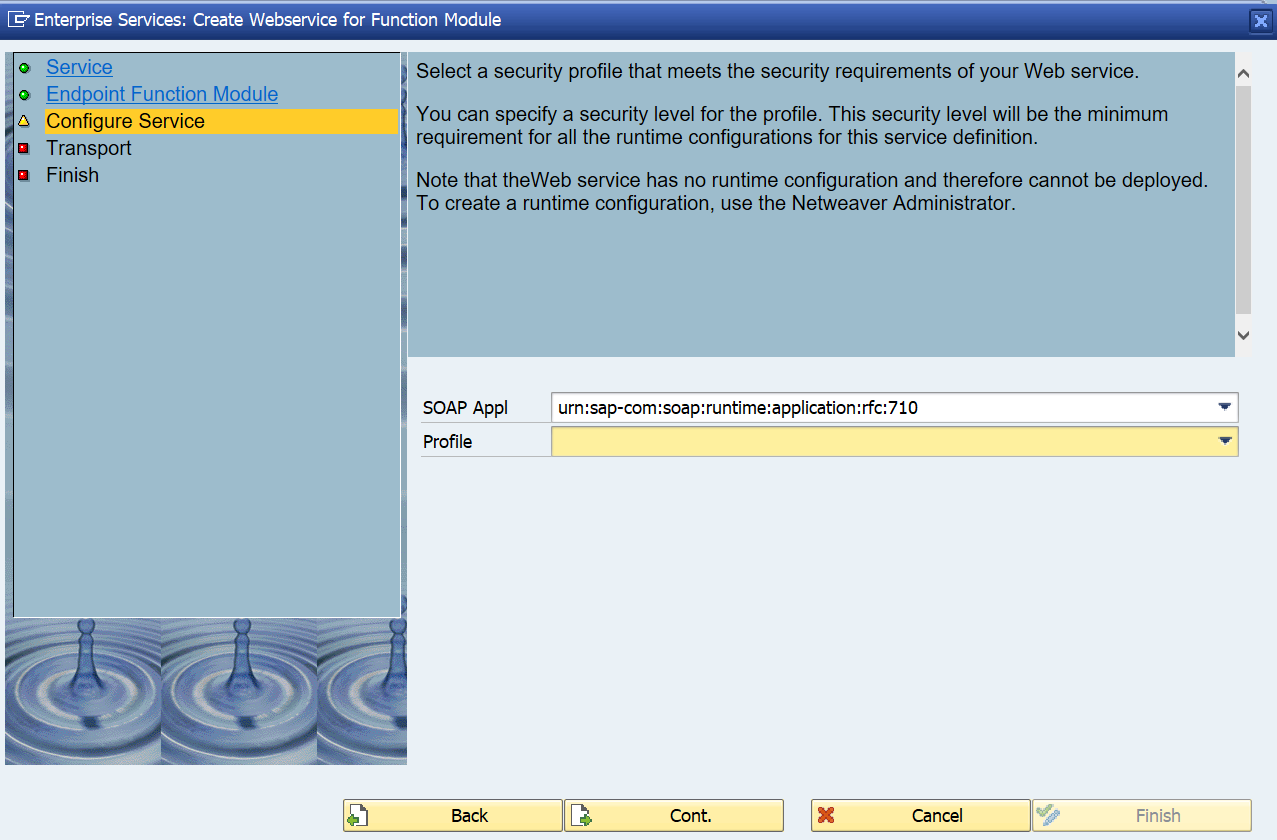
Press Cont. to go to the next screen:

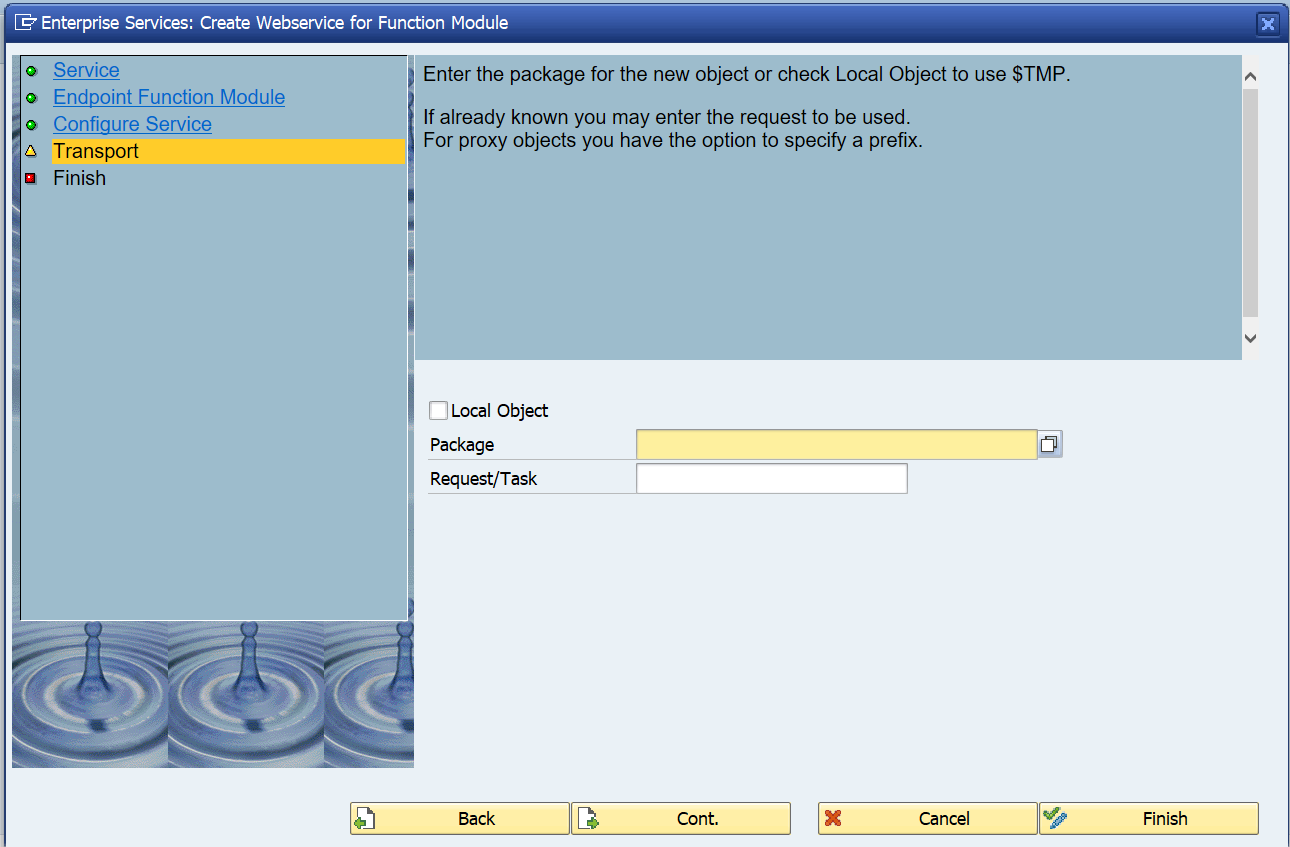
Fill out your package and transport request.

Important here: on a sandbox you might want to use a local object ($TMP). In a development system, NEVER use the local option. A lot of data structures and coding will be generated. If you later try to move the objects from $TMP to a real package, you will be faced with a lot of issues. See note  886682 - Proxy inconsistencies on the use of repair programs SXIVERI_PROXY_HASHID_CHECK and SXIVERI_PROXY_HASHID_CHECK_70. After the cumbersome and painfull repair you will not make the mistake again... 

Press Cont. to goto the last screen:

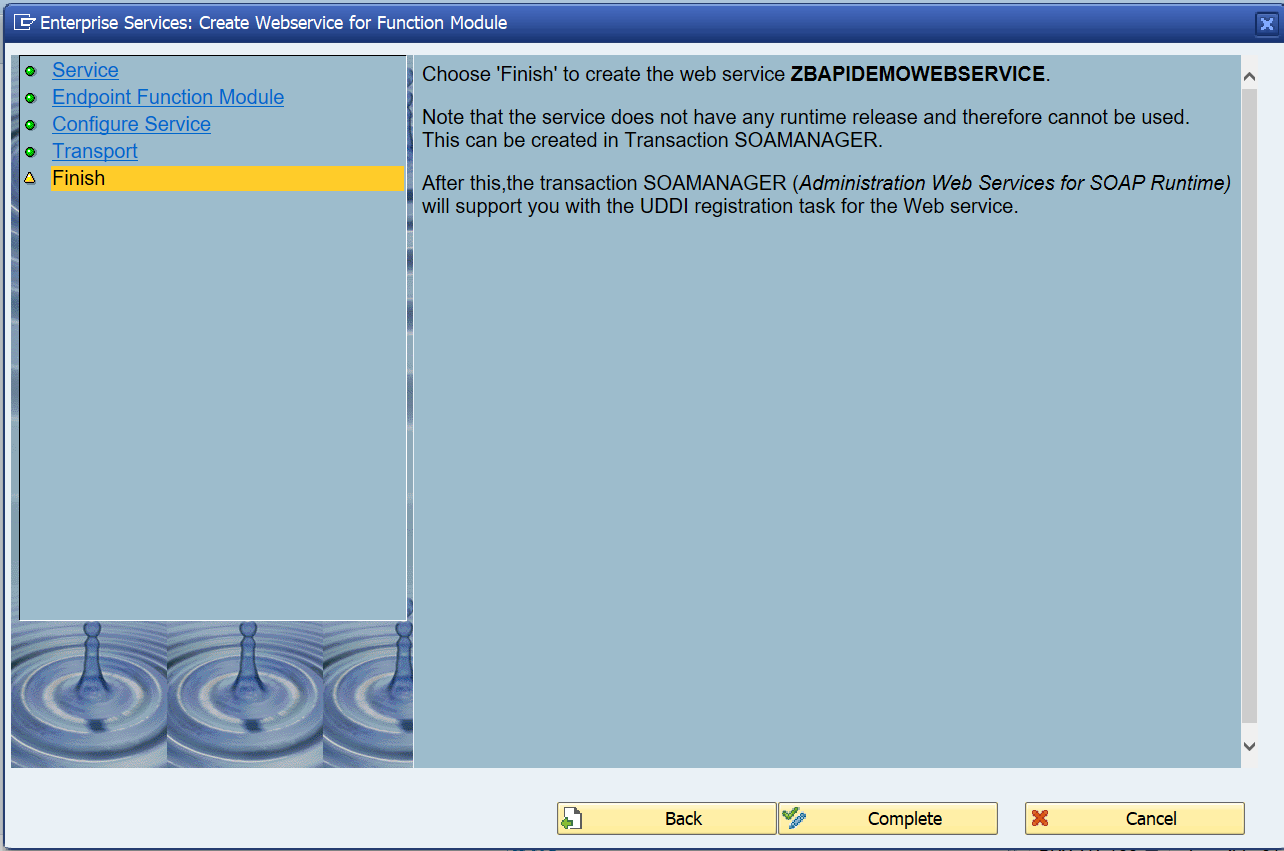
On the screen you can already see the next action after completion: SOAMANAGER. But first press Complete to start the generation of the objects.

After the generation, do not forget to Activate the objects!

Activation success message:

Setting up the runtime with SOAMANAGER

To setup the runtime, start transaction SOAMANAGER. It is assumed that the basis team has performed the initial SOAP runtime setup. If not done, ask the basis team to follow the steps in this blog.

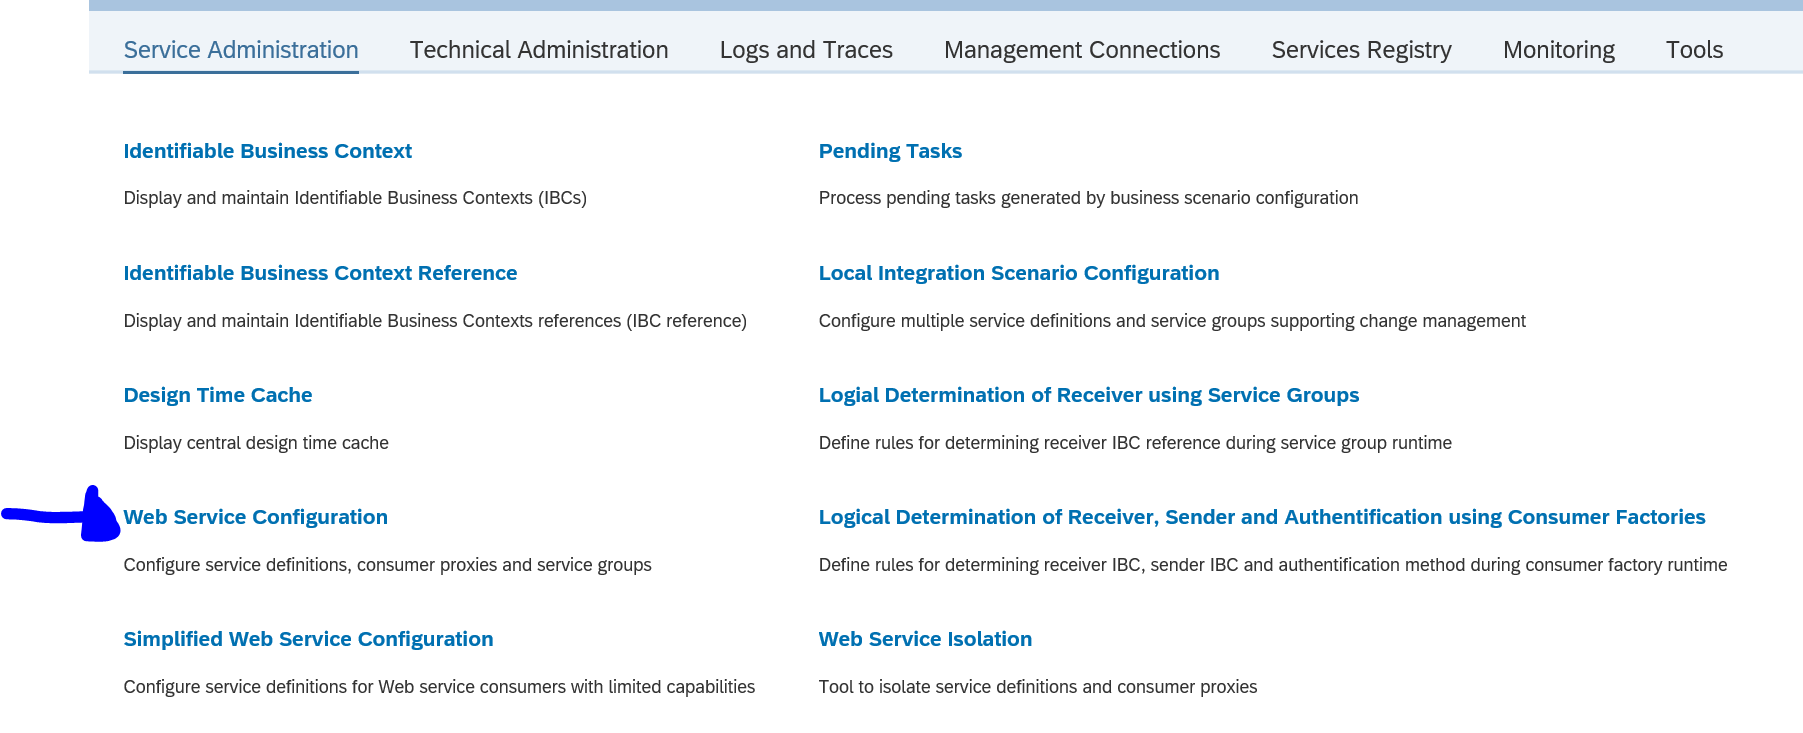
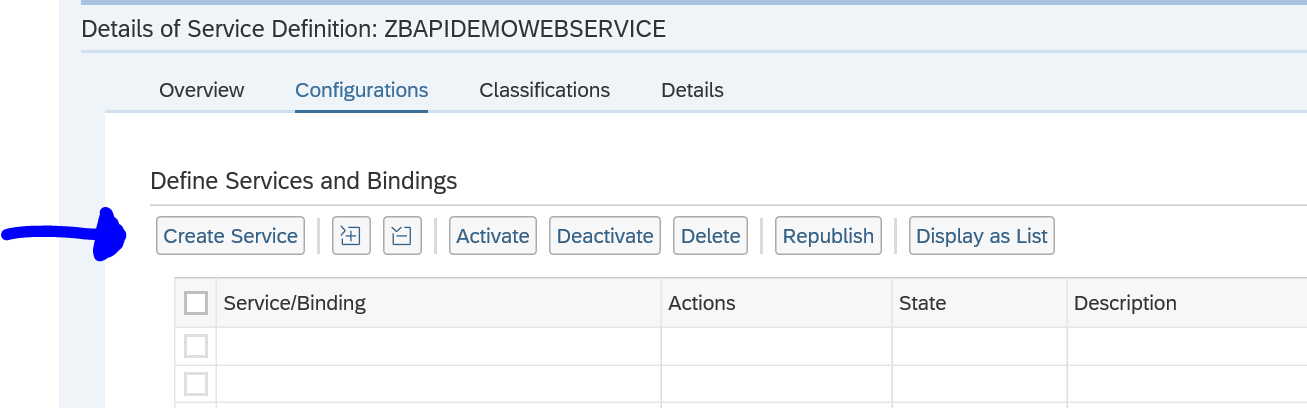
On the SOAMANAGER start screen choose the option Web Service Configuration:

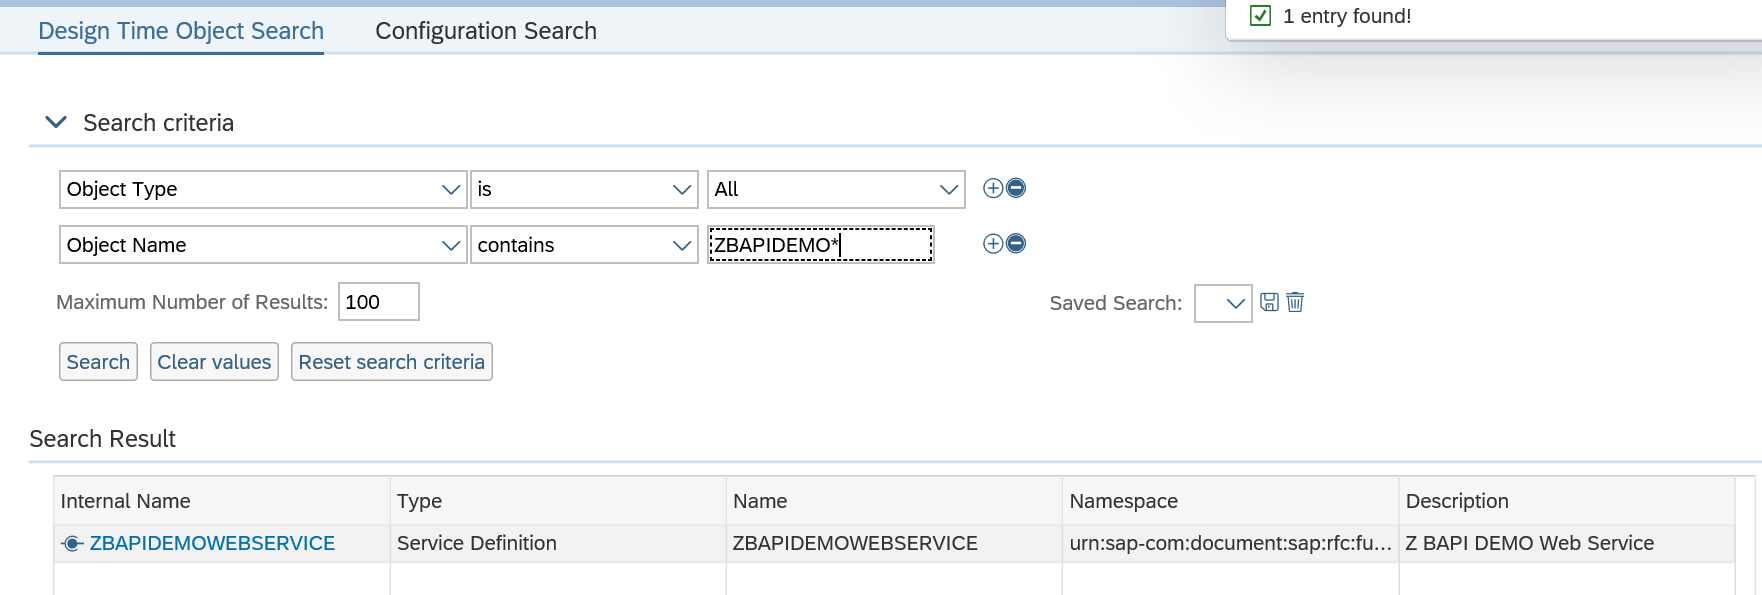
In the next screen search for the design time object we created and activated in the previous section (if you forgot the activate, you will not find it now…):

Select the service and on the next screen press the button Create Service:

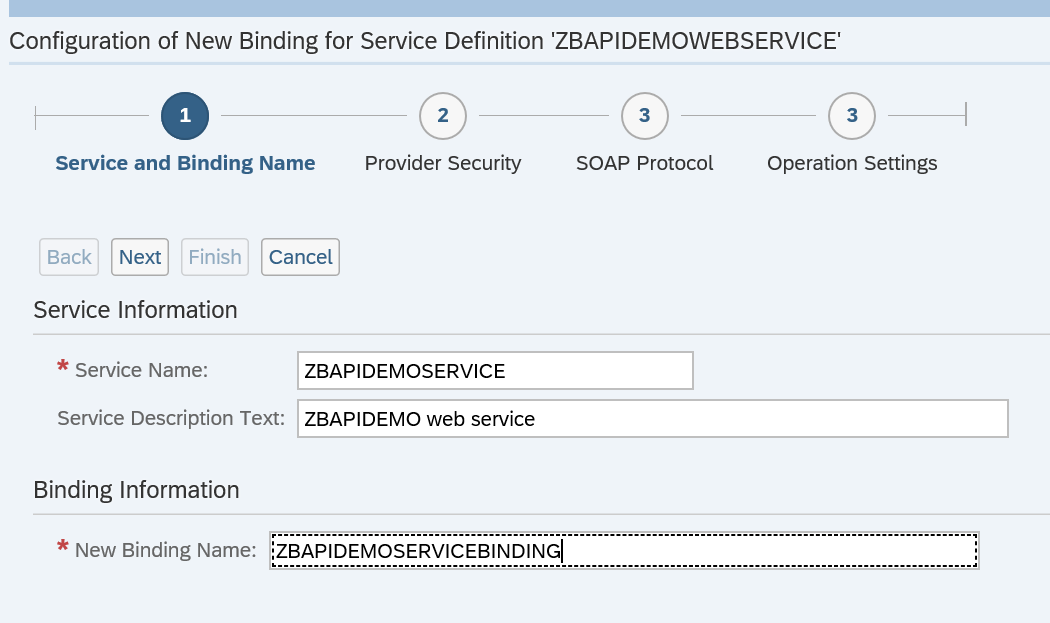
Fill out the definition details:

Press Next and define the security settings:

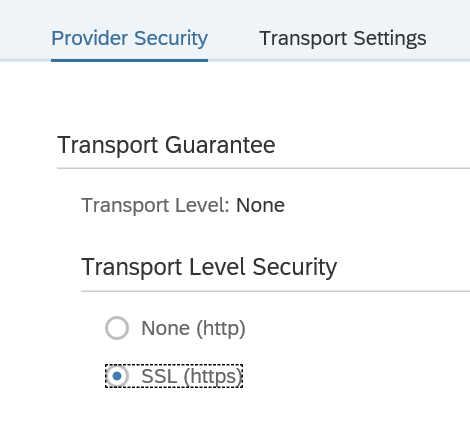
Remark: in the newer versions, the default security is set to high. If you need lower security, go back to SE80 definition in the tab configuration to change the security profile (save and regenerate!):

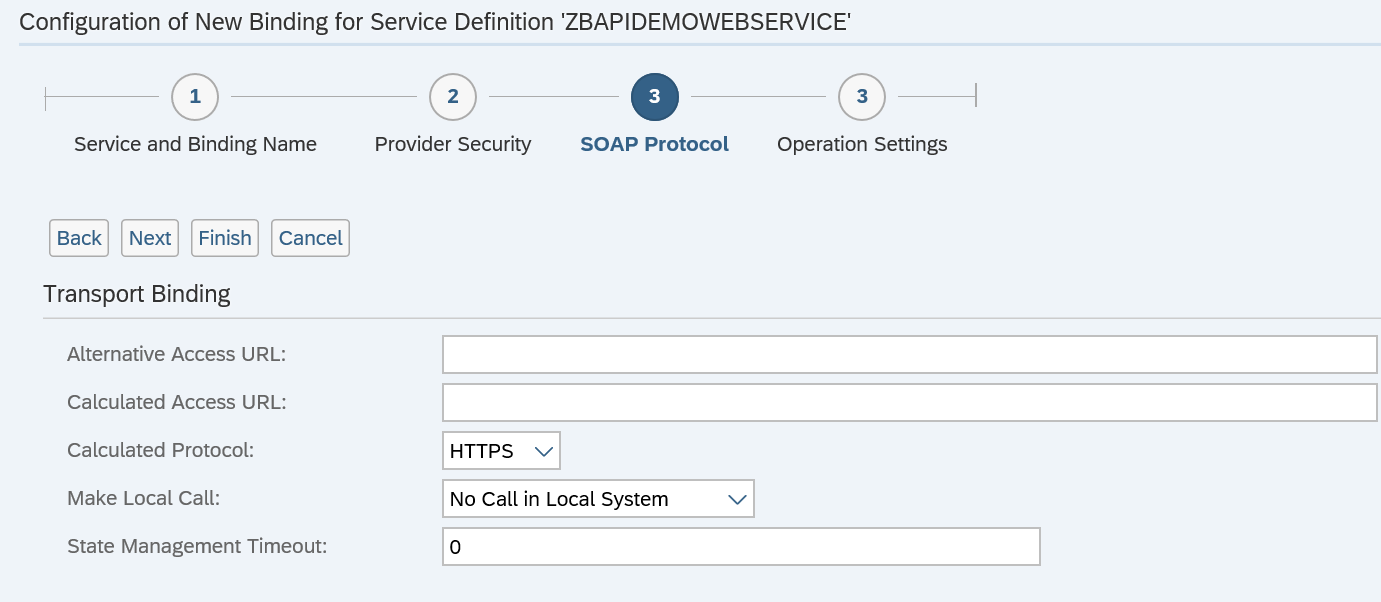
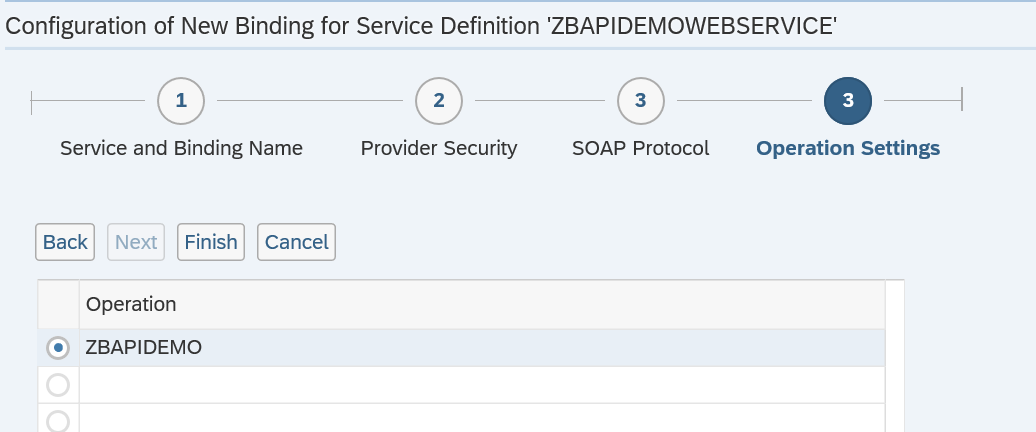
Press next and define the SOAP protocol settings:

On the last screen of the wizard press finish:

Wait for the runtime generation to finish.

The screen returns to the generated runtime artifacts:

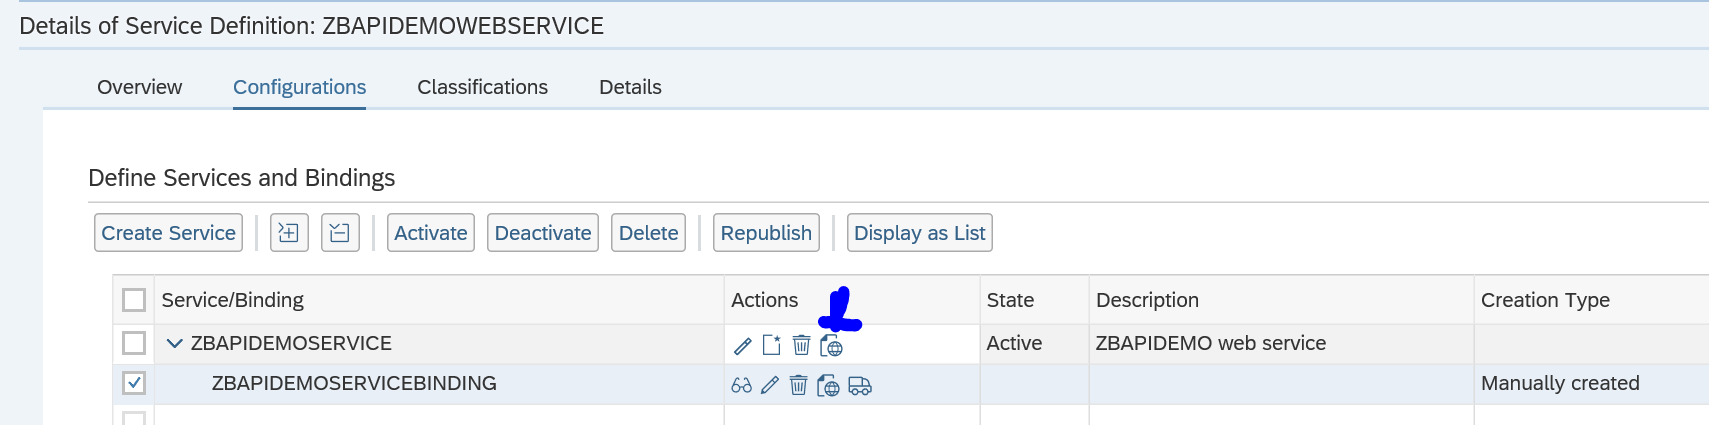
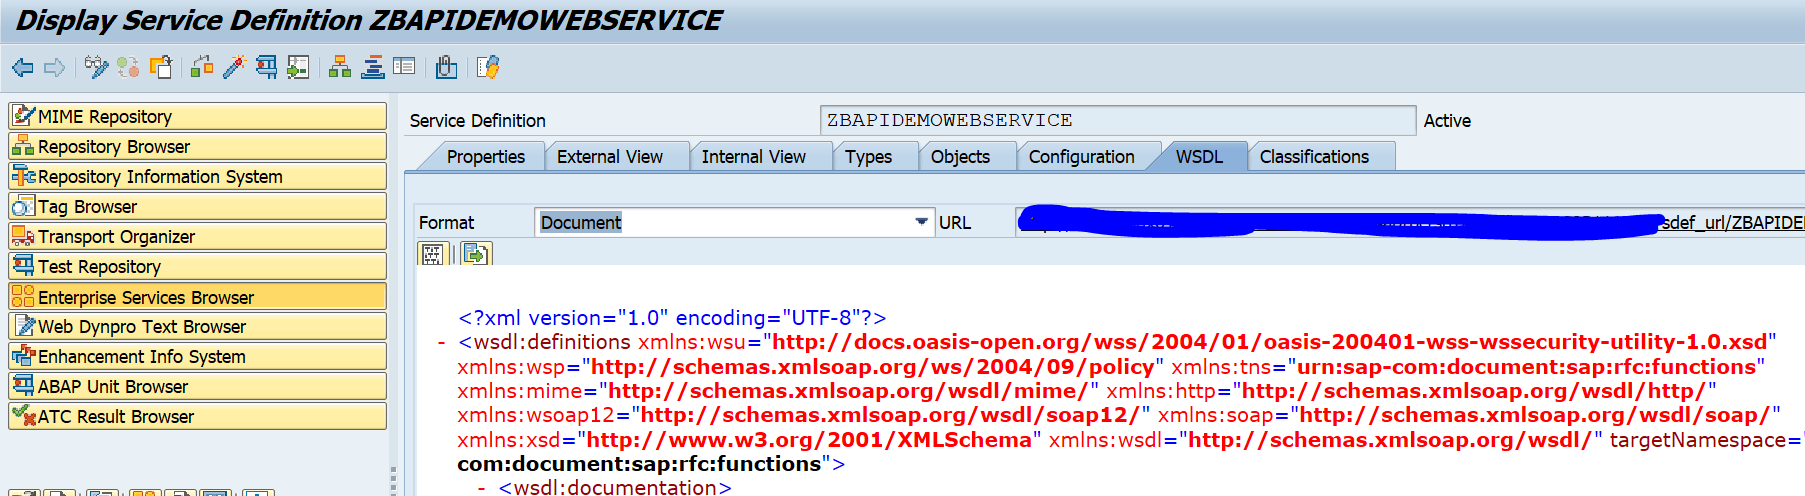
The most important artifact is WSDL file which you can open from here.

Testing the service

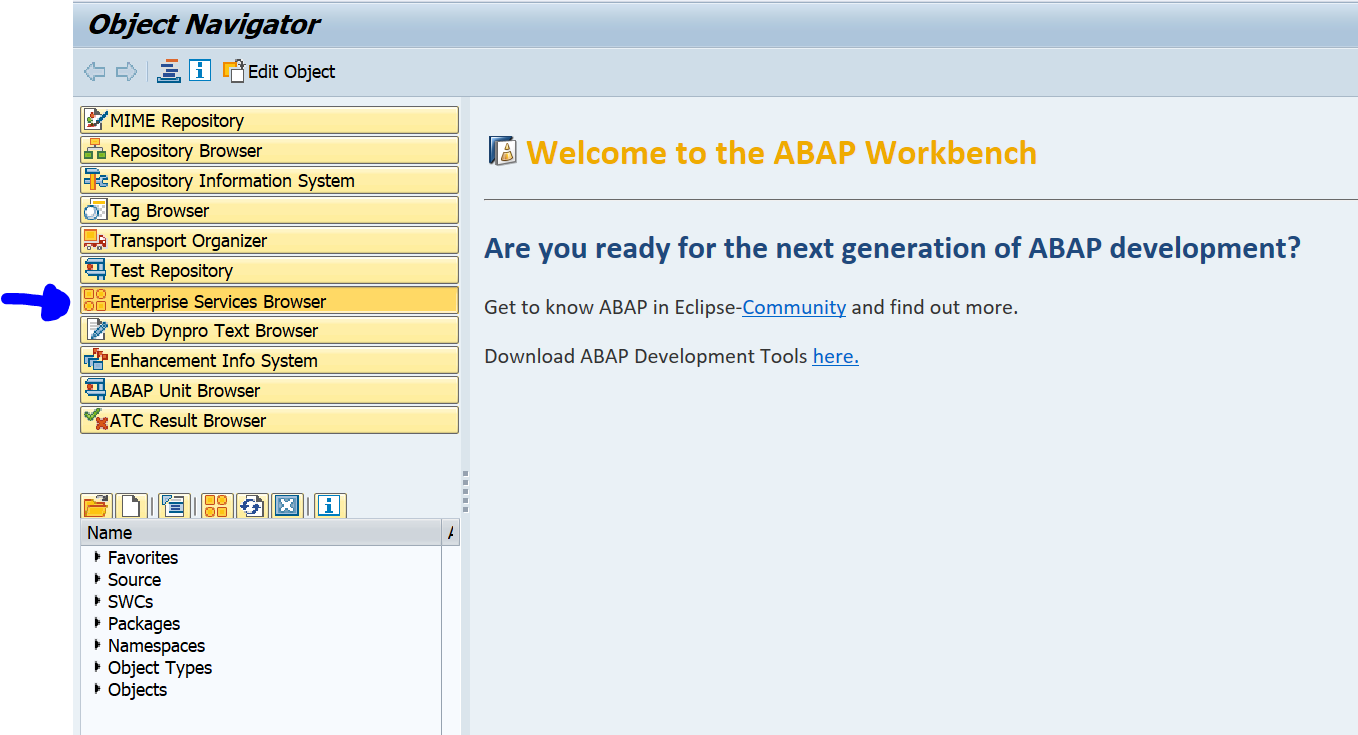
Go to transaction SE80 and select the Enterprise Services Browser (if not visible go to menu path Utilities/Settings and add the tool):

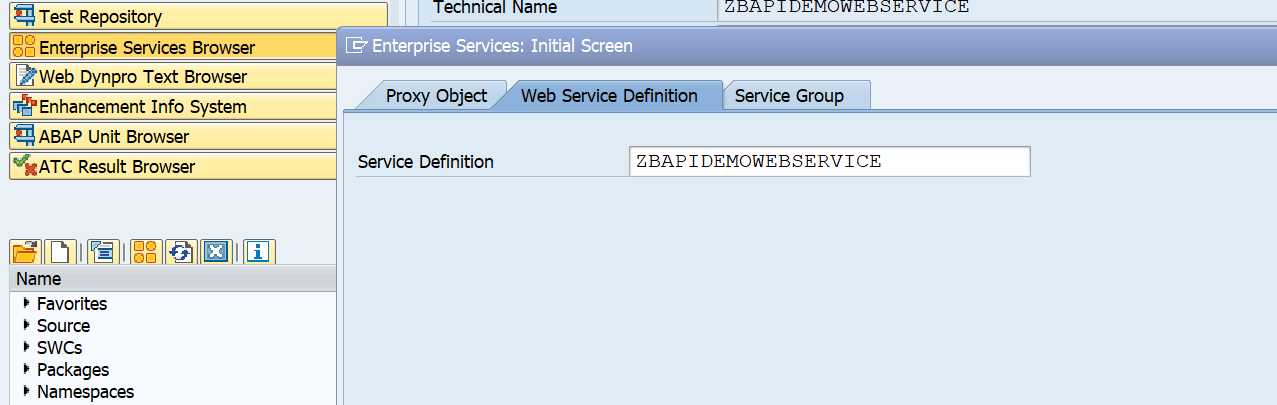
Now open your service by clicking the Open Object button and search for the service in the second tab:

Check that the WSDL file is properly showing:

If ok, press the test button (F8) to start the test tool:

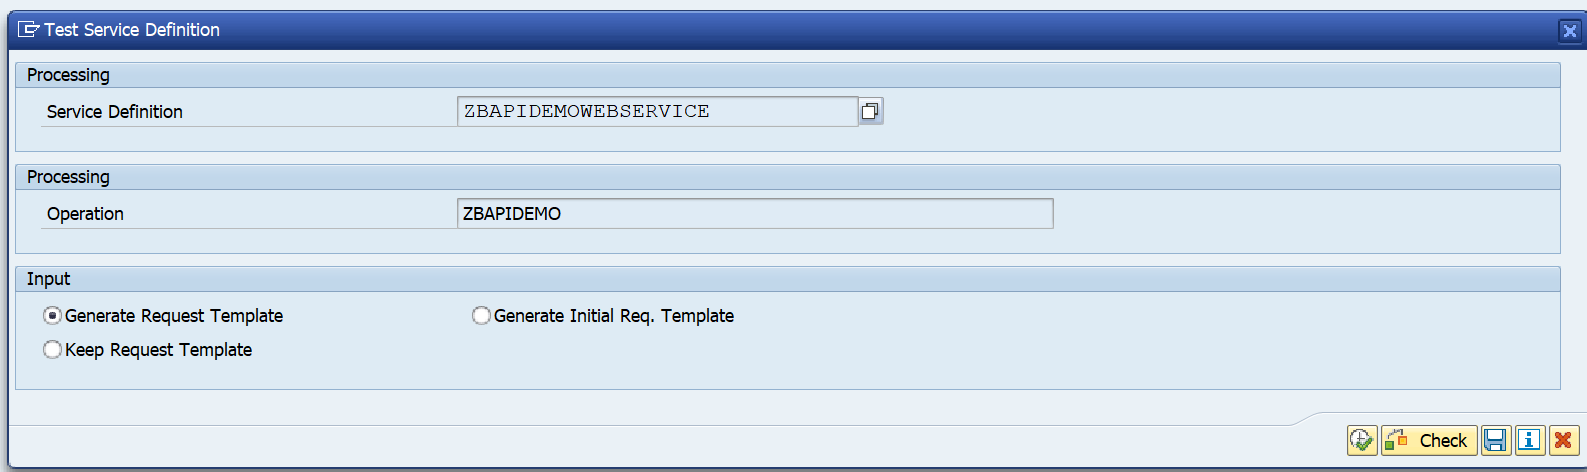
On the next screen first press the XML editor button to allow the content to be changed:

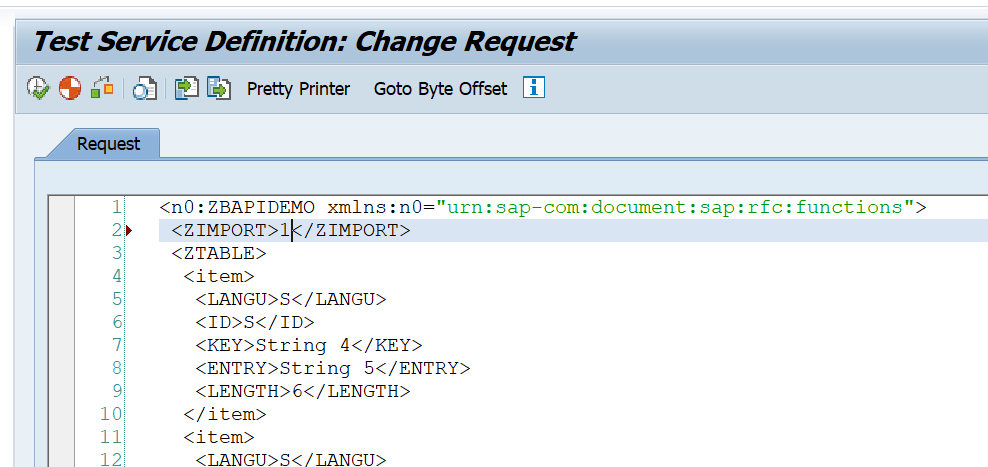
Now press execute to test. The result:

Web service security

The functionality security of the web service is the same as for the generic RFC handling (see blog on this).

The technical security of web services is mainly driven from the security settings in SOAMANAGER. There you can set the transport protocol security and you can indicate if you want simple user ID / password security or work with additional certificates for server to server authentication.

The user calling the SAP web service must have the authorization object S_SERVICE. In S_SERVICE you can define the specific web service it needs to be able to call.

Troubleshooting web services security issues

For troubleshooting web services note 2321968 – SOAP Web Service Security Troubleshooting refers to a very extensive SAP site for web service security issues troubleshooting.

Monitoring web services

For monitoring web services, read this dedicated blog.

SAP interfacing: RFC

SAP has many different ways to interface. The RFC (Remote Function Call) protocol is one of the most wide used.

This blog will explain best practices around secure and correct setup of custom built ABAP RFC function modules.

Questions that will be answered are:

  • How to setup RFC enabled function module?
  • How to setup proper RFC error handling?
  • How to setup security in RFC enabled function module?
  • How strict is the S_RFC authorization handling?
  • Why is SAP_ALL not sufficient for RFC handling?

Creation of test RFC enabled function module

In SE37 you can setup an RFC enabled function module just like a normal function module. First create a function group. Activate that function group in SE80. Now you can create the function module. We will call our test module ZBAPIDEMO:

Important here in the first tab is to set the processing type to Remote-Enabled Module.

For testing we setup import and export tabs:

Important here with RFC: set the Pass by value tickbox.

For tables use a suitable table type:

And setup the correct exceptions:

Here you can see 2 very important error messages that should always be implemented:

  1. An extra authorization check
  2. An error message when no data is found

Now we can implement the following simple source code:

   DATA: zls_coms_gen_textline TYPE coms_gen_textline.
 
   AUTHORITY-CHECK OBJECT 'S_CDMC'
   ID 'CDMC_AREA' FIELD 'A'
   ID 'CDMC_ROLE' FIELD 'U'.
   IF sy-subrc EQ 0.
 
     CASE zimport.
       WHEN 1.
         zexport = 'Hello world'.
       WHEN 2.
         zls_coms_gen_textline-entry = 'Hello world table 1'.
         APPEND zls_coms_gen_textline TO ztable.
         zls_coms_gen_textline-entry = 'Hello world table 2'.
         APPEND zls_coms_gen_textline TO ztable.
       WHEN OTHERS.
         RAISE not_found.
     ENDCASE.
 
   ELSE.
     RAISE not_authorized_business.
   ENDIF. 

What is important here in this source code:

  1. The authorization check is implemented and raises an error
  2. If no data is found the NOT_FOUND error is raised

With the SE37 test suite you can test diverse scenario’s now.

Calling RFC function module from another ABAP system

If you call this RFC function module form another ABAP sytem you have to make sure you have set and check the following exceptions:

  exceptions
      not_authorized_business = 1
      not_authorized          = 2
      system_failure          = 3
      communication_failure   = 4
      not_found               = 5
      OTHERS                  = 6.

There are 2 exceptions from the BAPI definition:

  1. NOT_FOUND (nothing found)
  2. NOT_AUTHORIZED_BUSINESS (our own implemented business authorization check)

4 exceptions should be implemented as part of the RFC framework:

  1. NOT_AUTHORIZED: this is the RFC authorization, which will be explained next chapter
  2. SYSTEM_FAILURE: the coding has caused a dump and the system returns and error message (see OSS note 2484377 – Error Message: “RFC Exception SYSTEM_FAILURE Raised; No More Memory Available to Extend an Internal Tab” Upon Executing a Data Extraction Run as an example)
  3. COMMUNICATION_FAILURE: the call to the other system fails. Most likely if you go to SM59 to the RFC destination and perform a connection test you will get a failure.
  4. OTHERS: something else went wrong

The developer should take proper care of these error situations.

Dear ABAP developers: the basis team member are also humans. They will make RFC configuration errors, they rely on the authorization team to assign the correct roles and they rely on infrastructure providers to make sure systems are up and running. Also the basis team will need to perform patching and upgrades to the system, which you as ABAP developer, are calling. So please don't blame the basis team for these exceptions, but please be a good developer and implement proper error handling. If you didn't implement proper error handling, and something went wrong on basis side, that caused your code to go wrong, think twice before putting blame on basis if your code is not handling the situation properly.

For reference: OSS note 1371131 – Correct error handling of RFC calls.

Security of RFC calls

Security of RFC calls is consisting of 2 layers:

  1. The RFC layer
  2. The business application code

You should always implement both layers!

The RFC layer is protected by authorization object S_RFC:

Here you can choose between a function group or even allowing per function module. Personally I would protect by function module. Background: create, change and display BAPI’s will normally be developed inside same function group.

There is a common misunderstanding that if you give SAP_ALL to a (background) user, this would solve the RFC authorization issues. This is not true. SAP_ALL does not contain the S_RFC rights. You have to hand them out separately.

Best practice 1: you might want to start with broad authorizations at the beginning of a development to rule out authorization issues. But you must definitely limit the rights before you make the development go productively live.

Best practice 2: as first statement inside each and every RFC function module, program a relevant business authorization check statement. This is an extra safety measure that is needed to protect important business data from authorization consultants that have handed out * authorizations in object S_RFC (* means all).

Best practice 3: check in transaction SM59 that the RFC callback protection is activated. Read this blog how a hacker can easily misuse if not properly setup.

Best practice 4: be careful on the RFC setup to avoid that hackers misuse the RFC jumping option. Read more in this blog.

More on checking the basis RFC security: read this blog.

Generic S_RFC check handling at basis level

The behavior of the S_RFC check is driven by the settings of RZ11 profile parameter auth/rfc_authorithy_check. Please make sure it has a setting of 6 or higher. Best is 9. A system with 5 or lower can be considered as insecure!

Background OSS note: 2216306 – S_RFC check and profile parameter auth/rfc_authority_check.

Setting up trusted RFC connections

Set up of trusted RFC connections are explained in this blog.

RFC performance

Check if you can use the RFC fast serialization option. This option is available for a lot of modern SAP systems. It is not activated by default. Read more on the fast serialization option in this blog.

Running SCI and ATC on standard SAP and add-ons

SCI and ATC are very powerful code scanning tools (see blog and blog). Unfortunately you cannot apply it to standard SAP and add-ons.

Analyzing standard SAP code is the responsibility of SAP, and they take good and secure code (since they provide good code, it is weird they don’t allow everybody to scan their code…). Unfortunately a lot of add-on providers do not.

The blog will explain how to scan code of standard SAP and mainly on add-ons.

Questions that will be answered are:

  • What is the background on not being able to scan standard SAP and add-on code?
  • Can I truly scan the code of a new OSS note 7 days?
  • How can I work around these restrictions and still scan the code of an add-on?

Background

The background of not being able to scan standard SAP code is explained in OSS note 1986391 – Using SLIN/SCI to check SAP standard objects. This note also explains you can scan OSS notes and transports for 7 days. After that time it is no longer possible. Unfortunately this rule also applies to add-ons.

Why run SCI on add-ons?

Why would you want to scan add-ons? Add-ons come with various quality levels. Ranging from very well written with much attention to performance and security. Some add-ons are full of performance issues and full of security leaks. Some are even allowing full dynamic read SELECT and UPDATE statement without any authorization check. This is heaven for a hacker!

The below method is meant for scanning these poor add-ons using the SCI tool for performance, robust coding and security.

ATC checks on non-SAP addons

First apply OSS note 2215288 – ABAP Test Cockpit: Analyzing Objects Using Arbitrary Prefix Namespaces.

For ATC checks, now run program SATC_AC_INIT_NAMESPACE_REG to add the namespace as registered for ATC.

See note 2439348 – SATC_AC_INIT_NAMESPACE_REG list is empty, if you get empty list.

See OSS notes: 2141202 – FAQ – ATC/CI: Analysing Objects with Custom Prefix Namespace ‘/MYSPACE/’ and 2313169 – ATC checks and ABAP Unit tests for objects in producer namespaces not possible

How to run SCI on SAP standard?

When you run the SCI tool on an add-on by selecting package or development object, you get the message that it does not contain any objects:

This is because your selection is first scanned for standard SAP and add-on objects. These are removed. So the result set is empty.

Goto transaction SE24 and select class CL_CI_OBJECTSET. Now select method BUILD_TADIRSET and display the code:

Put a break-point as statement if ENABLE_CI ne ‘X’.

Now start the SCI tool again. If the debugger stops at this statement, use debug and replace to change the content of ENABLE_CI to ‘X’. Now the skipping of SAP and add-on objects is not done. SCI will scan the code. It will still not use SLIN. But these are minor checks.

Bug fix OSS notes

Bug fix notes:

Load balancing settings

Larger productive systems have multiple application servers to spread the workload. But if the system is not configured properly one application server can be overloaded while others are almost idle. This blog will explain the load balancing settings.

Questions that will be answered are:

  • How can I check my current load balancing situation?
  • How can I load balance SAP GUI users?
  • How can I load balance SAP to SAP RFC traffic?
  • How can I load balance external system to SAP RFC traffic?
  • How can I load balance qRFC traffic?
  • How can I load balance batch jobs?
  • How can I load balance web traffic?
  • How can I load balance workflows?
  • How can I configure MRP parallel processing settings?
  • How can I configure load balancing for TMS transport system (STMS)?
  • How can I validate if load is properly balanced?

How to make parallel processing settings

Parallel processing settings are explained in this blog.

How to check current situation of load balancing

You can start transaction AL08_OLD (in older systems AL08) to get an overview of the distribution of your logged on users and how they are spread over the application servers:

Load balancing for GUI logon

With transaction SMLG you can setup logon groups that can be used for SAP GUI logon and RFC logon. In the details of each logon group you can make dedicated settings:

The Fav.Typ setting indicates the load balancing mechanism (round robing, best performance, weighted round robin). Set Ext RFC-enabled to also do load balancing in this group for external RFC calls.

You can set limits per application server on response time and amount of users. This limit is not a hard limit, but a soft limit to influence the quality calculation. The setting is per application server and it is across the logon groups (you cannot make settings per logon group). The background of these limits is explained in OSS note 118093 – Concepts of defining ‘limits’ in logon load balancing and on the SAP wiki page.

In SMLG you can choose menu option Goto / Load distribution to get an overview of the current load distribution and quality:

A higher quality number means it has the best quality. New users that logon will be routed to this server if you have set the SMLG settings to Best Quality.

Relevant OSS notes:

RFC traffic load balancing for SAP to SAP connections

For SAP to SAP connections using RFC you have to set the load balancing to Yes in SM59 and fill out the proper message server and logon group details:

RFC traffic load balancing for external system to SAP connections

Many external systems connect to SAP via the SAP JCO connector. The JCO connector can do load balancing, if configured properly. The problem here is that the developers form the other application using JCO have no idea on the settings to be made. The other problem is that on a development system the settings are typically pointing to one server only and the basis team did not configure load balancing. Now suddenly in production (or in a quality environment) they have to switch to load balanced settings using different parameters.

The parameters settings to be made are explained in:

Tips for basis team:

  • Also setup the logon group in development system and assist the external team with the needed settings. The best way is that the external team uses load balancing settings from the start in development as well
  • Setup extra application server in quality landscape to test load balancing

RFC server group

With transaction RZ12 you can setup RFC server groups that also can be used for load balancing purposes.

RFC load balancing for qRFC

If you use qRFC (this is used for example in the CIF interface to SCM and EWM), then you need to configure the RFC group (settings made in RZ12) in transactions SMQS and SMQR. See blog on qRFC.

Web traffic load balancing

For web traffic load balancing, you have to set up the SAP web dispatcher. In the SAP web dispatcher you can configure to which back-end application servers to use.

Batch job load balancing

Batch job load balancing can be done by setting up batch job server groups in transaction SM61. See this blog.

Workflow load balancing

For workflow load balancing read OSS note 888279 – Regulating/distributing the workflow load.

Inbound Idoc processing load balancing

Inbound idoc processing program RBDAPP01 has an option for parallel processing:

Make sure you apply OSS note 3167309 – Delay in IDoc processing when using RBDAPP01 report (and 3142563 – Parallel processing in RBDAPP01, 3064890 – ALE: Endless loop during IDoc processing).

MRP run parallel processing

The MRP run (material requirements planning) is a very intensive process from the system perspective and very important from business perspective. It is important that the MRP run finishes in time, but is also should not overflow the system by occupying all work processes and CPU. In this customizing action you can defined the MRP run parallel processing settings:

Now you can assign the specific application servers that the MRP run is allowed to use in parallel and the maximum amount of work process it can use:

For background on MRP parallel processing settings, read OSS note 568593 – FAQ for parallel MRP: MD01, MS01, MD40, MDBT – Number of parallel planning processes in OMIQ, settings, server load, and so on.

There is also specific MRP tool now available. Not related to parallel processing, but is can help you in technical optimization of the MRP run. See blog.

Load balancing TMS transport system (STMS)

OSS note 943334 – TMS setup in high-availability systems describe the enabling of load balancing via logon group SPACE for TMS via program TMS_MGR_LOADBALANCING. A different logon group is not possible via this program.

User measurement load balancing

User management transaction USSM can cause significant load on the system. Apply OSS note 3028252 – USMM2: Background Jobs Lastverteilung and the settings to have the user measurement program jobs load balanced.

How to validate correct load balancing?

To check if load balancing has done its job, go to transaction ST03, and open the section Load History and Distribution, Instance comparison, then the time frame:

Check that the load is evenly distributed among the application servers. The central instance will off course have a different load profile.

Troubleshooting OSS notes and blogs

The following OSS notes can be useful for troubleshooting:

Useful background blogs:

Workflow tips & tricks

SAP workflow is used for many different business scenarios. This blog will give tips and tricks for the basis part of SAP workflow.

Questions that will be answered in this blog are:

  • How can I send a reminder email to the workflow owners?
  • How to check how many items in the inbox a user has?
  • How to delete the items in the inbox of a user?
  • How to delete the items in the outbox of a user?
  • How can I terminate workflow(s) as administrator?
  • How do I execute general workflow activation?
  • Where can I find more FAQ and manuals on workflow?
  • How to solve workflow transport issues?
  • How can I add a general task to a transport?
  • How can I setup forwarding of workflow as admin?
  • How can I check if a user has setup a substitution?
  • How can I restart workflows?
  • What to check in case of delays in workflow?
  • How can I trigger workflow processing again after a system crash?
  • How to solve the Workflow error “maximum number of 10,000 nodes reached” error?

Workflow FAQ note

SAP has created an excellent FAQ note: 2214571 – Collection Note: Workflow troubleshooting guides, FAQs and important notes. This is a good starting point for find solutions to workflow issues.

Sending reminder email to workflow owners

Program RSWUWFML2 can be used to send reminders to workflow owners that they still have open workflow items:

It is important to know that only reminders will be send in mail if the workflow owner user ID’s mail address in maintained in SU01.

Important explanation OSS note:

Important bug fix OSS notes:

Changing the message subject of the reminder mail

To change the message subject of a mail, create a new message in SE91. Example is class Z_CUSTOM message 010 with text: “Gentle reminder of workflow”. Now put in field message class for subject field the name of your class (Z_CUSTOM) and the message number in message number for Subject:

Changing the body of the message of the reminder mail

Goto transaction SE61 and select text type Text in Dialog. First the default text SWU_NOTIF_INBOX:

Now use the copy button to copy the text to a Z text. For example Z_SWU_NOTIF_INBOX. Change the text as per you requirement and activate the text.

Now you can use this new text in the workflow reminder mail program:

SAP workflow inbox

Using transaction SOY5 or via program RSSOINBO you can get an overview of the amount of workflow items per user:

Via program RSSOINBD you can delete the inbox of a user:

Removing work items from user inbox

There are many ways to remove work items from and end users inbox: 2382266 – How to remove work items from user’s Inbox.

Removing work items from user outbox

To delete expired items from the users outbox, run program RSSOEXDA: 2774728 – Remove entries from user Outbox.

Changing priority of a work item

To change priority of a work item in SBWP follow the instructions in OSS note 2863528 – How to change the priority of a work item from SBWP.

Terminating workflows as administrator

Start transaction SWIA:

In the second screen select all the items you want to terminate and use menu option Edit / Work Item / Logically Delete. The workitem will now to status CANCELLED. Then they can be archived (see blog).

See also OSS note 2422812 – How to delete workflow item from inbox and OSS note 1705866 – “Logically Delete” for a large number of work items.

For execution of mass logical deletion in SWIA, you must select all items and in the command area enter ADMC as command and press enter:

Or select all and choose menu option Edit/Work Item/Logically Delete.

Please note: mass cancellation is possible. Mass completion not. Only via ABAP code (read this blog for the custom code which performs this). See OSS note 2650820 – Mass complete work items manually.

Restarting workflows

Transaction SWPR can be used to restart a workflow:

When there was a system crash transaction SWPC can be used to continue workflows:

Bug fix note: 3270257 – Multiple selection value help does not work for input field “Multistep task” in transaction SWPC.

How to find top level ID for a workflow item?

To find the top level for a workflow, follow the instructions in OSS note 3277360 – How to find the Top-Level work item ID of a workflow.

Reducing size of workflow tables

Workflow tables start with SWW. They can grow very large in a productive environment. For analysis see blog. For deletion and archiving see blog.

For workflow from idocs specifically, read OSS note 1813141 – How to delete unnecessary workitems of IDoc processing.

Specific note: 2847116 – SWF_TRC_CONT table huge growth.

Deleting workflow trace can be done via program RSWEQDELETE (see note 2162503 – Deleting trace records from Workflow tables).

Basic workflow activation in a new system

For activating workflow in a new system or after an S4HANA upgrade, please read this dedicated blog.

Delays in workflow

When you are experiencing delays in workflow, read OSS note 2146408 – Delay in executing a Workflow. Also check OSS note 888279 – Regulating/distributing the workflow load for load balancing on workflows.

Transport issues with workflow

Workflow development objects can give some issues in transports, since not all objects are immediately put into a transport upon development.

If you have set a workflow task to general and want to transport it, use program RHMOVE30 to put it into a transport. For more background read this SAP blog.

Substitution and forwarding

Using transaction SBCS_EXTCOM you can setup forwarding for a user ID towards different user ID as admin. This might be needed in case of illness of a user:

In the third tab of this transaction you can see if a user has setup a substitution himself.

Workflow error “maximum number of 10,000 nodes reached”

If you get this error, increase the value Maximum node number in transaction SWPA:

Do not just increase, but read OSS note 2397114 – Workflow error “maximum number of 10,000 nodes reached”, which advices to check the workflow definition, before increasing this value.

Use report RSWP_CHANGE_MAX_NODES to solve your immediate issue.

Workflow delegation and substitution

SAP workflow has options for delegation and substitution (for example when person is on holiday). Read more on this in the SAP wiki for substitution.

Workflow and system copy

After a system copy, check the workflow configuration again. See OSS note 3227538 – Workflow background steps are not getting completed after system copy.

Data archiving: store files in SAP content server

With data archiving you reduce the database size of SAP and increase the performance by reducing the amount of records in the SAP tables. The data archiving process write files with the archived data. These files must still be stored securely, since on file level any admin can delete the files and you might loose valuable business data.

This blog explains the setup of storage of data archiving files by using SAP content server as storage medium.

Questions that will be answered are:

  • How do I setup the link from SAP netweaver ABAP stack to the SAP content server?
  • Which settings do I need to make in the archiving objects to store the archiving file to SAP content server?
  • How do I store the files in the SARA transaction?

General tips and tricks for SAP content server can be found in this blog.

Setup of SAP content server 7.5 information can be found in this blog.

How to setup archiving technically can be found in this blog.

How to run archiving can be found in this blog.

Linking the SAP Netweaver ABAP stack to SAP content server

First we need to maintain a special protocol in customizing using this path:

Create a new protocol:

This protocol can now be assigned to the SAP content server you want to use for storing the data archiving files. Go to transaction OAC0 to link the protocol to your content server:

If the field protocol is not visible immediately there, click the button Full administration first.

Data archiving object specific linking

After the steps above to make the general connection to content server available, the content server needs to be explicitly mentioned in each data archiving object. For any data archiving object (start transaction SARA first and select the object), click on the customizing button:

In the popup screen now select Technical Settings in Archiving Object-Specific Customizing:

At the bottom fill out the content server repository and decide if you want to start automatically or immediately:

Remark 1: the F4 search help does not work here! Key in the value directly and check using the check button. Then save the data.
Remark 2: always tick the option Delete Program Reads from Storage System. This forces that the archive file is securely stored first, before the deletion run is allowed to start. 

Use of archive routing

If you have a lot of archiving data and a lot of years of archiving done, it can be needed to set up a second or third content server.

With the use of Archive Routing you can determine in which content server to store which archive files.

On the SARA screen push the customizing button and select Archive Routing:

Now set up a rule:

And the conditions of the rule:

Storing archive files in SARA

After the configuration is done the new button Storage system appears on the screen in the SARA transaction for this specific object:

If the button does not appear: check the technical settings above, and remember: this is to be repeated for each object.

Storing files that have been written by the Write phase of the data archiving process can now be stored by pressing the Archive Files button:

Select the file(s) to store:

Now a batch job starts (per file!) to store the archive file into the SAP content server.

After correct storage of the file, the file can be selected in the delete phase.

SAP content server 7.5

SAP has released content server 7.5. Content server can be used to store attachments, documents and archiving files outside of the SAP database.

Questions that will be answered in this blog are:

  • Where can I find more information on SAP content server 7.5?
  • How to upgrade to SAP content server 7.5?
  • What is the support on my SAP content server 6.5 installations?

SAP content server 7.5

The main OSS note for SAP content server 7.5 is 2786364 – SAP Content Server and Cache Server 7.5 (and higher). This is a major different technology setup: there is no Apache or Microsoft webserver needed any more. The content repository setup itself does not change.

For installation you can follow the instructions from the main OSS note, or follow the steps from the SAP blog on content server 7.5 installation.

Upgrading from 6.5 to 7.5

As mentioned before the technology has changed on how data is put into content server and how it is retrieved, but the data structure itself is the same. Note 2786364 – SAP Content Server and Cache Server 7.5 (and higher) is also describing the migration process. Your database (most of the times MaxDB) remains as is. But you have to install new 7.5 content server. Then you migrate the configuration. You stop the old 6.5 server and start up the new 7.5 server. You test that all works via the content server check programs from this blog (you might need to perform changes in transaction OAC0). SAP recommends after successful migration to clean up the old 6.5 as soon as possible to avoid issues (like an overzealous admin starting it up again…).

Support of SAP content server 6.5

In the main OSS note on SAP content server 6.5 (1983930 – Availability of SAP Content Server 6.50) there is no direct indication of end of support date. SAP content server 6.50 is part of the Netweaver 7.40 stack. The support of this stack ends by 31st of December 2020.

See also OSS notes 761387 – SAP Content Server support information and 719971 – SAP Content Server release strategy.

Before raising SAP message, first read OSS note 3345452 – SAP Content Server – required information for analysis on the information SAP needs for a quick solution to your issue.

Changes to test programs

The content server test programs (for example RSCMST) can respond differently with the new content server. SAP is updating these. For more information see the blog on content server tips & tricks.

Content server license

For using content server from SAP using MaxDB no special licenses is needed. See OSS note 2553449 – Does the SAP Content/Cache Server require a separate license?.

New SAP JCO 3.1 version

SAP has released a new SAP JCO version 3.1. JCO is the workhorse for JAVA programs and other external programs to call RFC enabled function modules and BAPI’s to SAP ABAP systems.

Questions that will be answered in this blog are:

  • Where can I find information on the new JCO 3.1 version?
  • What is the end of support for the current JCO 3.0 version?

New JCO 3.1 version

The main OSS note for JCO version 3.1 is 2786882 – SAP JCo 3.1 release and support strategy. Documentation for JCO 3.1 is available publicly on the SAP site. Or download the PDF of the JCO 3.1 standalone connector directly via this link. General implementation information on both versions is still on the SAP wiki page.

End of support for current JCO 3.0 version

SAP has updated the main note for JCO version 3.0: 1077727 – SAP JCo 3.0 release and support strategy. In this note the current end of support date for JCO version is set to October 31st 2020.

JCO installation issues

OSS note 1953762 – Hints for frequent installation errors with SAP JCo 3.0 release describes the most frequent errors with installation of SAP JCo 3.0. Most of the hints will be identical for SAP JCo 3.1.

Latest version

Latest JCO version now is 3.1.7. See OSS note 3276799 – SAP Java Connector Release 3.1.7.

Storing SAP office documents in content server

When you are storing a lot of SAP office documents, you will find that table SOFFCONT1 is growing to a large value. Out-of-the-box SAP stores SAP office documents in that table. This blog will explain how you can route the storage of these documents from database to a content server. If you no longer need the SAP office documents, you can also delete them (read this blog on the deletion).

Questions that will be answered are:

  • Which settings do I need to make to route SAP office documents to the content server?
  • Which settings do I need to make to route GOS attachments to the content server?
  • How can I test if the documents are stored correctly in the content server?

Check current settings

Start transaction OAC0 and open the entry for content repository SOFFDB:

Here you can see documents are written to SAP table SOFFCONT1.

Reconfiguration of SAP office to content server

First check with transaction OANR that the number range is defined properly:

Goto transaction OAC0 and alter the settings for SOFFDB to your content server settings:

Also set up a new content server:

Now goto transaction AOCT to change the category settings for 3 entries: SOFFDB, SOFFHTTP and SOFFPHIO:

More background can be found in OSS note 2571570 – Where are documents physically stored with Business Communication Services?. And in OSS note 1634908 – Reduce the number of entries of table SOFFCONT1.

Reconfiguration of GOS (generic object services) to content server

Goto transaction SKPR08 and assign the content server category to class SOFFPHIO:

More background can be found in OSS note 530792 – Storing documents in the generic object services.

Other settings

There are more settings to be done or validated. It might be that these settings are already done in your system. If not, make the settings.

First define the Data carrier in customizing:

Make sure the entry for Data Carrier for front end has the type PC defined with a temporary storage path:

Please make sure that the end user has full rights to this directory. Some companies shield a lot. Without write and delete rights a temporary file cannot be stored here and the function will not work.

Now check that the default entry for data carrier is present. If not present use the Create Default Entry button to create it:

Now check the workstation application settings in the customizing path below, or directly via transaction DC30:

Search for the application type PDF and make sure the entries for 1 (display), 2 (change) and 3 (print) are maintained:

%AUTO% means it will take over the value from windows default to open PDF file.

Repeat this check for the popular formats DOC and DCX (Word), PPT and PPX (powerpoint), XLS and XLX (excel), ZIP (compressed files).

Testing the setup for SAP office

To test the setup for SAP office goto transaction SBWP to create a new message:

Create a document with attachment:

During upload you will see in the left bottom side the Test HTTP destination and destination test ok:

This means the document will be moved to content server. If this does not come, it is not ok.

If all is uploaded and you have filled out a receiver: hit the send button.

Now go back to SBWP and select the outbox. Double click on your message you just created and go to the attachment tab:

The document opens now.

You can ask your basis team to stop the content server. If that is stopped the document will not open (you get a HTTP error). This proves that the attachment is stored in the content server.

Testing the setup for GOS

To test the setup for GOS goto one of the transactions supporting the GOS setup. In our example we will use purchase requisition change (transaction ME52N). Select a purchase requisition and open the GOS box top left:

Select Create… and then option Create Attachment and upload a file.

Now select attachment list:

Open the document. Ask you basis team to stop the content server. Now try to open again and you will get an http error proving the document is stored in the content server.

Migrating existing documents

To migrate existing documents from the database to the content server, you can use program RSIRPIRL. The use of this program is explained in OSS note 2459712 – How to use report RSIRPIRL. For GOS documents: better use program RSGOS_RELOCATE_ATTA.

More background is written in this blog.

Regaining storage space

Depending on your database the moving of attachments from database to content server will immediately free up storage, or only after database table reorganization.

Activate SAP GUI for HTML via integrated SAP ITS

For users that do not use the SAP GUI regularly, you can use the SAP GUI for HTML as an alternative. The end users will then access the SAP system via the GUI shown in the web browser. This way the end user does not need to install the fat client on his laptop or desktop.

Questions that will be answered in this blog are:

  • How to activate the SAP GUI for HTML?
  • How to change the theming?
  • How to monitor the ITS behind the SAP GUI for HTML?

Activation of SAP GUI for HTML via integrated ITS

In transaction SICF activate the SAP GUI for HTML node /sap/bc/gui/sap/its/webgui:

Look and feel of the SAP GUI for HTML

OSS note 1508958 – Look and Feel in the WEBGUI explains the different themes for SAP GUI for HTML. OSS note 2540597 – Supported Themes for SAPGUI for HTML explains the support of different theme versions per netweaver version. Note 1656975 – How to set the theme for SAPGUI for HTML? explains how to set the theme.

Monitoring the SAP GUI for HTML via ITS tools

The SAP GUI for HTML is using SAP ITS (internet transaction services) to render the HTML pages. Transaction SITSPMON is the monitoring transaction for ITS:

If you have issues with the ITS web gui, this note explains which information to download from SITSPMON and add to the ticket: 3010580 – SITSPMON: How to send ITS Support Information in a Support Incident. For this function also apply OSS note 2948114 – SITSPMON: Improvement of Support Information Tab.

Health check feature

Apply the OSS notes mentioned in 3031743 – WebGUI Health Check feature to activate the Health check tab:

Known issues

If you get a popup stating Transaction SMEN is locked and you are redirected to the logoff page, please check OSS note 2874027 – Transaction SMEN is locked in direct webgui.

Known limitations

SAP GUI for HTML has known limitations. These limitation vary per SAP netweaver and S/4HANA version. The main OSS note is: 314568 – SAP GUI for HTML functionality / Limitations / Sp. Behaviour. This note has a reference to the restrictions of SAP GUI for HTML per version.

For ABAP developers there is a specific OSS notes on which developments are possible ,and which ones not, for Webgui as in comparison to SAP GUI: 3024355 – Webgui HTML Viewer: Restrictions compared to SAP GUI for Windows.

Full release notes are published in OSS note 2658822 – Release notes for SAP GUI for HTML (short WEBGUI).

Kernel updates

The SAP GUI for HTML is very sensitive for issues in the SAP kernel. When applying a kernel update, test the use of SAP GUI for HTML carefully for the functions your business needs. More on kernel patching strategy can be found in this blog.

Upload and download of files with the WEBGUI file browser

For upload and download of files with ITS webgui, you need to use the WEBGUI file browser. How to use this is explained in OSS note 2249454 – ITS Up/Down: Using the WEBGUI File Browser. See also: 2636752 – WebGUI File Browser: option in file save dialog to save to native file system.

Other OSS notes

New service handler CL_HTTP_EXT_ITS_2 replacing CL_HTTP_EXT_ITS. See OSS note 2860209 – SAP GUI for HTML: New Service Handler.

ITS support info might be needed by SAP. For this read note 2199237 – ITS: How to download ITS SupportInfo file.

Exit mobile version