HANA Cleaner Monitoring Setup in FRUN

Introduction

Maintaining SAP HANA systems requires regular housekeeping activities, and one of the critical components is the HANA Cleaner. Monitoring its activity ensures that log cleanup and housekeeping jobs are running as expected.

In this blog, it is explained how we implemented HANA Cleaner monitoring in SAP Focused Run (FRUN) using custom metrics via template maintenance, without requiring custom scripts. This approach leverages standard FRUN capabilities and provides a scalable and maintainable monitoring solution.

Solution Overview

The objective of this monitoring setup is:

  • Track the execution of HANA Cleaner jobs
  • Detect inactivity or failure scenarios
  • Alert operations teams proactively

We achieved this using:

  • Custom Metric based on File Monitoring
  • FRUN Template Maintenance
  • Diagnostic Agent (push) data collection

How It Works

The monitoring logic is simple but effective:

  1. The system monitors the last modified timestamp of HANA Cleaner log files
  2. A custom metric evaluates this timestamp continuously
  3. If no update is detected beyond a defined threshold (e.g., 2 days), an alert is triggered

This ensures immediate visibility into any issues with the HANA Cleaner process.

Implementation Details

Step 1: Create Custom Metric in FRUN

Navigate to:

Advanced System Management → System Monitoring → Template Maintenance

Create or enhance a metric such as:

HANA Cleaner Run Status

Category:

Exceptions

Step 2: Configure Data Collection

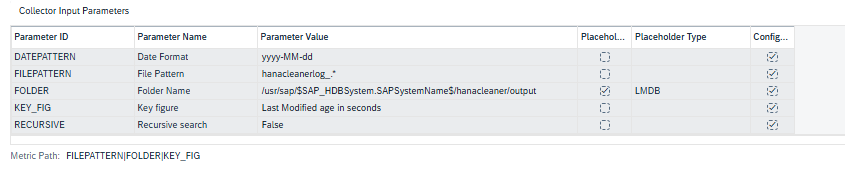
From the screenshot setup, the following configuration is used:

Data Collector Type

Diagnostic Agent (push)

Data Collector Name

File Information

Collection Interval

5 Minutes

Step 3: Maintain Collector Input Parameters

Here are the key parameters used:

Parameter IDDescription
DATEPATTERNDate format used (yyyy-MM-dd)
FILEPATTERNHANA Cleaner log file pattern
FOLDERPath to log directory
KEY_FIGMetric to evaluate
RECURSIVEEnable/disable recursive search

Actual Values Used

Plain Text

DATEPATTERN = yyyy-MM-dd

FILEPATTERN = hanacleanerlog_*

FOLDER = /usr/sap/${SAP_HDBSystemID}/${SAPSystemName}/hanacleaner/output

KEY_FIG = Last Modified age in seconds

RECURSIVE = False
Show more lines

✅ This configuration ensures the system monitors the latest file modification time in the HANA Cleaner output directory.

Step 4: Define Metric Logic

The key figure:

Last Modified Age in Seconds

This indicates how long it has been since the log file was updated.

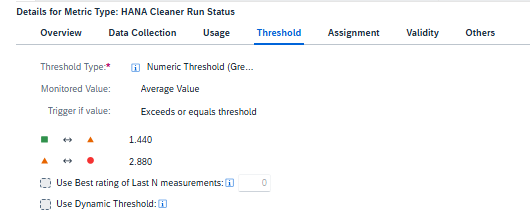
Step 5: Threshold Configuration

Define thresholds based on your operational requirements.
Example:

ConditionThreshold
Green< 24 hours
Yellow24–48 hours
Red> 48 hours

This ensures alerts are triggered if HANA Cleaner hasn’t executed in expected time.

Step 6: Assign Metric to Template

Assign the custom metric to:

  • Relevant HANA systems
  • Both Production and Non-Production landscapes

This ensures full coverage across your environment.

Monitoring Output

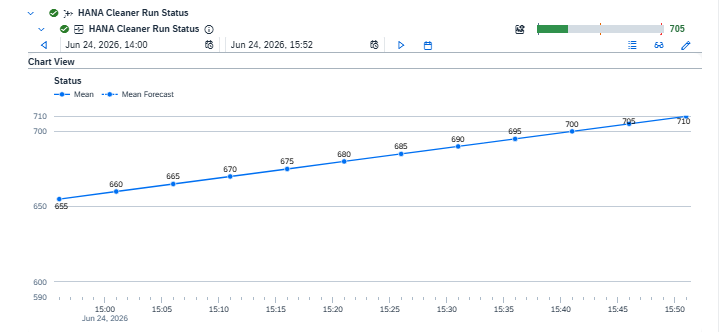
Once configured, FRUN displays:

  • Historical trend of HANA Cleaner activity
  • Status indicators (Green/Yellow/Red)
  • Alerts in case of inactivity

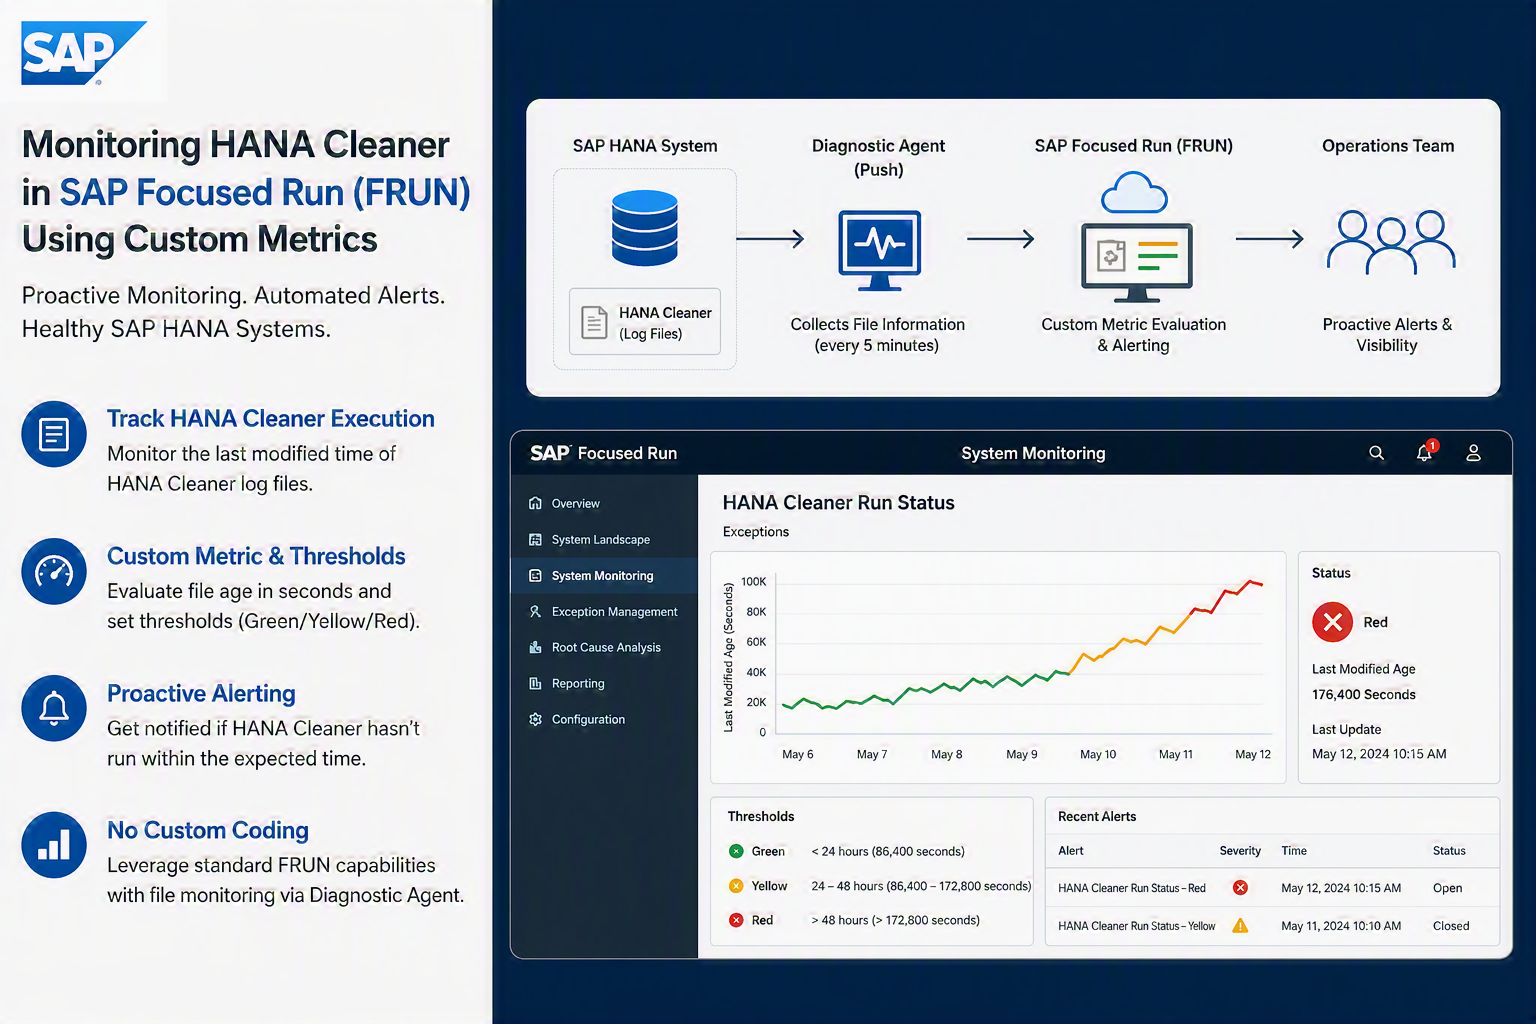
From your reference screenshot:

  • The metric appears under Exceptions
  • A graph shows activity progression
  • Alerts are triggered if thresholds are breached
  • System Monitoring
  • (Optional) Root Cause Analysis

Coverage

This setup can be implemented:

  • Across the entire HANA landscape
  • For all S/4HANA or standalone HANA systems
  • In both:
    • Production
    • Non-Production environments

Advantages of This Approach

No Custom Coding Required
Uses standard FRUN capabilities
Can be applied across multiple systems via templates
Frequent monitoring (every 5 minutes)
Detects failures before business impact
Simple file-based monitoring logic

Key Learnings & Best Practices

  • Always ensure correct file path and pattern
  • Validate that Diagnostic Agent has access to directory
  • Fine-tune thresholds based on:
    • HANA Cleaner job frequency
    • Business requirements
  • Use template-based rollout for consistency

Conclusion

Monitoring housekeeping activities like HANA Cleaner is critical for maintaining system health. By leveraging FRUN custom metrics and file monitoring, we can implement an efficient, scalable, and proactive monitoring solution.

This approach eliminates the need for custom scripts while fully utilizing standard SAP monitoring capabilities.

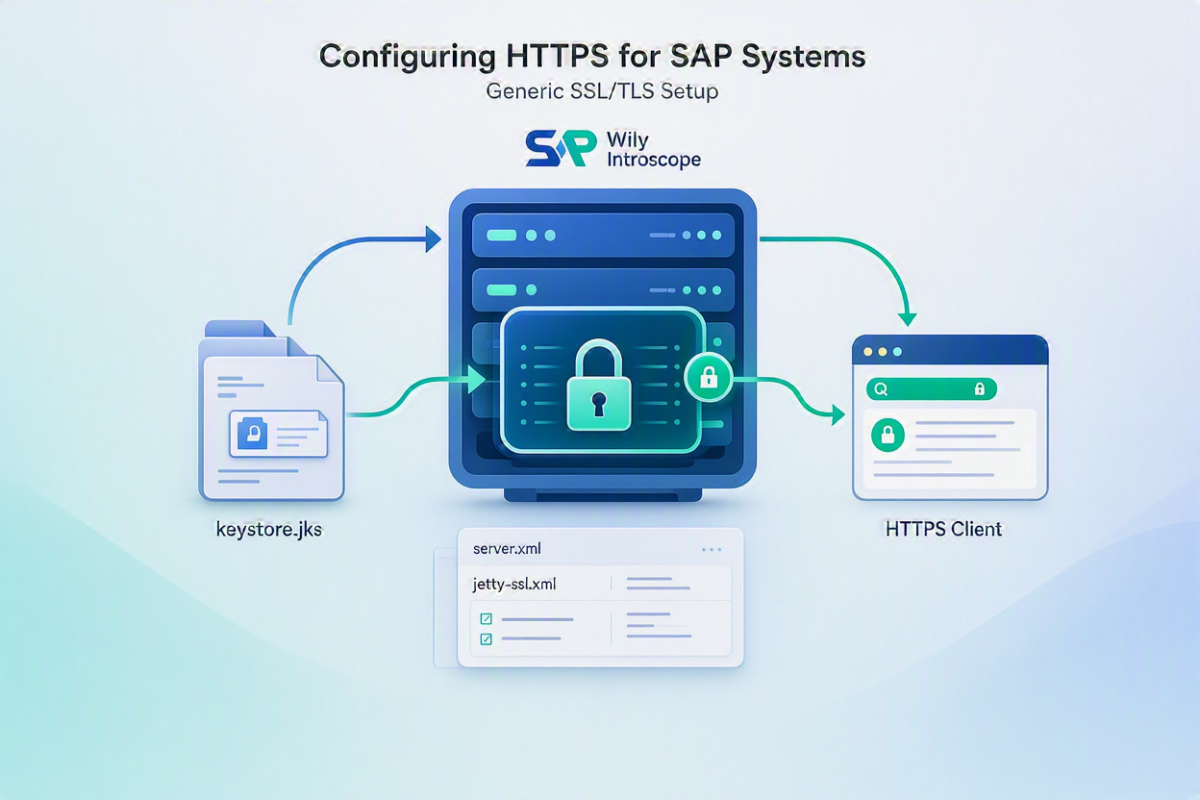
How to Configure HTTPS in SAP Wily Introscope (Jetty SSL Setup)

Introduction

SAP Wily Introscope (CA APM) Enterprise Manager (EM) plays a critical role in monitoring SAP system performance. By default, the EM web interface communicates over HTTP, which is not secure for enterprise environments.
For SAP reference page : https://support.sap.com/en/alm/solution-manager/expert-portal/introscope-enterprise-manager/enable-https-introscope.html?anchorId=section_956927644

To ensure secure communication, SAP recommends enabling HTTPS using the embedded Jetty web server.

This blog provides a step-by-step guide to:

  • Enable HTTPS in Introscope Enterprise Manager
  • Configure Jetty SSL settings
  • Use custom certificates (optional but recommended)

Goal

The objective of this configuration is to:

Convert all HTTP-based communication to HTTPS for the Introscope Enterprise Manager.

Overview of the Process

HTTPS setup typically involves the following steps:

  1. Enable Jetty configuration in Introscope
  2. Activate the HTTPS port
  3. (Optional) Configure a custom SSL certificate
  4. Restart EM and validate the setup
  5. (Optional) Update SAP Focused RUN (FRUN)

Step 1: Enable Jetty Configuration

Navigate to the following file: <EM_HOME>/config/IntroscopeEnterpriseManager.properties

Find and enable the parameter:

introscope.enterprisemanager.webserver.jetty.configurationFile=em-jetty-config.xml

✅ This activates Jetty customization using the em-jetty-config.xml file.

Step 2: Configure HTTPS Port in Jetty

Open the Jetty configuration file: <EM_HOME>/config/em-jetty-config.xml

Key Points:

  • Default ports:
    • HTTP → 8081
    • HTTPS → 8444
  • Ensure:
    • HTTPS section is enabled (not commented)
    • HTTP section can remain disabled (recommended)

Step 3: Maintain HTTPS Port in EM Properties

Even though Jetty handles the port internally, update this parameter:

introscope.enterprisemanager.webserver.port=8444

👉 This is important for integrations (like Solution Manager) to generate correct URLs.

Step 4: Restart the Enterprise Manager

Restart EM for changes to take effect:

./EMCtrl.sh stop

./EMCtrl.sh start

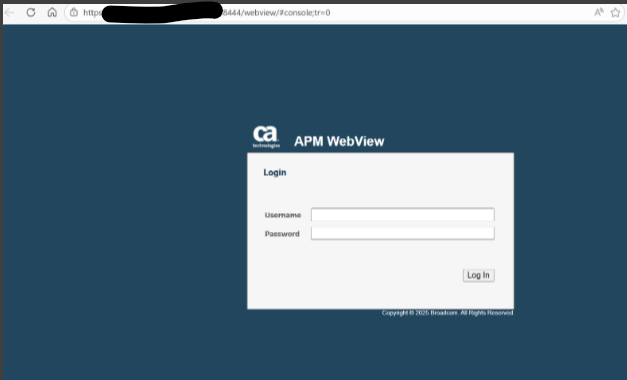
Step 5: Verify HTTPS Access

Access the Enterprise Manager via browser:

https://<hostname>:8444

Validation

Check the EM log file: <EM_HOME>/logs/IntroscopeEnterpriseManager.log

Expected entries:

  • HTTPS connector initialized
  • SSL certificate details (alias, chain)

✅ If these entries are missing, the SSL configuration is not active.

Configure Your Own SSL Certificate

Using a custom certificate avoids browser warnings and is recommended for production.

Step 5.1: Generate Keystore

keytool -keystore emhttps.jks -storepass <password>-alias emhttps -genkeypair -keyalg RSA -keysize <keylength>-keypass <password>-dname “CN=<hostname>& company details as per PKI>”

Step 5.2: Generate CSR

keytool -keystore emhttps.jks -storepass <password>-alias emhttps -certreq -file SID.csr -ext “SAN=DNS:<hostname>”

Step 5.3: Import Certificates

keytool -keystore emhttps.jks -storepass <password>-importcert -file SID.p7b -noprompt -alias emhttps -trustcacerts

Step 6: Update Jetty Configuration with Certificate

Edit: em-jetty-config.xml : update emhttps password

After applying SSL certificates, restart wily and launch https URL with 8444

Common Issues and Troubleshooting

HTTPS not working

  • Check whether the Jetty SSL configuration is actually enabled
  • In many cases, the HTTPS section in the configuration file is still commented out

Certificate not recognized

  • Verify that the correct alias is being used in the keystore
  • Ensure the full certificate chain is present, including any intermediate certificates

SSL errors in the browser

  • This often happens when using a self-signed certificate
  • Also check for CN/hostname mismatches between the certificate and the URL

Port not accessible

  • Confirm that the HTTPS port is open on the firewall
  • Make sure the port is properly exposed and the service is listening on it

Best Practices for HTTPS Configuration

  • Use certificates issued by a trusted Certificate Authority (CA) for any production environment. Self-signed certificates should be limited to testing only.
  • Wherever possible, disable plain HTTP access and enforce HTTPS across all endpoints to avoid unsecured communication.
  • Always maintain a secure backup of both the keystore and truststore files, along with their passwords, in case recovery is needed.

Conclusion

Enabling HTTPS in SAP Wily Introscope ensures secure communication between users and the Enterprise Manager. By leveraging Jetty SSL configuration and proper certificate management, organizations can significantly improve the security posture of their monitoring infrastructure.

This setup is a recommended best practice for all enterprise deployments of Introscope.

Enable SNC settings for SAP Cloud Connector

Secure Network Communication (SNC) is a key requirement in enterprise landscapes where SAP BTP interacts with ABAP systems via SAP Cloud Connector (SCC). Enabling SNC ensures encrypted RFC communication, mutual authentication, and end‑to‑end protection of sensitive data.

This blog provides a generic, implementation‑ready guide for enabling SNC between SAP Cloud Connector and SAP ABAP systems.
It combines the official SAP documentation with hands‑on technical steps commonly followed in real projects.

Background OSS note: 3536285 – SAP Cloud Connector – How to set up general SNC settings for SAP Cloud Connector.

Why Enable SNC?

SNC provides:

  • ✅ Encryption of RFC traffic
  • ✅ Strong authentication between Cloud Connector and ABAP systems
  • ✅ Integrity protection
  • ✅ Compliance with corporate security policies
  • ✅ Reduced risk of man‑in‑the‑middle attacks

SNC is increasingly mandatory in SAP landscapes, especially when integrating BTP services with ERP systems.

High-Level Steps

Below is the complete workflow followed during SNC enablement.

1. Create SEC Directory and Deploy Required SAP Cryptographic Files

On the SAP Cloud Connector host:

  1. Create a secure SECUDIR directory(/usr/sap/sec/)
  2. Download and extract the SAP Cryptographic Library from the Download Center (search for sapcryptolib).
  3. Make sure the Cloud Connector process is running.
  4. Place the required SAP CommonCryptoLib files inside(/usr/sap/sec/):
    • libsapcrypto.so (Linux)
    • sapgenpse tool

This directory holds the Personal Security Environment (PSE) used by SNC.

2. Configure Environment Variables

Set the following environment variables:
SECUDIR=<path to sec directory>
SNC_LIB=<path to SAP crypto library>
setenv SNC_NAME=<p:CN..>

Restart the Cloud Connector service after updating.

3. Generate SNC PSE in Cloud Connector

Using sapgenpse, generate a PSE & Sign the Certificate through Your Internal Certificate Authority.

This converts the self‑signed PSE into a fully trusted SNC PSE.

Please read the blog on Certificate Automation for Linux based: https://www.saptechnicalguru.com/automating-sap-certificate-management-using-sls/ for the detailed instructions.

4. Validate SNC Configuration in Cloud Connector

In the SCC Admin UI:

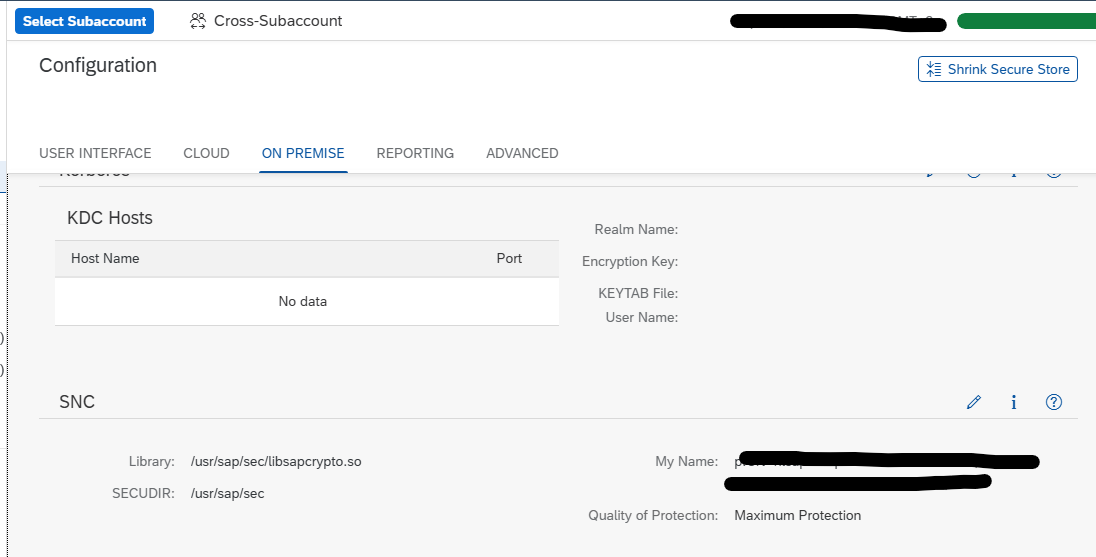
Configuration → On-Premise → SSL/SNC

Verify:

  • SNC is enabled
  • SNC name (p:CN=…) is visible
  • PSE is correctly detected

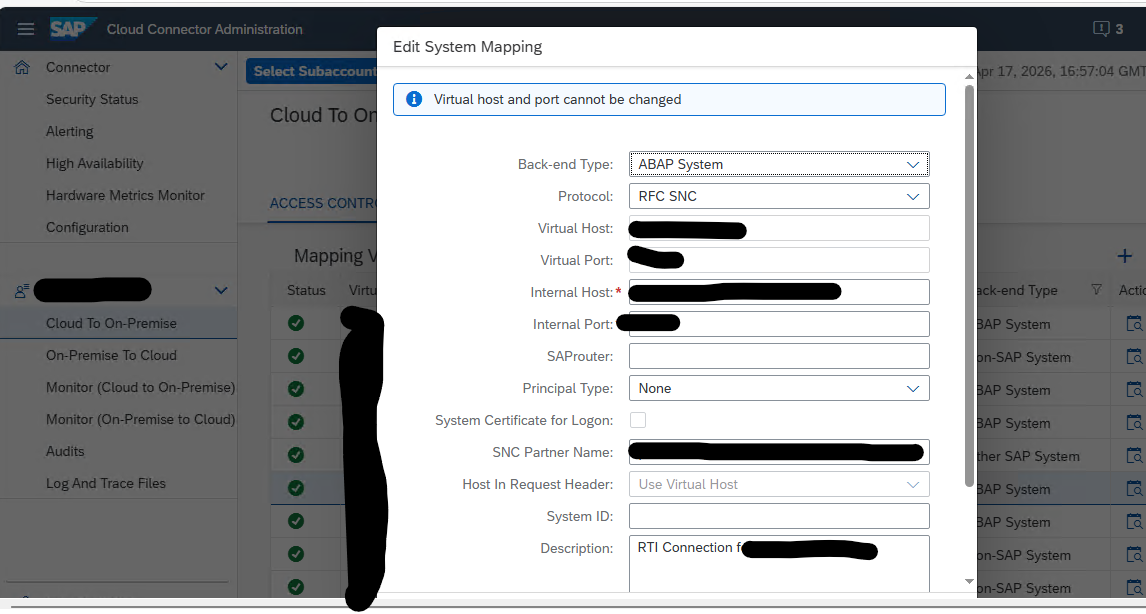
5. Enable SNC in BTP Subaccount (On‑Prem → Cloud Direction)

In SAP BTP Cockpit:

Connectivity → Cloud Connectors → ABAP Systems

For each RFC connection:

  • Enable “Use SNC”
  • Maintain SNC partner name of the ABAP system
  • Upload the ABAP system’s SNC certificate if required

6. Configure SNC in the ABAP System (Transaction SNC0)

In the on‑premise ABAP system:

  • Maintain SNC names
  • Import Cloud Connector certificate into the ABAP Trust Manager
  • Ensure profile parameters such as snc/enable and snc/identity/as are set

Restart the cloud connection if profile parameters are updated.


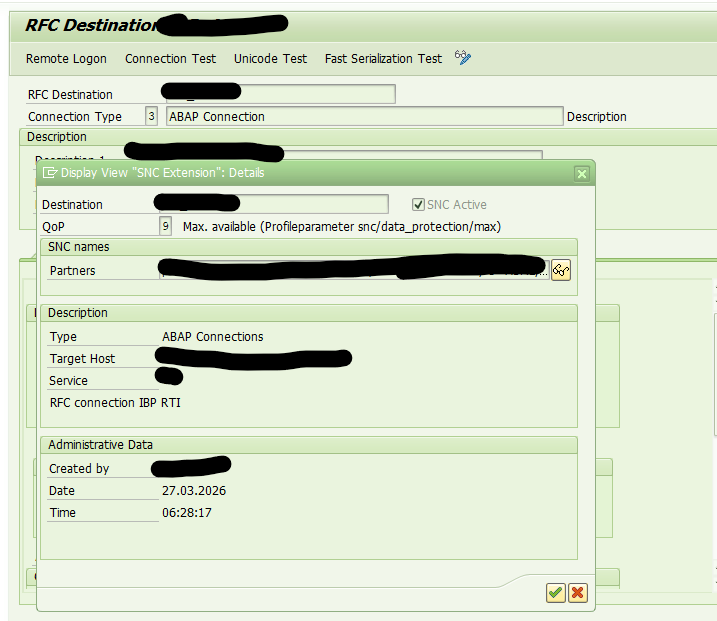
7. Enable SNC in RFC Destinations (SM59)

For each RFC destination:

  • Activate SNC
  • Maintain the partner SNC name
  • Set Quality of Protection (e.g., 3 – integrity + encryption)

Test the RFC connection to verify SNC handshake.


8. Enable SNC in BTP (Cloud → On‑Prem Direction)

For outbound connections from BTP:

  • Enable SNC
  • Configure the SNC partner name (ABAP system)
  • Set QOP (quality of protection)

Test communication via integration flows or services.


9. Functional Validation by Application Teams

Functional teams should validate:

  • All RFC-based interfaces
  • Connectivity from BTP services (e.g., IBP, CPI)
  • Replications and data transfers

All connections should show SNC encryption enabled.

SAP Certificate Automation for Linux-Based Components

This blog is a continuation of the generic setup explained in the blog on this page.

Many SAP components running on Linux (Host Agent, Web Dispatcher, Message Server, and HANA) store their certificates in local PSE files instead of STRUST.
To automate certificate enrollment and renewal, these components use two tools:

  • sapgenpse → creates PSE files and generates CSRs
  • sapslcscli → enrolls and renews certificates through SAP Secure Login Server (SLS)

This page describes the generic and simplified approach for automating certificate enrollment and renewal for:

  • SAP Host Agent
  • SAP Web Dispatcher
  • SAP Message Server / ICM (Linux)
  • SAP HANA pse

All of them use the same command‑line workflow.

Process:

1. Create the Registration PSE (ra.pse)

This PSE is used by the system to authenticate with Secure Login Server (SLS).

sapgenpse gen_pse -p <PSE_PATH>/ra.pse “CN=<SystemID>

Note: It is recommended to use password‑less certificates for automated renewals to ensure the process runs smoothly without requiring manual input.

2. Add the Root CA Certificate

sapgenpse maintain_pk -p <PSE_PATH>/ra.pse -a <Root_CA_File>.cer

This allows the RA PSE to trust your PKI.

3. Generate the TLS Server PSE & CSR

sapgenpse get_pse -p <pse_path>SAPSSLS.pse -r csr.txt “CN=<Server-FQDN>”

Generates the HTTPS certificate request (CSR). Used for Host Agent, Web Dispatcher, Message Server, HANA, etc..

4. Maintain DNS / SAN in SLS (Fresh Enrollment Only)

Before performing the first enrollment:

  • Open SLS administration
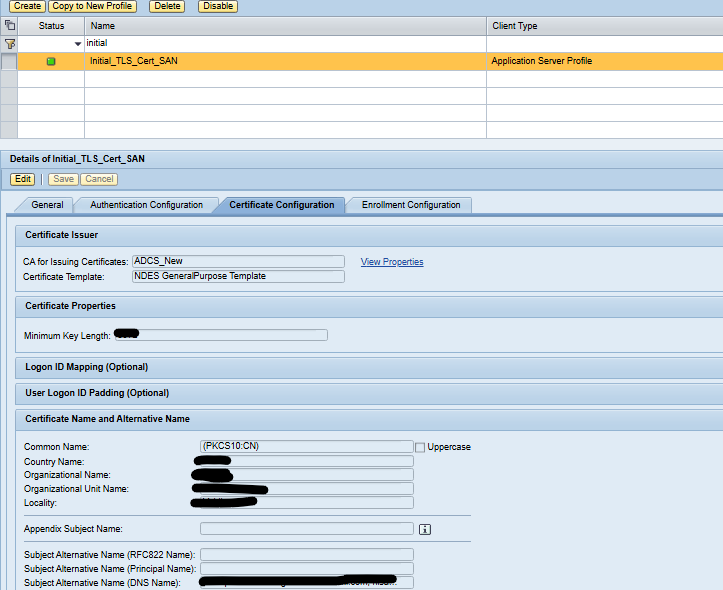
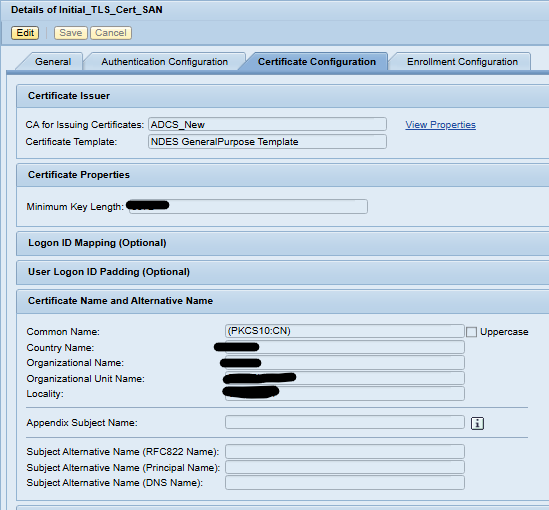
  • Go to the TLS profile (example: Initial_TLS_Cert_SAN)
  • Add correct DNS / SAN values
  • Save

This ensures the certificate is issued correctly.

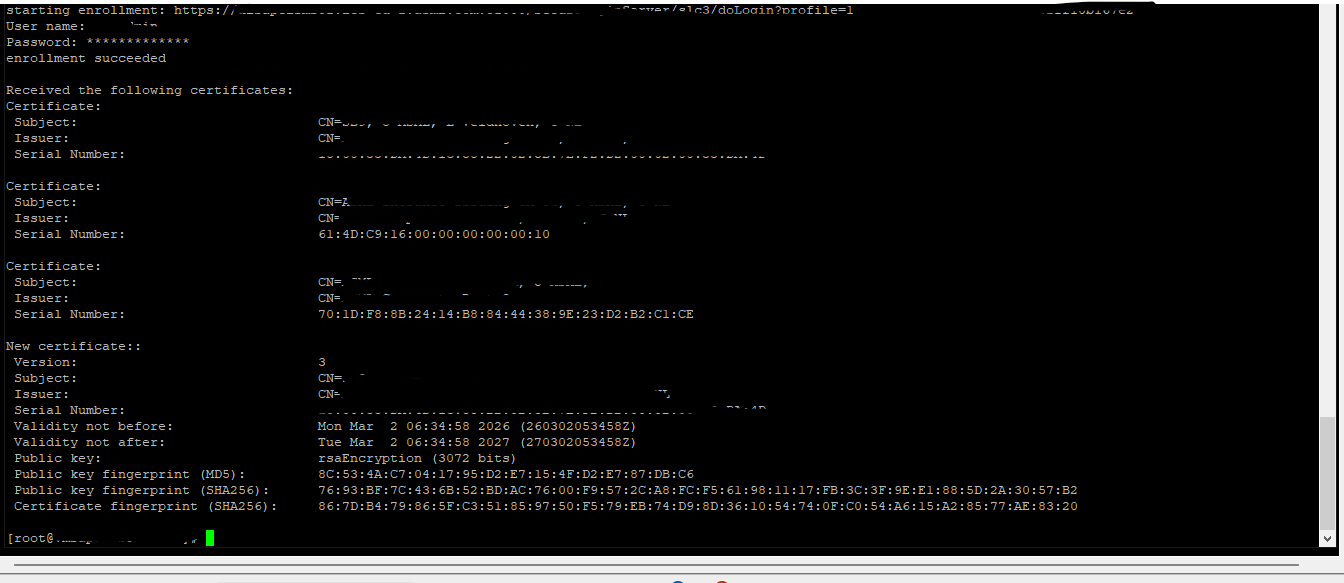
5. Perform the Initial Enrollment

/<sapslscli_path>/sapslscli enroll -r /<pse_path>/ra.pse -i -e ‘SLS_enrollemnt_metadata’

This will:

  • Send CSR → SLS → PKI
  • Retrieve certificate
  • Update SAPSSLS.pse

Enrollment is one-time only.

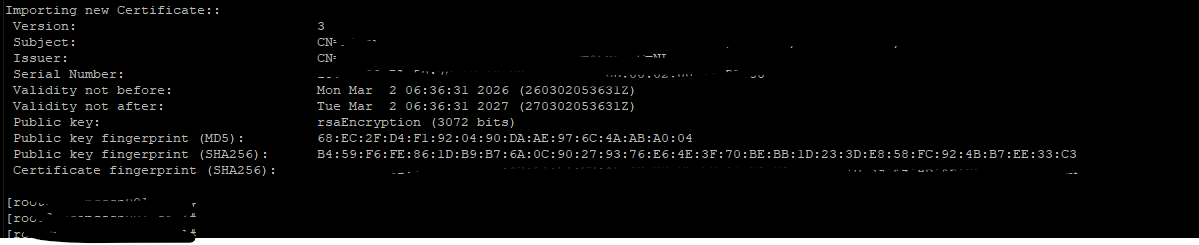
6. Renew the Certificate (Automated)

/<sapslscli_path>/sapslscli renew -r /<pse_path>/ra.pse -p /<pse_path>/SAPSSLS.pse -g 365 -e ‘SLS_Renewal_Profile_URL’

-g 365 = renew 365 days before expiry. (you can adjust it)
Each SLS certificate profile has its own metadata URL.
Renewal replaces the certificate in the PSE automatically

7. Automate with a Cron Job (Linux Scheduler)

To enable automation, configure a cron job that periodically executes the renewal command with the corresponding SLS certificate profile.

We use background job in SAP ABAP and Job Scheduler in SAP JAVA system. In case of non-ABAP non-JAVA systems we can use OS tool like Cron jobs to execute this script on daily basis.

Explanation of Each Placeholder:

PlaceholderMeaning
<PSE_PATH>Directory where PSE files are stored (e.g., /usr/sap/<SID>/<INSTANCE>/sec)
<sapslcscli_path>Directory containing the sapslcscli executable (e.g., /usr/sap/<SID>/<INSTANCE>/exe)
<SLS_Renewal_Profile_URL>Metadata URL of the specific SLS certificate profile used for renewal
-g 30Renews the certificate 30 days before expiry (you can adjust this)


Now all certificates can be renewed automatically using command line tool of SLS server and it will save manual efforts by enabling automation using SLS certificate life cycle management functionality.

SAP Certificate Enrollment & Renewal Automation Process (Java)

This blog is a continuation of the generic setup explained in the blog on this page.

To enable certificate automation in an AS Java system, you must first deploy the Secure Login Library 3.0. (official help.sap.com link).
The operating‑system‑independent package is delivered as an SCA file, which can be installed on AS Java through the telnet deployment tool.

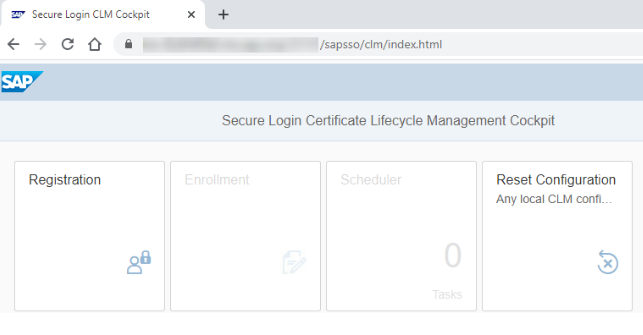
Once deployed, the system automatically provides access to the CLM application, available at: https:/<host>:<port>/sapsso/clm

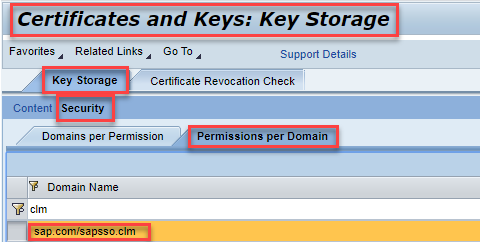
In the NWA, go to Configuration → Certificates and Keys.
Under Key Storage, open Security → Permissions by Domain, search for the CLM application, and grant it full access to the keystore views that should be renewed automatically.

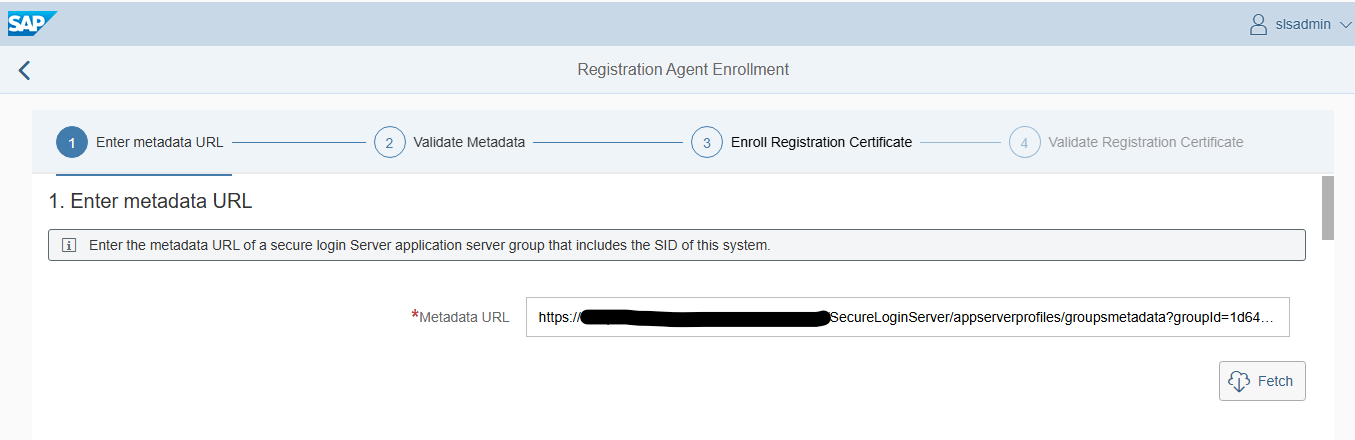
Open the CLM application in the browser. Start by registering the system (initial enrollment).

  • Enter the metadata URL and click Fetch.

  • When prompted, log in with a user allowed to perform CLM enrollment.

Click Register, then Save

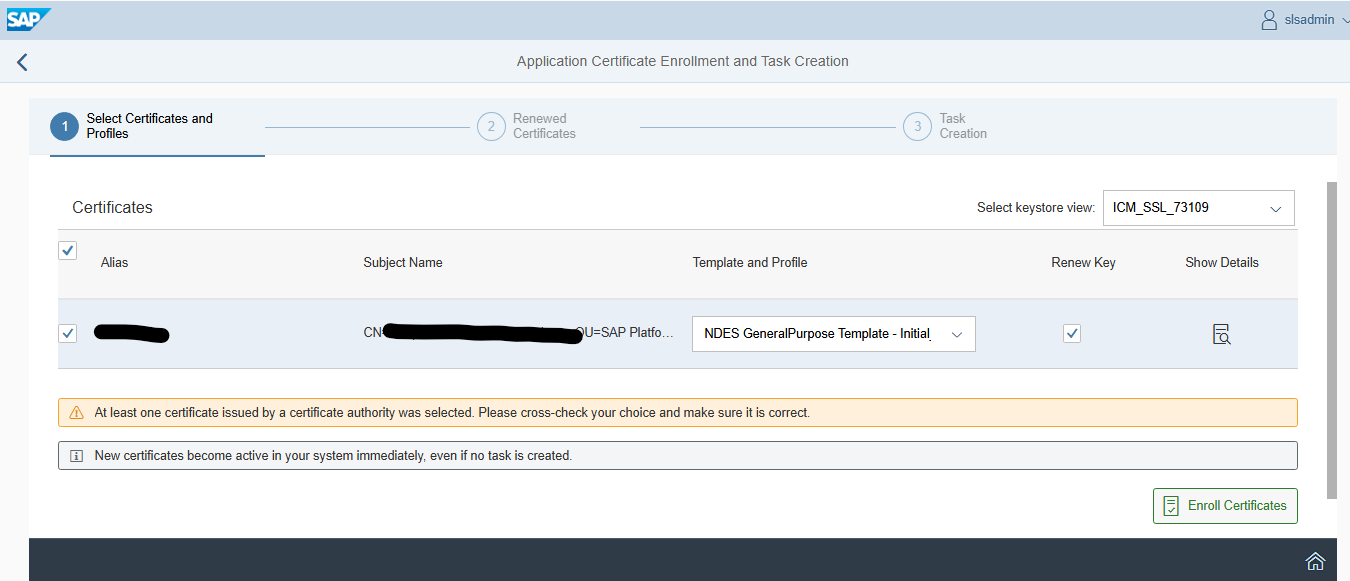
To renew certificates, go to the Enrollment tile.

  • The metadata URL is already stored, so select the keystore view and the certificate you want to renew.
  • After choosing Enroll Certificates, the updated certificates appear.
  • You can review them using Show Details.

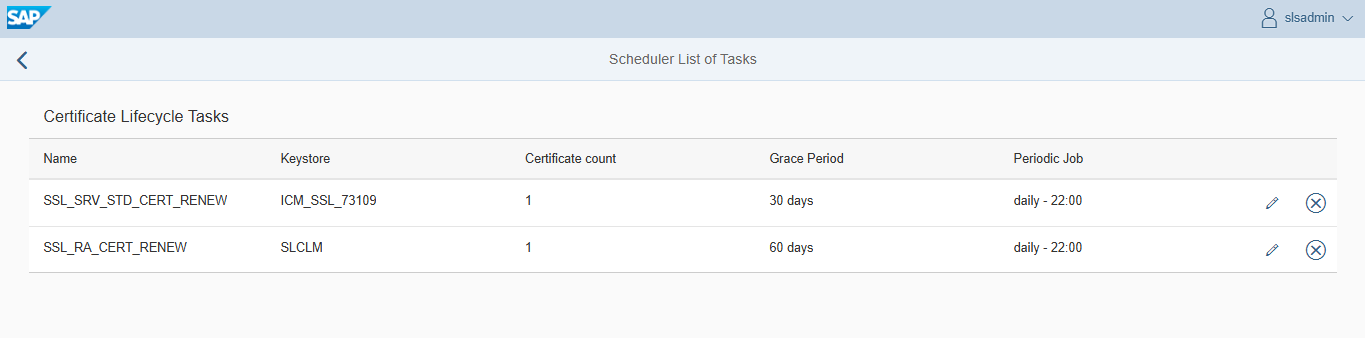
Finally, you may create a scheduled task so renewals run automatically.

  • The task executes under the currently logged‑in user.

Conclusion

After this configuration, the certificates in AS Java should be renewed regularly before reaching the end of their lifetime.

SAP Certificate Enrollment & Renewal Automation Process (ABAP)

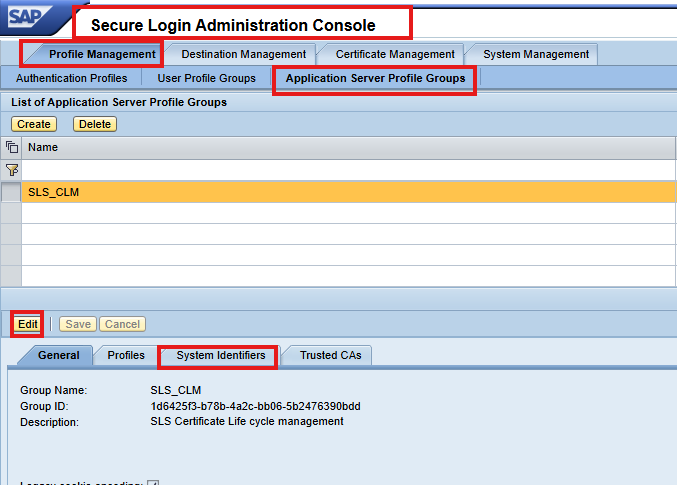
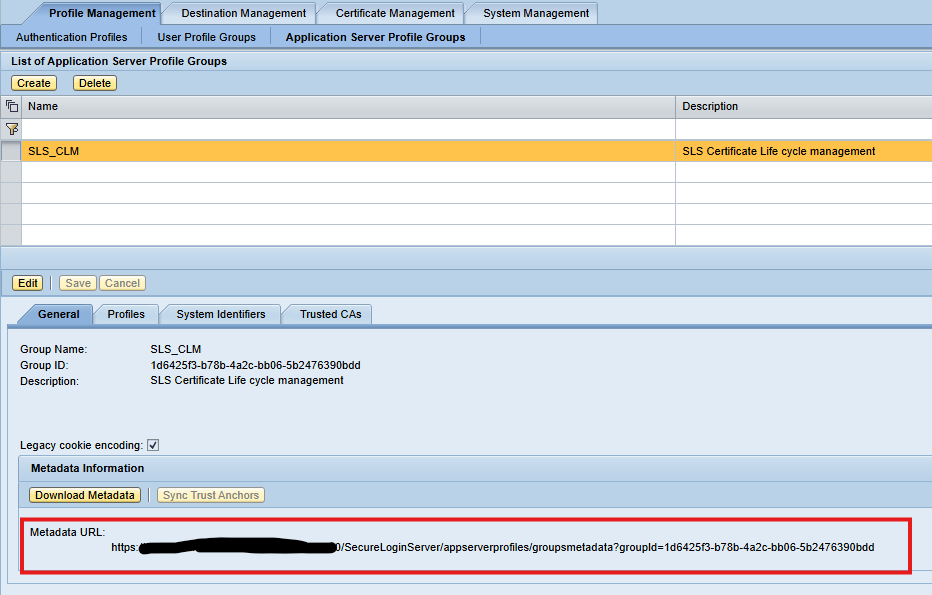
To organize certificate profiles and control which SAP systems participate in the automation process, you need to create an Application Server Profile Group in the Secure Login Administration Console (SLAC).

This blog is a continuation of the generic setup explained in the blog on this page.

For ABAP certificate renewal OSS note 2452425 – Collective Note – SAP SSO Certificate Lifecycle Management for ABAP contains full list of bug fix notes to apply or to check in case of issues.

Reference to official help.sap.com for SLS for ABAP.

1. Create a New Profile Group

In SLAC, navigate to: Application Server Profile Groups → Create New Group

Give the group a name that clearly identifies its purpose.

2. Assign System Identifiers

Under System Identifiers, add the SIDs of all SAP systems that will participate in certificate renewal. Important notes: SIDs can contain uppercase letters and digits.

3. Configuration on AS ABAP

Configuring ABAP for CLM automation involves running two key reports.
Most recent NetWeaver releases already include them, but to ensure you are using the latest versions, SAP recommends implementing the corrections from SAP Note 2452425 – Collective Note – SAP SSO Certificate Lifecycle Management for ABAP.

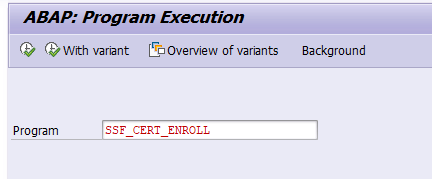
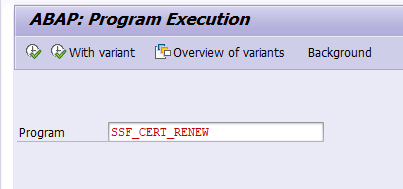
Run the SSF_CERT_ENROLL Report

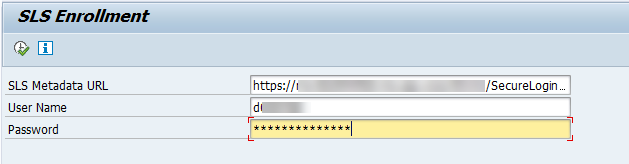
This report performs the initial connection between the ABAP system and Secure Login Server (SLS).

Metadata URL of the Application Server Profile Group in SLS

Technical user with password authentication that is authorized to perform the enrollment

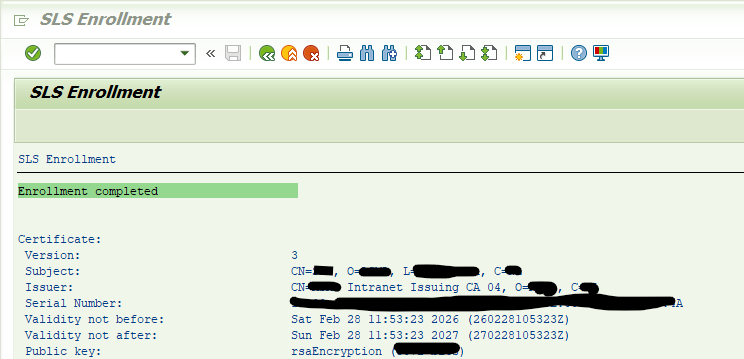
Running this report enrolls the system for the first time and retrieves the required certificate information.

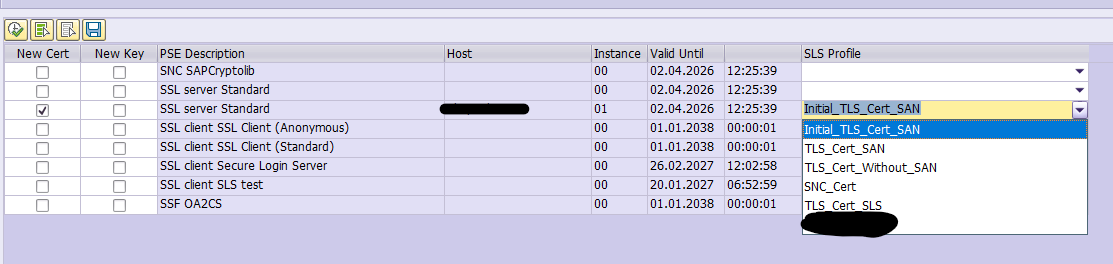
Once the enrollment report has been executed successfully, the system displays an overview of all certificate objects that are available for renewal. This screen also shows the certificate profiles assigned to the different PSEs.

Check OSS note 3115847 – CLM: SSF_CERT_RENEW cannot renew certificates where subject and SANs extend 255 characters for very long subjects.

Select Certificates for Renewal

You will see a list of certificate entries along with the available certificate profiles. For each entry:

  • Choose the appropriate certificate profile
  • Select the certificates you want to renew

This allows you to control exactly which PSEs should be processed.

2. Execute the Renewal

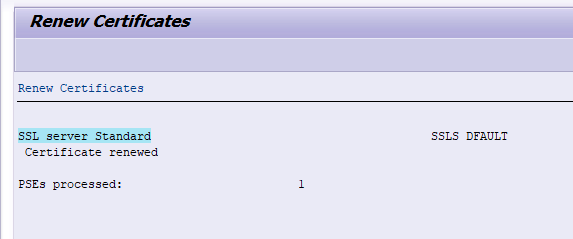
After starting the renewal process, the system will update the selected certificates through the Secure Login Server. When the renewal completes successfully, you should receive a confirmation message for each certificate that was processed.

3. Schedule Automated Renewal

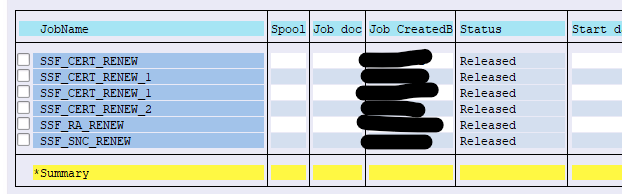
To avoid manual renewals in the future, you should save the selection in a variant and set up a scheduled job of program SSF_CERT_RENEW. You need a batch job per application server and per certificate type.

Conclusion

After this configuration, the certificates in AS ABAP should be renewed regularly before reaching the end of their lifetime.

Automating SAP Certificate Management using SLS

Digital certificates play a critical role in securing SAP systems—whether for HTTPs communication, SSO, Cloud Connector integration, or internal system‑to‑system traffic. As organizations scale, manual certificate renewal becomes error‑prone and difficult to manage.

This guide explains how to automate the entire lifecycle of SAP certificate monitoring, renewal, deployment, and validation using standard tools available on any SAP system. The approach is applicable to SAP ABAP, Java, HANA, Web Dispatcher, Content Server and Host Agent environments.
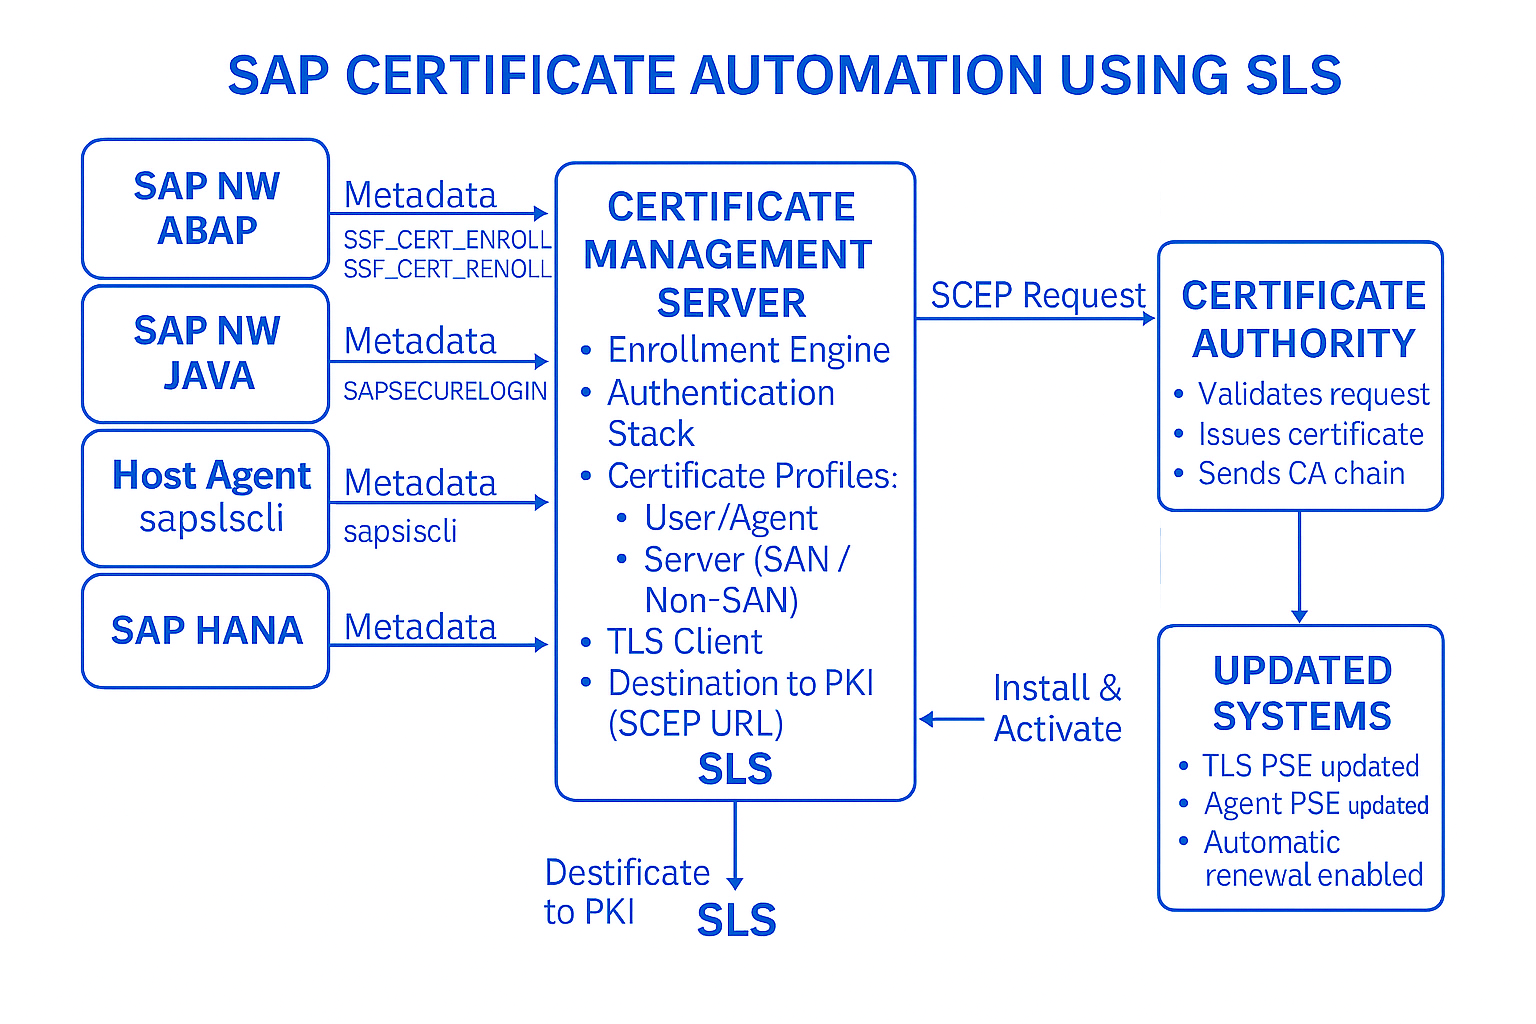
This blog will explain the overview and generic setup. The follow up blogs will describe:

1. Overview

SAP Secure Login Server (SLS) is part of the SAP Single Sign-On product. This is a licensed product, for more information read OSS note 1876552 – License Requirement and Download of Single Sign-On 3.0 from the SAP Software Center. Within SSO, SLS serves as the central component for Certificate Lifecycle Management (CLM), enabling automated renewal of certificates used by:

  • AS ABAP systems
  • AS Java systems
  • SAP Web Dispatcher
  • SAP Host Agent
  • Other SAP components requiring HTTPS or SSL

For automation, SAP SLS communicates with a PKI infrastructure. A widely used option is Microsoft NDES, which supports enrollment using the SCEP (Simple Certificate Enrollment Protocol).

This blog describes the configuration in the Secure Login Server and how to connect an AS ABAP as well as an AS Java. Configuring a Remote CA.

This blog assumes that you are familiar with the general Certificate Lifecycle Management process. Before setting up Certificate Lifecycle Management (CLM) with Secure Login Server (SLS), make sure the following requirements are met:

1.1 Secure Login Server Installed
You need a working installation of SAP Secure Login Server. SLS can run on any supported, modern SAP NetWeaver AS Java system. Read OSS note 3529951 – SAP Single Sign On 3.0 product compatibility for exact specifications.

1.2 Administrative Access
You need a user who can access the Secure Login Administration Console (SLAC) to configure CLM settings.

1.3. Supported SAP Releases
Your SAP systems must support the CLM client components:

The ABAP stack must be on a release level that includes CLM functionality
(SAP note 2452425 – Collective Note – SAP SSO Certificate Lifecycle Management for ABAP explains requirements). The Java stack must also meet the CLM prerequisites.

1.4. Required Authorizations

For configuration tasks, you need:

A user with SLAC_CERT_ADMIN/SLCLM_ADMIN/SLAC_SUPERADMIN or equivalent permissions in the Secure Login Administration Console.

2. Configuration of Destination (Connecting SLS to the PKI / NDES Server

(This step must be completed before creating certificate profiles)
Before defining any certificate profiles in Secure Login Server (SLS), you must configure a destination that allows SLS to communicate with your PKI infrastructure (typically Microsoft NDES). SLS uses this destination to forward CSR requests and to retrieve issued certificates, acting as a broker between SAP systems and the PKI server.
This is a mandatory step because without a properly configured destination, SLS cannot reach the PKI, and no certificate enrollment or renewal will work.

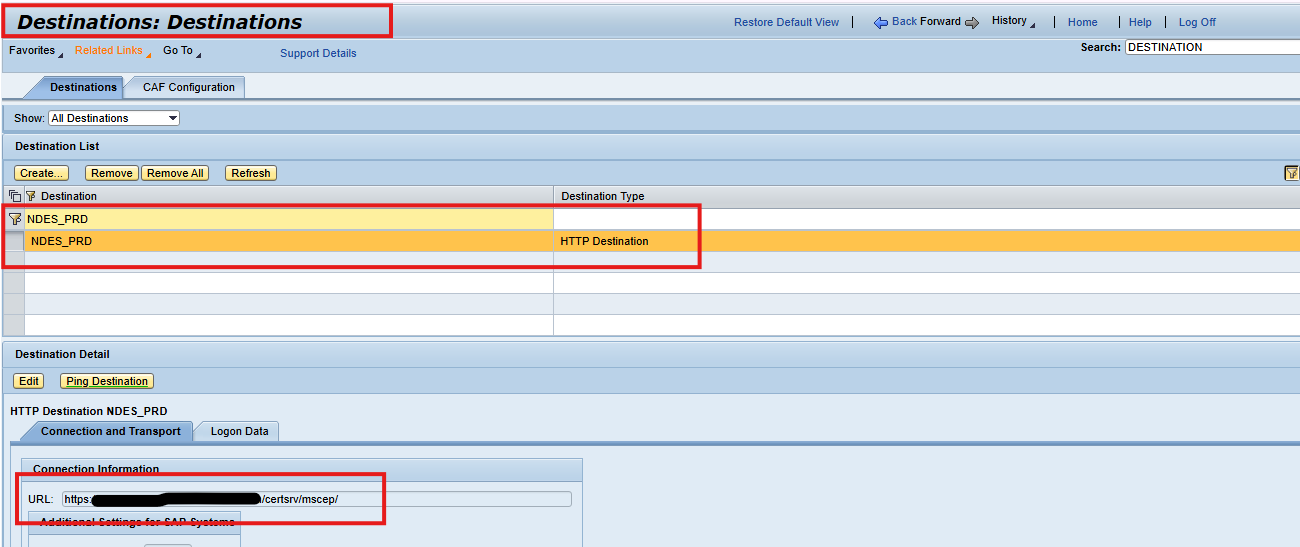
  1. Open the Destinations Area in NWA
    In the SLS (AS Java) system:

Go to NetWeaver Administrator (NWA)
Navigate to:
Configuration → Infrastructure → Destinations

This area allows you to create HTTP/S destinations that SAP components use to reach external systems.

  1. Create a New Destination
    Create a new destination dedicated to your PKI/NDES server.
    Recommended Naming Convention
    Use a name that reflects your PKI or environment (e.g.,):
    NDES_PROD
    NDES_QA
    PKI_SCEP

This improves clarity when assigning the destination later in SLS certificate profiles.

  1. Configure Destination Type
    Set the destination type to: HTTP Destination, Since NDES SCEP endpoints are exposed over HTTPs, this ensures compatibility.
  1. Enter the SCEP URL of the NDES Server
    In the Connection Information section, enter the full SCEP endpoint URL of your PKI/NDES server.
    For example (generic format):
    https://<ndes-hostname>/certsrv/mscep/

This URL points to the NDES SCEP service used for certificate enrollment.

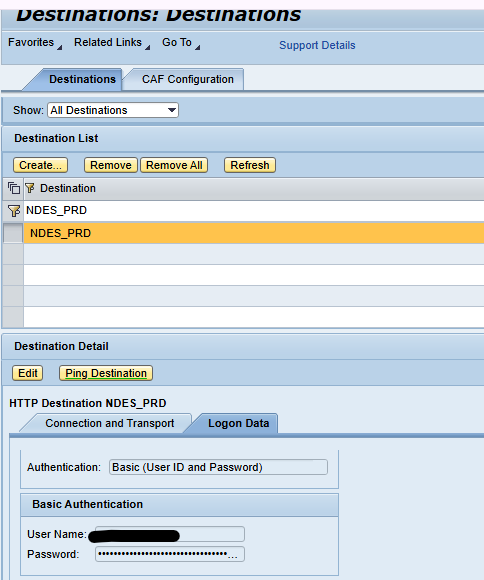
  1. (Optional) Configure Logon Data
    Depending on your PKI security configuration, you may need to configure:

Basic Authentication with a technical service account Certificates for mutual TLS.
No authentication if internal trust is used. This must align with your PKI design.

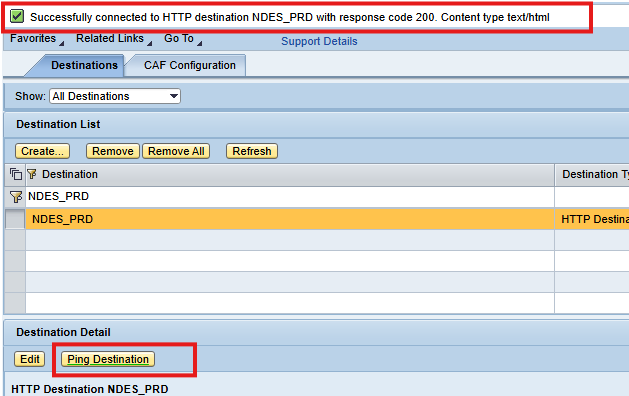
  1. Test the Destination
    After configuring:

Click “Ping Destination”
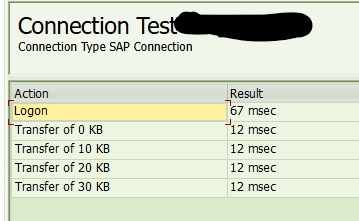
Ensure the HTTP/HTTPs connection is successful
If the response is reachable, SLS can now communicate with NDES

Remark: even though HTTPs is configured, the success message still shows HTTP.

SLS relies on this destination for all CLM certificate operations.

  1. Why this destination is critical
    This destination is used internally by SLS for:

Forwarding Certificate Signing Requests (CSR) to NDES
Receiving signed certificates
Validating enrollment responses
Triggering certificate renewals
Communicating over the SCEP protocol

Without this destination, all profiles (TLS, SNC, Client) and enrollment workflows will fail because SLS would have no path to the PKI infrastructure.

  1. How It Fits Into the Overall CLM Workflow
    Once the destination is created:
    SAP System → SLS → (Destination) → NDES/PKI → CA → SLS → SAP System

3.1 Configuring Secure Login Server for CLM

Before you configure anything in the Secure Login Administration Console (SLAC), you must prepare SLS to accept certificate‑based authentication from SAP systems. This requires creating a dedicated logon stack.

The formal SAP help document link can be found here. The steps below describe the summary main steps with clarifying screen shots.

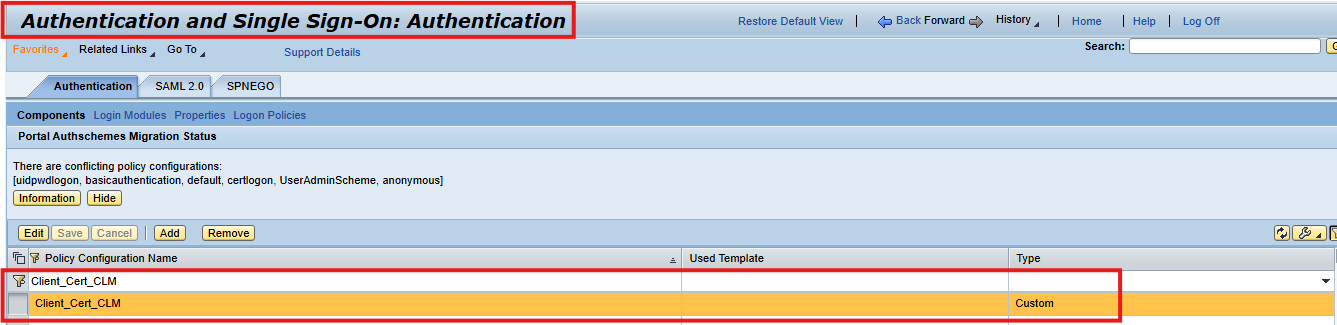
1. Create a Logon Stack in SLS

1.1 Create a Logon Stack in NWA

Begin by opening the NetWeaver Administrator (NWA) of the Secure Login Server and navigating to:

Configuration → Authentication and Single Sign‑On → Logon Stacks

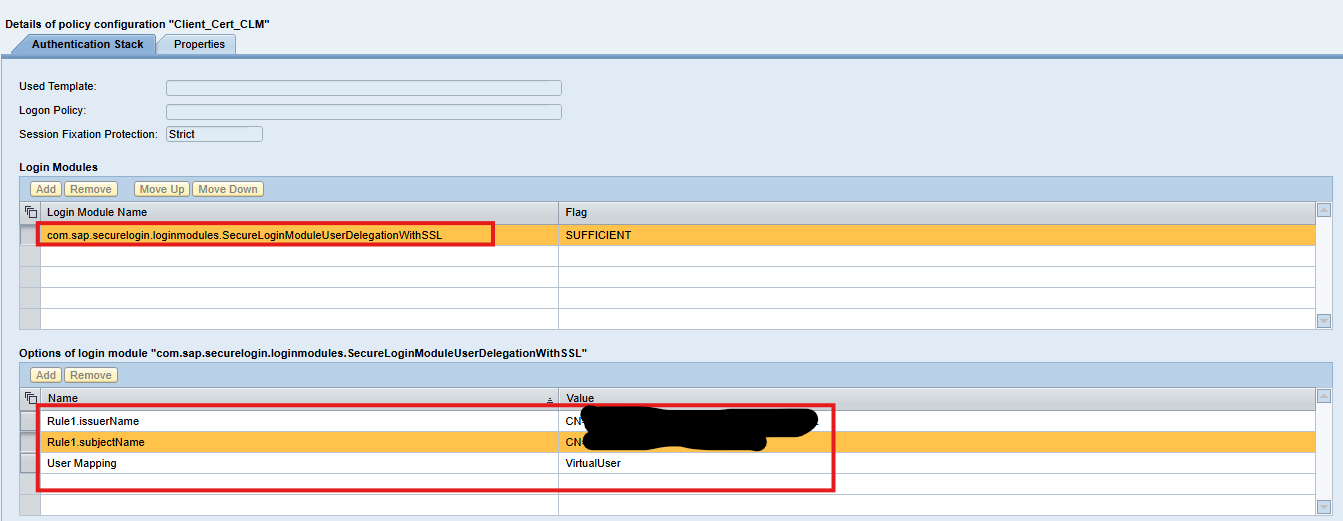
Here you create a new logon stack. Choose a name that clearly indicates it is intended for CLM system authentication, such as Client_Cert_CLM

1.2 Steps to Create the Logon Stack

  1. Open the NetWeaver Administrator (NWA) for SLS.
  2. Navigate to:
    Configuration → Authentication and Single Sign‑On → Logon Stacks
  3. Create a new logon stack with a name that clearly indicates it is intended for CLM client authentication (for example, CLM_ClientAuth).
  4. Add a single login module to this stack:
    SecureLoginModuleUserDelegationWithSSL

**Configure the Three Key Attributes**
This module requires three important attributes that control how certificates are validated:
🔹 Rule1.subjectName

Used to filter acceptable certificate subjects using a regular expression.
If you set it to the wildcard pattern:
(.*)

it effectively accepts any subject. Even with the wildcard, the Common Name (CN) of the system certificate must still match one of the system entries you later configure in the Secure Login Administration Console (SLAC).

🔹 Rule1.issuerName

Controls which certificate issuers are allowed.
Typically also set to:
(.*)

This disables strict issuer filtering and allows any issuer that SLS already trusts through its root CA store.

🔹 UserMappingMode

Must be set to: VirtualUser

SAP systems do not exist as users in the UME. Therefore, SLS maps each system certificate to a virtual identity, and these identities are filtered and managed later in SLAC.

1.3. Purpose of the Logon Stack

This logon stack is used by every application profile in CLM.
It ensures that SAP systems can authenticate securely when requesting new or renewed certificates. This logon stack forms the authentication foundation for all certificate lifecycle operations in SLS. Every CLM application profile will reference it.
By configuring:

The SecureLoginModuleUserDelegationWithSSL module,
The subjectName and issuerName rules, and
Virtual user mapping

You ensure that:
✔ SAP systems authenticate themselves correctly via SSL client certificates
✔ Certificate enrollment and renewal requests are validated through the defined rules
✔ System‑to‑certificate mapping is handled through virtual identities (since systems do not exist in UME)
✔ CLM workflows function seamlessly from initial enrollment through automatic renewal
✔ Every SAP component—ABAP, Java, Web Dispatcher, Host Agent, HANA—can make use of this same logon stack This logon stack is therefore reused across all application profiles in CLM, ensuring consistency and secure handling of certificate requests throughout the entire SAP landscape.

1.4 Configuration of Certificate Profiles

After preparing the logon stack, the next step in setting up Certificate Lifecycle Management (CLM) is to define the certificate profiles inside the Secure Login Server (SLS). These profiles describe what type of certificates SAP systems should request and how SLS should communicate with the backend CA/NDES to obtain them.
Each certificate profile represents a specific certificate purpose (such as SNC or TLS) and includes the rules that control certificate enrollment, renewal, and template mapping.

The profiles are created via SLAC:

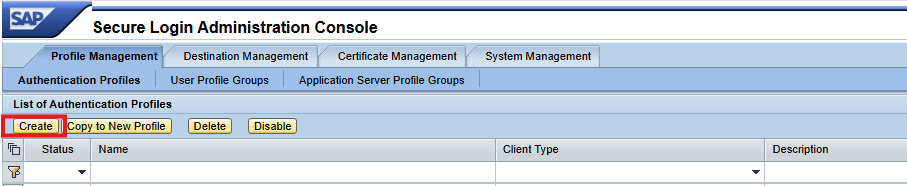
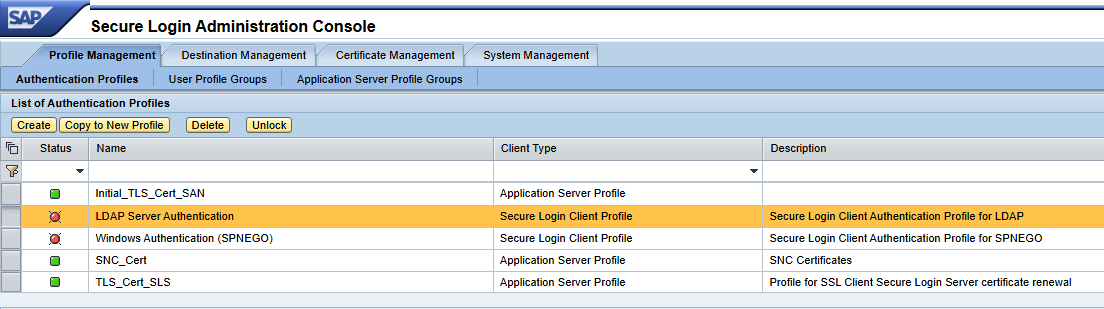
SLAC -> Profile management -> Authentication profiles -> Create

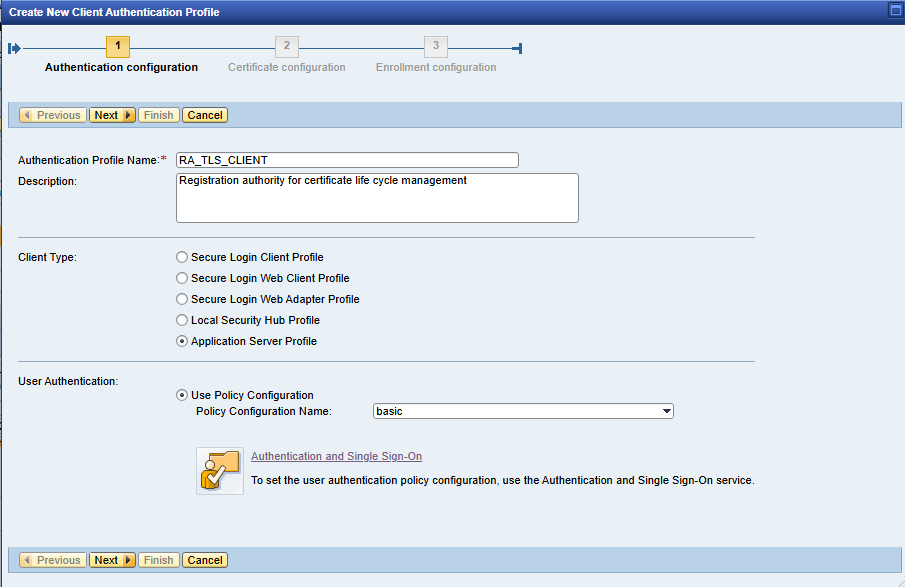
  1. Registration Agent Profile (Used for Enrollment Requests)
    The first profile that must be created is the Registration Agent (RA) profile.
    This profile is responsible for handling initial certificate enrollment requests coming from SAP systems.
    It acts as the “front door” for: Receiving enrollment metadata from SAP components, forwarding Certificate Signing Requests (CSR) to NDES and Returning the signed certificate back to the SAP system. Every system type—ABAP, Java, HANA, Web Dispatcher, Host Agent—uses this RA profile during enrollment.

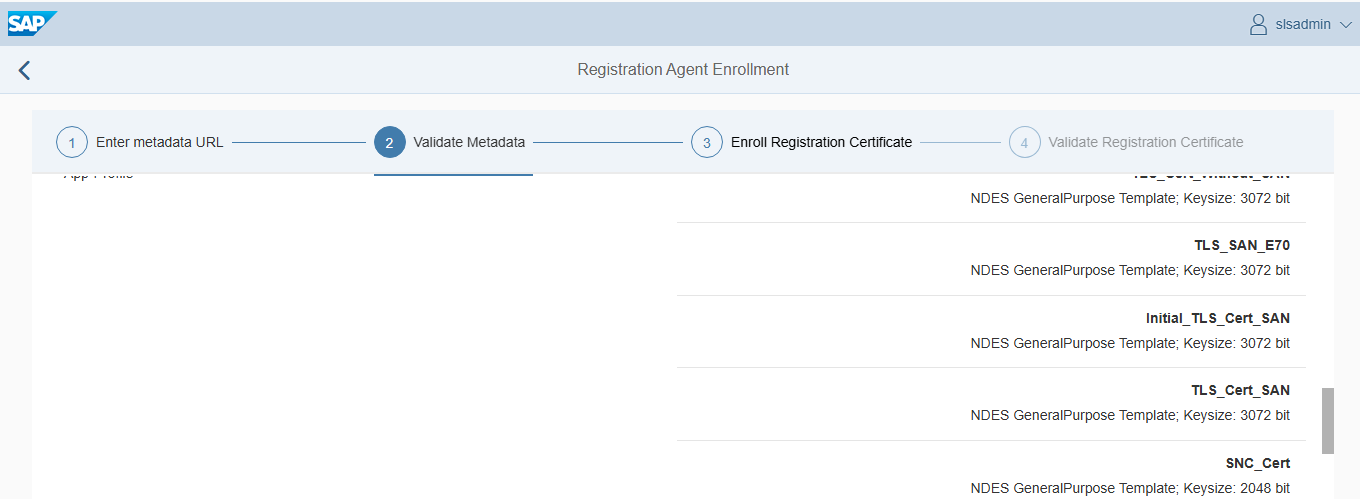
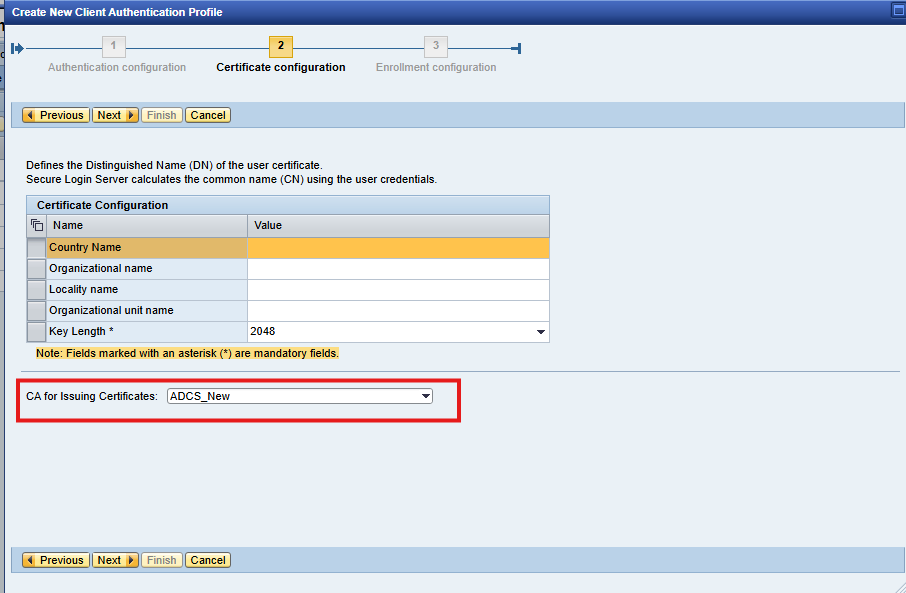
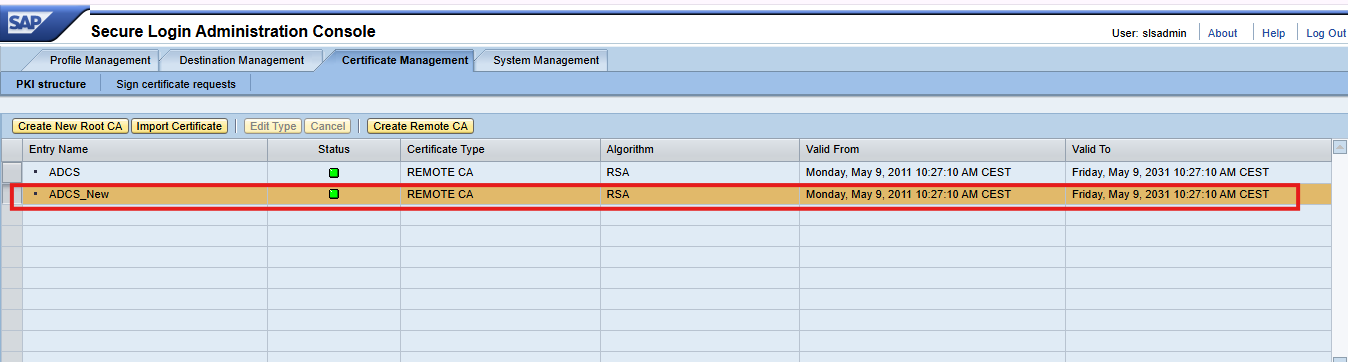
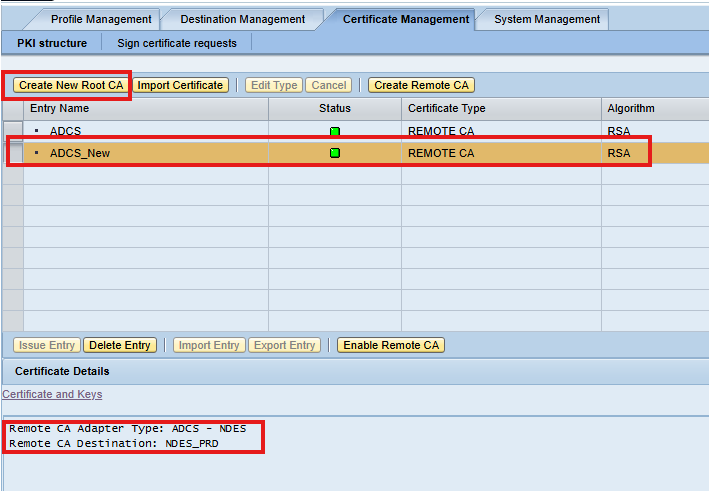
fill the required entry as per organization details. and CA for issuing certificates create PKI structure under certificate management

Create Certificate Profiles for Each Required Certificate Type

✔ Initial_TLS_Cert_SAN

Used for First‑Time SAN‑Based Enrollment & Renewal and This profile is required for the very first certificate issuance when: You are enrolling a system for the first time and want the initial certificate to follow SAN requirements (as enforced by modern PKI policies)

✔ SNC Certificate Profile

Used for systems that use Secure Network Communication (SNC) with X.509 certificates.

✔ TLS Server Certificate Profile

Disclaimer:
This page covers only the architecture and configuration required for SAP certificate automation.
For the full enrollment and renewal procedure, please refer to 👉 “SAP Certificate Enrollment & Renewal Automation Process” page dedicated to the operational workflow.