Aftercare for SAP upgrade or support package

This blog will explain the normal aftercare that needs to happen after an SAP system is upgrade or has been patches with support packages.

Questions that will be answered:

  • What is the normal processing sequence in SPAU?
  • What is the new SPAU_ENH transaction?
  • Which aftercare is needed when using embedded search via TREX or HANA?
  • Which aftercare is needed for the authorization team?
  • What are the general sanity checks after an upgrade?
  • How to regenerate SAP_ALL and SAP_NEW?
  • How can I check for new or altered security parameters?
  • What other things to do after upgrade?
  • SEGW issues after upgrade, how to solve them?

SPAU processing

For extensive explanation on SPAU, read the dedicated blog. The below is a summary.

When starting transaction SPAU in a netweaver 7.50 or higher system the screen will look as follows:

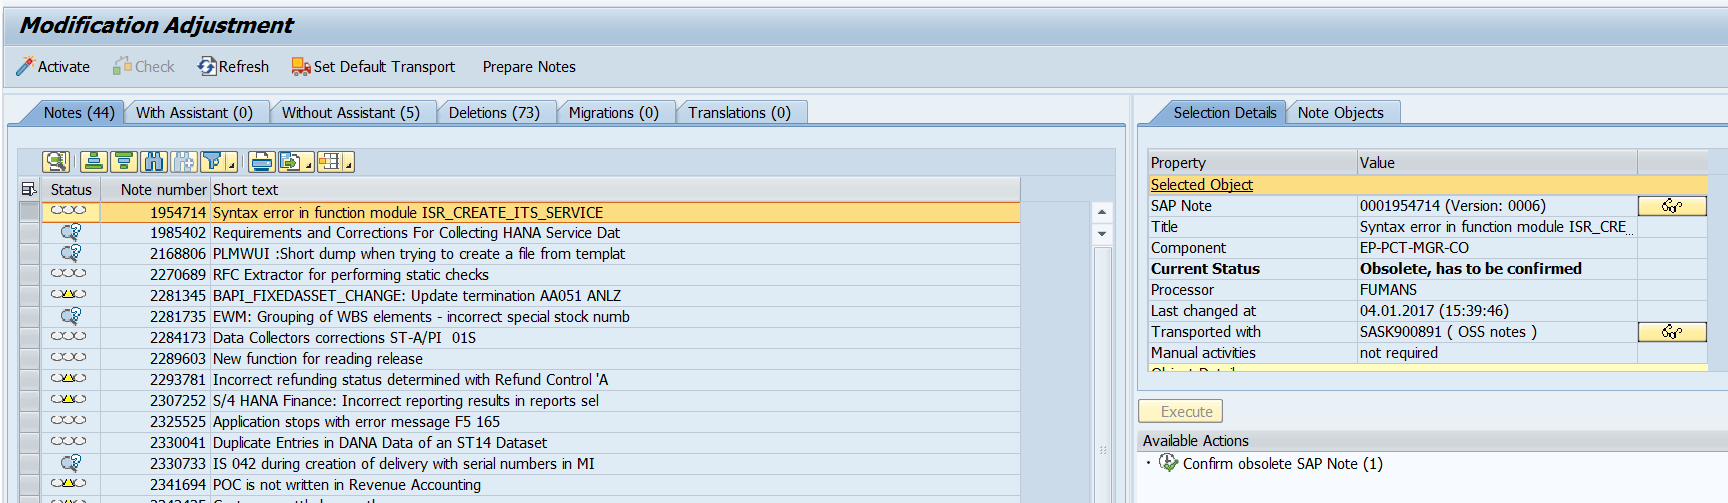
First thing to do is to hit the Reset OSS notes button or Prepare OSS notes button (the name can differ bit per version):

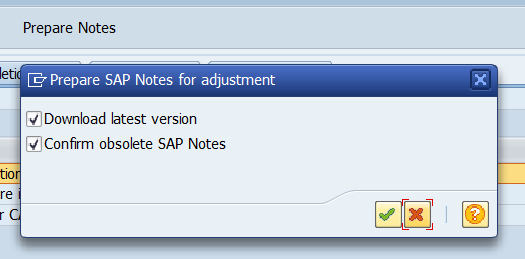
This will download all OSS notes again and automatically mark the obsolete ones and will remove them from the list. Wait until the batch job doing this job for you is finished. This will save you a lot of time.

In a 7.50 or higher system look at OSS note 2532229 that solves a bug with notes in adjustment mode.

Second step is to process all the OSS notes. Don’t start the other activities until the OSS notes are done.

Third step is to process the tab With Assistant. Only when this is done continue with the tab Without Assistant.

The steps Deletions, Migrations and Translations are optional, but best to do as well. Deletions can be many, but here you can select all and reset to SAP quite quickly.

SPAU_ENH to process enhancements

Often forgotten is the post processing with transaction SPAU_ENH.

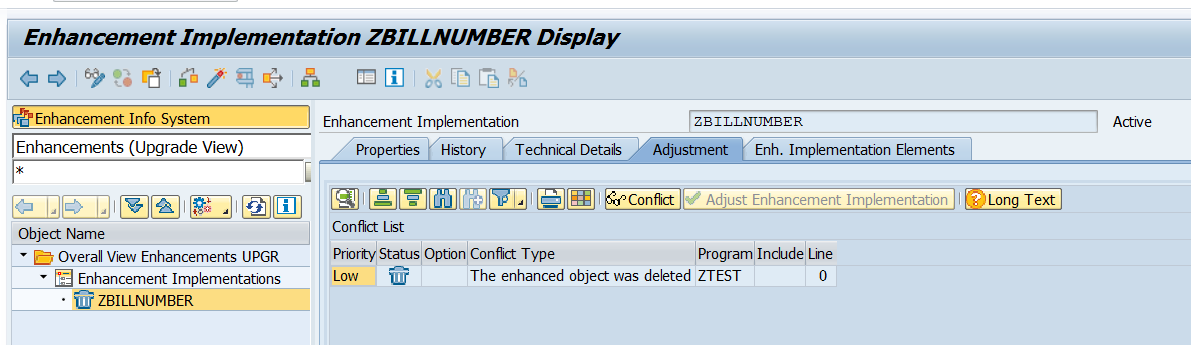
If there are changes in enhancements made by SAP conflicts with customer implementations can occur. SPAU_ENH will list them, and you can process them. If forgotten the customer implementation might not be called, which can lead to functionality giving errors.

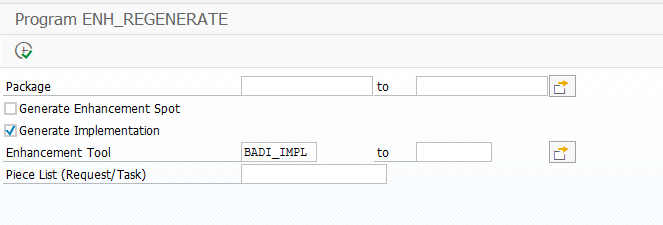
In rare cases you will need to regenerate the enhancement spots via program ENH_REGENERATE. See OSS note 2507482 – ENHO: After System Upgrade, BADI_SORTER for BAdI Implementation is not being triggered:

RTCCTOOL post processing

After any upgrade/support package the basis person must run the RTCCTOOL program. This will check and list any needed updates.

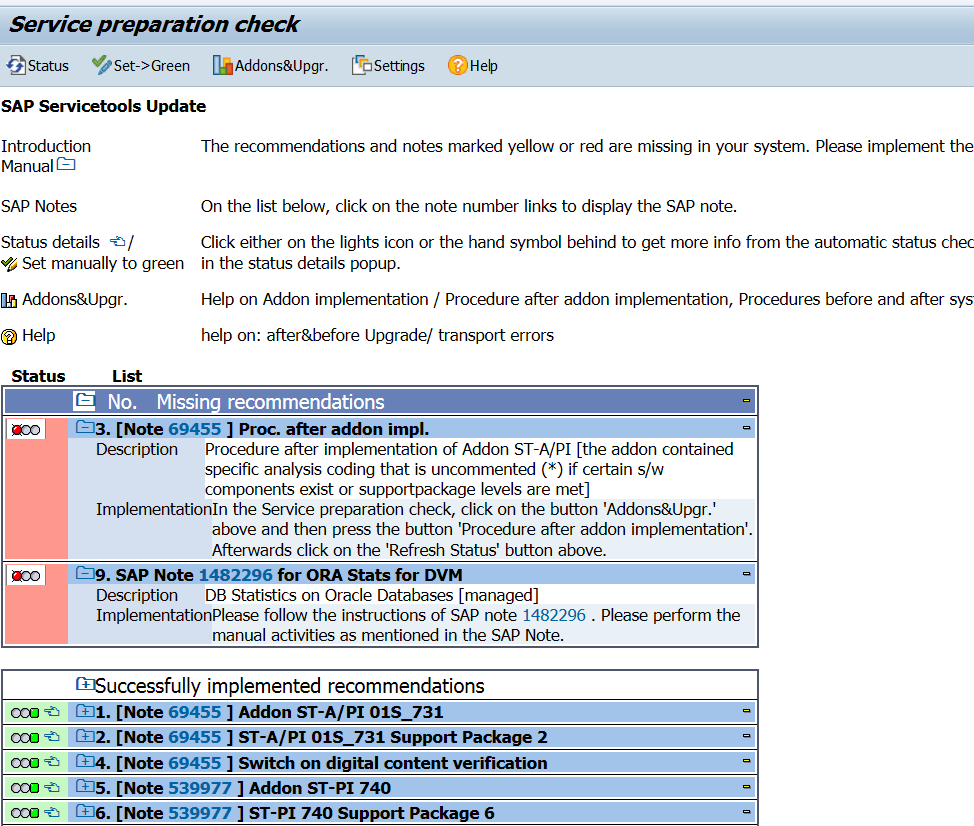
In almost all cases the actions behind the button Addons&Upgr must be triggered by the basis person.

DMIS plug in OSS notes

If you are using the DMIS plugin for SLT, then you need to run the DMIS note analyzer program(s) again after the support package or upgrade. More information: read this blog.

ScenarioReport name
Object Based Transformation (OBT)CNV_NOTE_ANALYZER_OBT
ABAP Integration for SAP Data Intelligence (DI)CNV_NOTE_ANALYZER_DI
S4HANA Migration Cockpit (MC)CNV_NOTE_ANALYZER_MC_EXT
SAP Landscape Transformation (SLT) Replication ServerCNV_NOTE_ANALYZER_SLT
Near Zero Downtime Technology (NZDT)CNV_NOTE_ANALYZER_NZDT

Embedded search post processing

With an upgrade or support package SAP will deliver new improved version of embedded search models. If you are using embedded search you have to do post processing to make use of these new improved versions.

By default SAP will keep using the old model to make sure the search function keeps working. The basis administrator can then update the search models at their convenience.

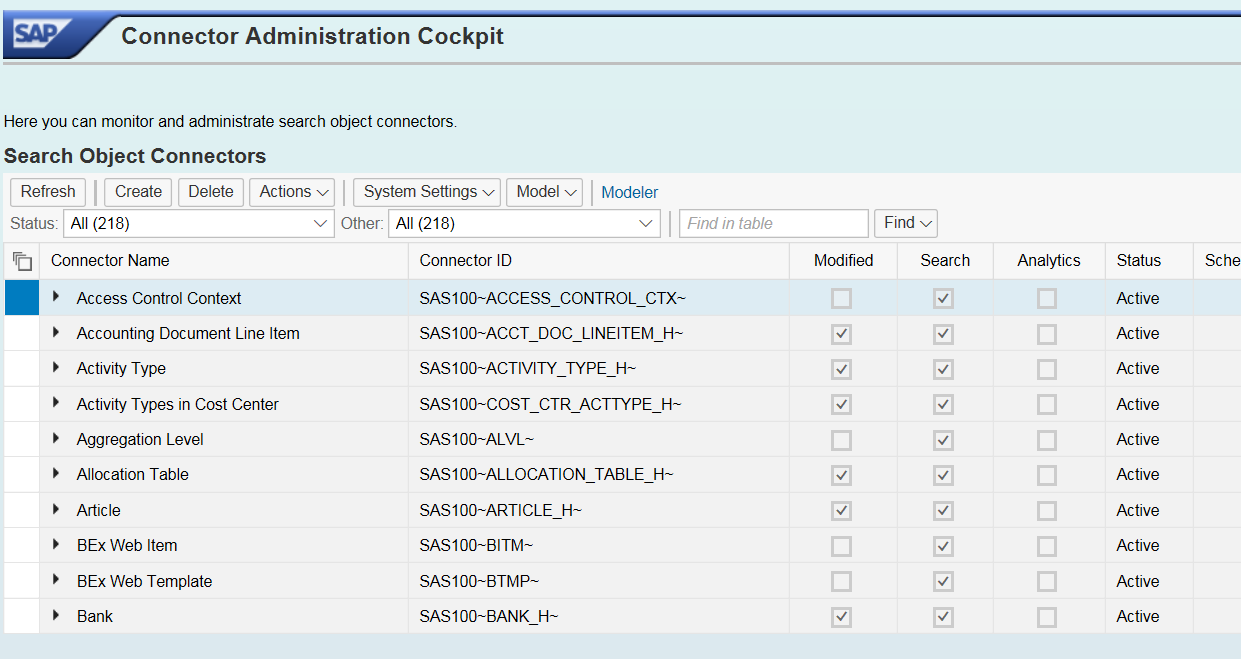
To update start transaction ESH_COCKPIT:

Then from the Other drop down select the option Model modified:

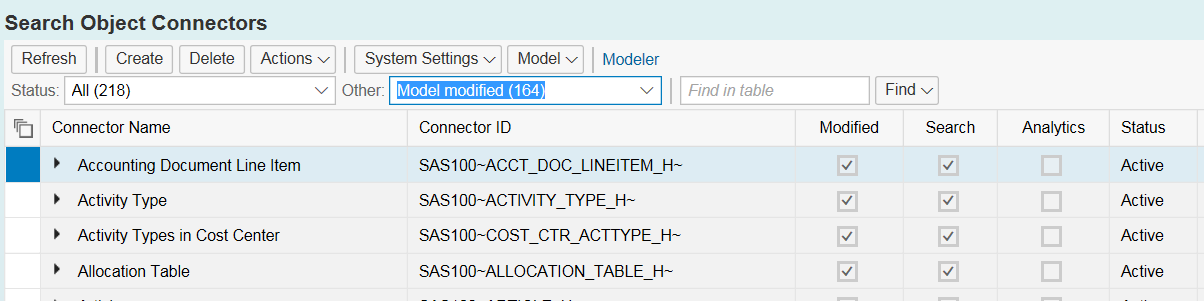
Note: if there are no Model modified present, but you do get the message like "update in background started", then wait until the model update background job is finished. This job can take long time. If finished restart transaction code ESH_COCKPIT again.

Select all to be updated (or in case there is a lot a subsection). Then select from Actions menu the Update option:

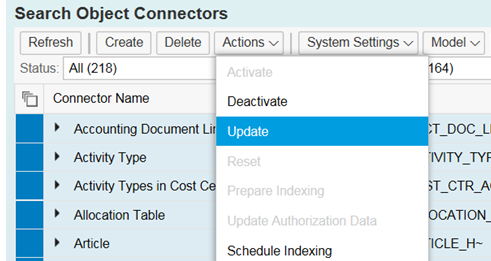
Then you have to wait (a lot). Even on HANA this will take a long time.

You might get a message that you yourself are locking the update process: in this case, wait until your processes in the background are done (SM66 monitoring) and then try again, or use smaller selection.

Alternative is to delete the search model after the upgrade and redo completely. For setting up search model in S4HANA read this dedicated blog.

Background OSS note: 2468752 – Re-indexing after an application Upgrade.

Authorization post processing

With any upgrade or support package SAP will deliver new authorization objects. These need to be handled as well.

Regenerate SAP_ALL and SAP_NEW

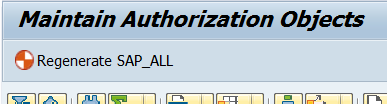
SAP_ALL needs to be regenerated. This can be done simply by starting transaction SU21 and hitting the Regenerate SAP_ALL button:

See also SAP note 410424 – Customizing for generation of profile SAP_ALL.

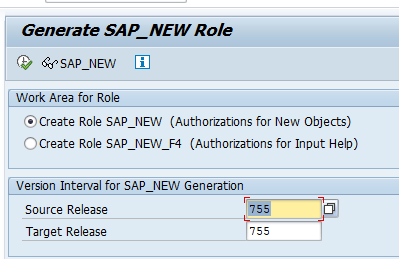
SAP_NEW can be regenerated with program REGENERATE_SAP_NEW:

Regenerate SAP_NEW

See OSS note 2606478 – REGENERATE_SAP_NEW | bridging authorizations for input helps.

SU25 profile generator post processing

The authorization team needs to do post processing in the SU25 transaction to update profile generator.

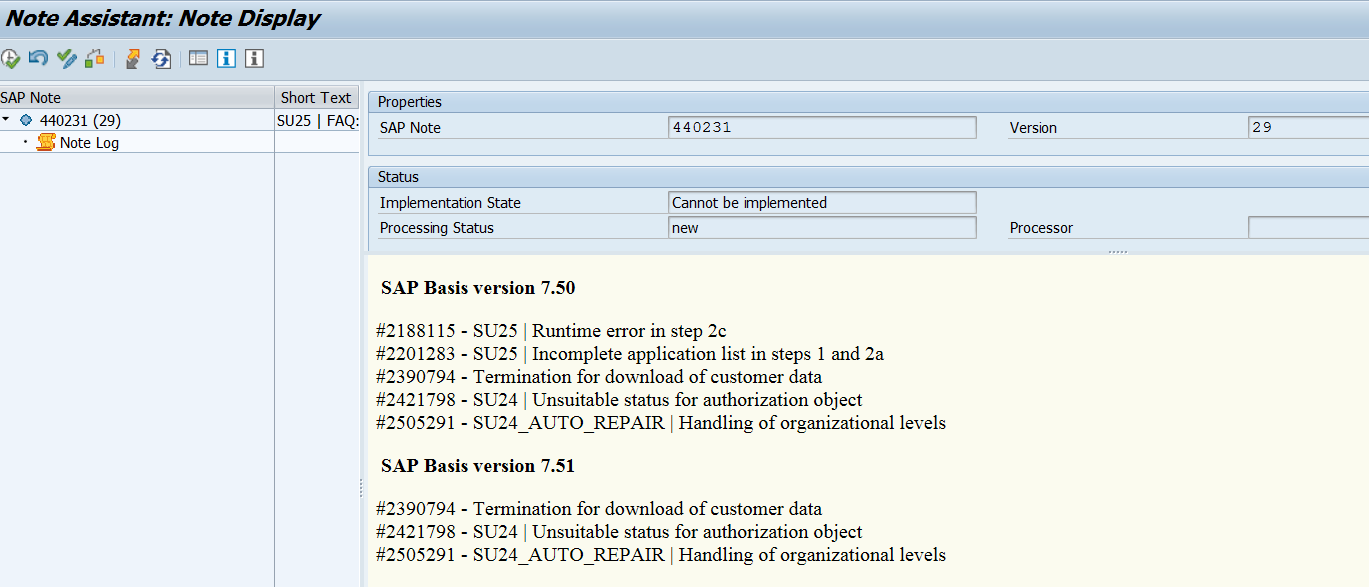
Upon starting this transaction after the upgrade or support packages it will prompt you for having checked OSS note 440231 (SU25 preparation FAQ note).

Do download the most recent version (redownload the OSS note!) and read the content. The note cannot be applied automatically (it will say cannot be implemented). This is because it is a FAQ note. If you open the content scroll to your version and check the OSS notes. Make sure the notes listed there are applied to your system before continuing with SU25.

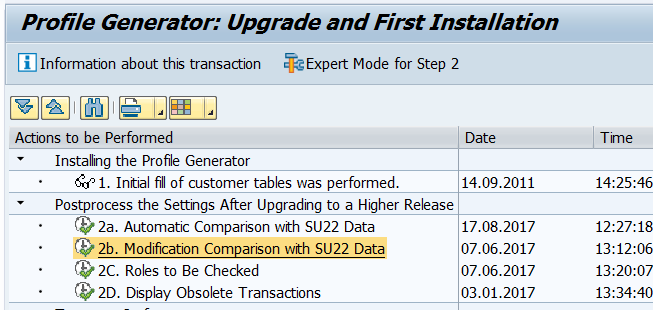
Then startup SU25 again and process steps 2a, 2b and 2c:

More background information can be found in SAP note 440231 – SU25 | FAQ: Upgrade postprocessing for Profile Generator.

Standard SAP job updates

After any SAP support package or upgrade, SAP will improve and/or change the standard clean up jobs.

To do this: go to SM36 and click the button Standard Jobs. Then select the Default Scheduling job. Then the system will tell you which jobs will be stopped (no longer needed), changed and new jobs there will be planned. See also the technical clean up blog.

For S4HANA standard jobs, read this blog.

Update of IMG nodes

If you use custom IMG nodes, you have to re-integrate your node into the main IMG using transaction S_IMG_EXTENSION. For more information see the blog on setting up custom IMG nodes.

Updating requirements and formulas

After an upgrade or support package the requirements and formulas might need to be regenerated via program RV80HGEN. More details: read this blog.

Updating ABAP where used list

After an upgrade or support package the ABAP where used list must be regenerated again. Read this dedicated blog.

General sanity checks after an upgrade

The basic sanity checks after an upgrade actually start before the upgrade!

Before the system is being upgraded, you should check following items:

If you check this at regular intervals before the upgrade you get a good mental picture (you can also take screen shots before the upgrade) of the issues already present in the system.

After the system upgrade and/or support package you check these items again. Because you checked before it is easy for you to see and filter out new items. New items can be analyzed for solution (can be SAP note that is needed, custom code that is not properly updated, changes in functionality, etc).

SGEN code generation

After support pack or upgrade you can use transaction SGEN to generate all ABAP code (standard SAP and custom) and check for errors in code generation. More information in this blog.

SEGW issues on standard SAP after the upgrade

In the past you could solve SEGW FIORI ODATA exposing issues directly in the system. Now SAP has forbidden this. See OSS notes 2734074 – Editing of standard SEGW projects for customers is blocked and 2947430 – Editing Standard OData Service Project throws error: Editing Prohibited SAP delivered projects cannot be edited in your system. The emergency workaround is described in OSS note 3022546 – In Transaction SEGW, Error ‘SAP delivered projects cannot be edited in your system’ is encountered during change of the OData Project PS_PROJFIN_MNTR.

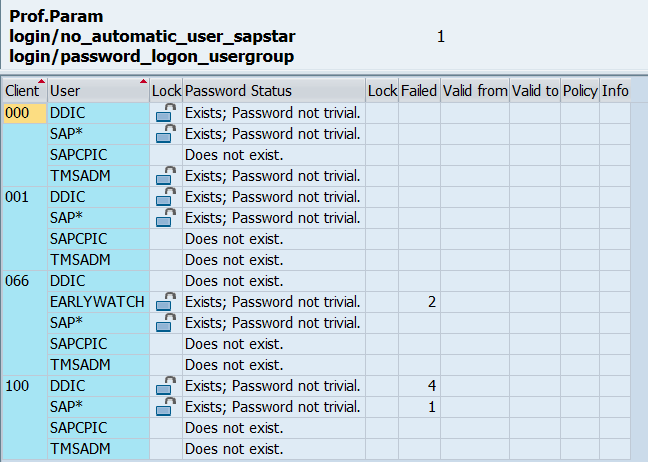
Check for new or altered security parameters

After a support pack most security parameters remain the same. After and upgrade you need to check for new or altered security parameters. For S4HANA upgrade there is special note and program to quickly check for new and altered security parameters including the SAP recommendation: read more in this blog.

Other things to do after an upgrade

After an upgrade you can scan and check for new or enhanced functions you can use.

Examples to check:

  • Update the SCI variants delivered by SAP (see blog)
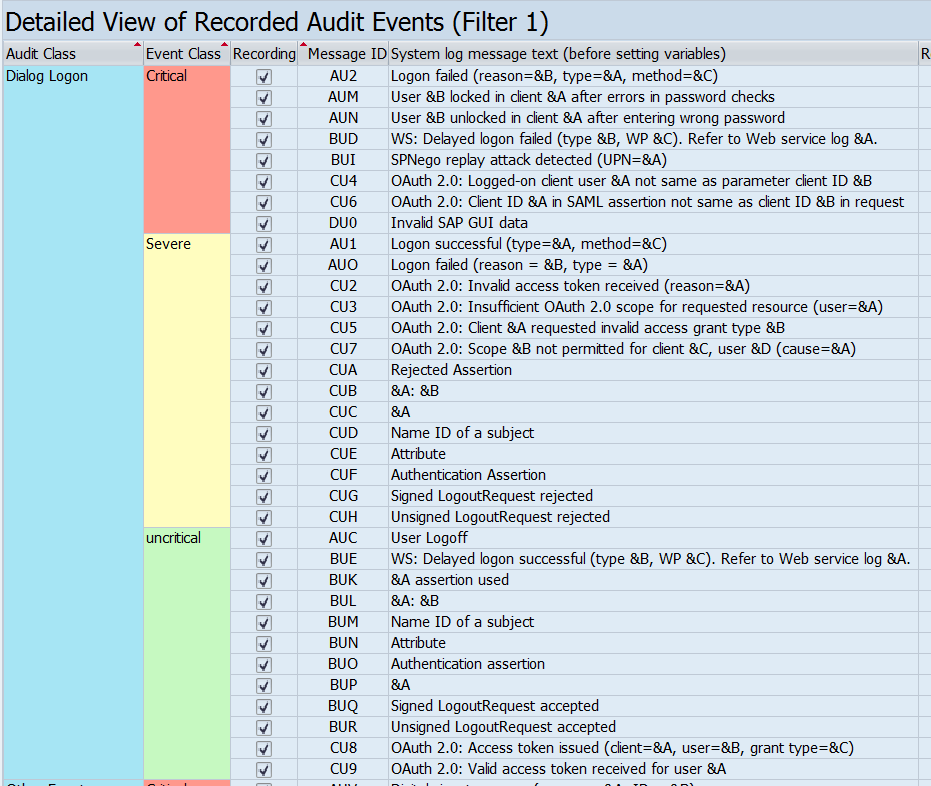
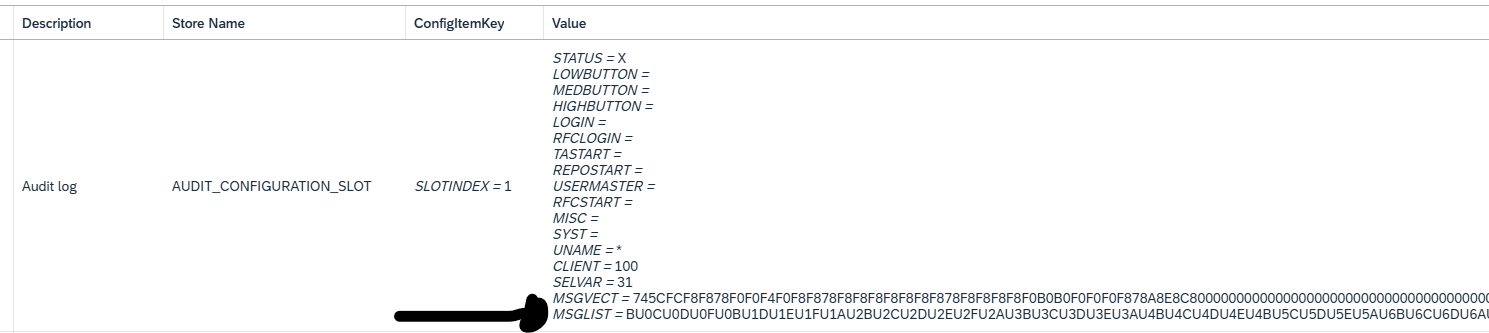
  • SAP audit logging will deliver new checks, but these are deselected after the upgrade
  • If using enterprise search: check if SAP delivered new search models that might be interesting for the business

SAP audit log

This blog will explain the SAP audit log.

Questions that will be answered are:

  • What is the intended goal of the SAP audit log?
  • How to switch on the SAP audit log?
  • What are the recommended settings for the SAP audit log?
  • What are the common issues with audit logging?
  • Can I get anonymous access to the audit logging?
  • How can I get statistics on audit logging?
  • How can I get a where used list from the audit logging?
  • How can I archive audit log data for long term storage?
  • How can I delete audit logging?

Goal of SAP audit log

The goal of the SAP audit log is to capture all audit and security relevant actions. The audit logging function can capture failed logon attempts, dangerous actions like debug & replace, execution of transactions and programs, and many more.

SAP has a note for the frequently asked questions: 539404 – FAQ: Answers to questions about the Security Audit Log.

Audit log and privacy

The audit log will capture actions performed in the system. It will not only capture the actions, but also the user ID and terminal ID. This makes the tool a bit of a big brother is watching you tool. Auditors are normally used to dealing with sensitive topics. But next to answering audit questions the audit can also be misused to check ‘is this person doing a lot of work in the system’. For this reason access to audit log should only be given to persons who understand the sensitivity and people privacy. This includes in giving information to managers extracted from the audit log.

Anonymous audit log reporting

In the SAP audit log user names and terminal ID’s are visible. This is in many cases privacy information. Due to privacy rules and regulations the audit log access might be very restricted or cumbersome. Especially when the audit logging is to be used for analysis purposes, rather than for audit. If OSS note 2883981 – RSAU_READ* | anonymized display of Security Audit Log data is applied, a new transaction is created. This new transaction, RSAU_READ_LOG_ADM, shows all the information, but now with user ID and terminal ID columns in anonymous mode.

Switching on the audit log

For switching on the audit log first the corresponding system parameters must be set:

  • rsau/enable: set to 1 to enable
  • rsau/local/file: set the file location in format “/usr/sap/<SID>/<instno>/log/
    audit_<SAP_instance_number>” (yes, unfortunately audit log still uses a file)
  • rsau/max_diskspace_local: max disk space (set to at least 1 GB)
  • rsau/selection_slots: default is 2, but typically this is set to 10 slots

Unfortunately these parameters are not dynamic, which means a system restart is required to activate these parameters.

After the activation you can go to transaction SM19 (or in newer version to RSAU_CONFIG) to switch on the audit logging in detail.

First step is to create a profile and activate it.

Next step is to setup the filters.

Audit log filters

The audit log filters are used to filter events. If you select all events this will cause logging shadow and make the function unreliable.

To configure the filters use transaction RSAU_CONFIG (this is replacing old SM19 transaction).

Main client versus 000, 001 and 066 client

SAP has multiple clients. The 000, 001 and 066 client are only used by system admins. For these clients you can setup a special filter and log ALL actions for ALL users. This will not cause too many entries.

If you want to fully avoid SAPSYS entries, follow the instructions from this blog section.

Main client logging settings

In the main client you have to be selective on the checks.

The audit log has 3 classification of checks:

  • Critical (always switch these on!)
  • Severe (if possible switch on as well)
  • Uncritical (be very selective for switching these on)

Audit log

Key filters recommendations

ALWAYS switch on the critical checks. This will include:

  • Debug & replace actions
  • Debug start
  • Changes to audit log configuration itself
  • User creation
  • Failed logon attempts
  • User locks due to wrong password

From the severe and uncritical sections the following checks are useful:

  • Logon failed: this can help to detect logon attempts with standard users (see blog on SAP standard users): the audit log will capture the terminal ID from which the attempt happened
  • Start of report failed: will avoid discussions if people really could start or not
  • Report started: though in many productive systems SE38 etc is not allowed for directly starting a report outside a transaction code, this still will happen by admins and firefighter. This check will log which direct report is started
  • Transaction locked and unlocked: capture locking and unlocking of transactions with SM01 in old systems (and SM01_DEV and SM01_CUS in newer systems)
  • Transaction started: this will avoid discussion if people key in the tcode or not (do remember that audit log captures the start; it can still be user is not authorized to continue with the transaction). And many RBE (reverse business engineering) type of tools rely on this audit log tracing rather than the ST03 logging. Reason is that the audit log is on user level rather then aggregated level and is usually kept longer.
  • User deleted, user locked and user unlocked
  • Password changed for user
SE92 audit log details

Using transaction SE92 you can get a more easy overview of the settings definitions as provided by SAP for the audit log details. Read more in this blog.

RSAU_CONFIG configuration overview

Using transaction RSAU_CONFIG you can get a more easy overview of the actual activation and configuration.

Audit log reporting

Transaction codes SM20 or RSAU_READ_LOG can be used to view the audit log results.

Be  careful to whom you give the rights to read the audit log.

Audit log settings overview

You can use transaction RSAU_CONFIG_SHOW to get an overview of the audit log settings.

New checks

With every new SAP release SAP improves the audit log. By default the audit logging is not updated after an upgrade. Therefore it is wise to check for new items added to the audit log after an upgrade.

Determining changes to audit log settings

OSS note 2680888 – SAL | Report for determination of differences in event parameters is delivering new report RSAU_READ_LOG_DIFF to show changes done to the audit log configuration:

RSAU_READ_LOG_DIFF

Delete SAP audit log files

Start transaction RSAU_ADMIN and start the option for log file reorganization:

Delete audit logging

Or you can run/schedule program RSAUPURG.

Restricted access to this function is a must.

Archiving audit logging

There might be requirements from security or business side that require you to find a solution for long term storage of the audit log data. Deletion as explained above could not be an option for you.

To archive audit logging data, activate the settings for archiving object BC_SAL. Read this blog on the exact technical execution of archiving runs.

OSS notes to be applied for the audit log archiving function:

Issues with audit logging

There are some known issues with the audit logging.

Logging shadow

If too much items are selected in the filters the audit logging will grow very fast. If the audit log is full, it will start to overwrite the earlier entries. The earlier entries are then lost. This is called logging shadow. Depending on your requirements, you have to increase the disk space, and better: check which item in the audit log settings you don’t need, but do cause extensive amount of logging.

Large SAP systems with multiple application servers

On large SAP systems with multiple application servers, the file handling can cause issues. If the system is setup using shared files and the names of the profile configuration per application server for the file name is identical, this will cause nasty issue. The issue is that the audit logging from several application servers will overwrite each other entries. This is hard to detect. Solutions: don’t use shared file, or change the profile parameter per application server to include the application server name into the audit log file name. To do this set the FN_AUDIT parameter to this value: SQL_++++++++.AUD. Upon runtime the +’s will be replaced with the application server name.

Be sure to read OSS note 2367475 – “Profile parameter FN_AUDIT contains an invalid pattern” in system log in this case as well.

See also point 25 in the audit log FAQ note 539404 – FAQ: Answers to questions about the Security Audit Log.

Audit logging integrity

Based on the settings in OSS note 2033317 – Integrity protection format for Security Audit Log, you can switch on the audit logging integrity. This way you can prove nobody tampered with the audit log. But this also means you cannot read the audit logfile on file level or by any third party tool. Please consider this carefully and read the note about other effects and prerequisites first before switching on.

Where used list and audit log statistics

On newer versions (or via notes below) there are 2 new programs available:

  1. RSAU_GET_STAT for statistical information
  2. RSAU_GET_WUSL for a where used list of security events

To get this function apply these OSS notes:

Audit log self check

To get this function apply the same notes as for the audit log statistics:

Then you can run program RSAU_SELF_CHECK_DIA.

Background OSS notes and blogs

Useful background OSS notes and blogs are:

Known bugs and bug fixing OSS notes

Bug fixing OSS notes:

Swiss knife for idocs: WLF_IDOC transaction

This blog is about the new and too much unknown new swiss knife for idocs: the WLF_IDOC transaction.

The blog will answer questions like:

  • What are the new features of the WLF_IDOC transaction?
  • Which transactions does WLF_IDOC replace?
  • Why should I start using the WLF_IDOC transaction?
  • How can I search in idoc content?

Idoc listing

The first function WLF_IDOC replaces are the idoc listing transactions WE02 and WE05.

Starting up WLF_IDOC will give you first screen to enter selections for idocs:

WLF_IDOC startup screen

This will give you the output screen with the list:

WLF_IDOC list output

So far nothing new.

The new part is the single idoc view:

WLF_IDOC detailed idoc screen

The idoc segments are shown on the left hand side and the idoc statuses top right.

The main new difference is when you select a segment on the left hand side, the right hand side bottom view will show you ALL the segments of that name in the idoc. This will give you a more complete overview of the idoc content. There is no need any more to scroll through the segments one by one: you see all in one shot.

Compare content of 2 idocs

If you are in the list screen of the idocs in WLF_IDOC, you can select two idocs and then use the idoc compare icon to compare the content of the selected idocs:

End result:

WLF_IDOC compare idocs result screen

This output screen now shows you the differences in the two selected idocs.

Idoc reprocessing

From the list overview you can start the idoc reprocessing for idocs with status 51. If you select and idoc and press the Process button:

you will be given following choices:

You can do online, background or jump to the classical BD87 idoc reprocessing transaction.

In the overview screen you can select multiple idocs as well for mass processing.

Change idoc status

If you have selected idocs in the overview screen you can use this button to change the idoc status:

You can use this for example to change status 51 (error in processing) to status 68 (error – no further processing) to avoid the idoc from ever being processed again.

Search in idoc content

In the selection screen of WLF_IDOC content there is a tab called criteria for data record.

idoc processing
WLF_IDOC search in idoc content

This tab can be used to filter idocs based on content of the idoc for a field fo the segment. You can select based on 1 filter (just leave the second one empty). Or you can use it to have and / or selection of the content of 2 segment data fields.

This can be used for example to fast select all the idocs for a certain material number inside the idocs.

Do keep in mind that the idocs are still filtered based on the data in the first tab (status, date, idoc type, etc.).

Alternative transaction for search is WE09.

Editing idoc content

To be able to edit idoc content, there are 2 ways:

  1. Classic BD87 and WE19 test tool approaches (BD87 can be used also in production, but WE19 should not be used in production): from WLF_IDOC you can go to BD87 by selecting an idoc and press Process (then select BD87 dialog), or go to WE19 by selecting an idoc and selecting menu option Utilities/Idoc Test Tool.
  2. Allowing some idoc fields to be edited directly

To allow some idoc fields to be edited, you first have to customize this. In SPRO go to the menu path Cross-Application Components, then select Idoc Monitor for Agency Business and Retail (yes, it is a strange place), finally select Idoc Maintenance Settings.

Now enter the message type and segment you will allow editing. And in the details specify the fields that should be editable. Example is given below:

Editing idoc content configuration

In the WLF_IDOC transaction, you can now select and idoc from the main screen and press the change button. In the details these fields have become editable (and only these fields):

Idoc editable fields in WLF_IDOC

Make the changes and save the idoc. Go back to the main screen in WLF_IDOC and you can reprocess the idoc via the Execute/reprocess idoc button.

You have to indicate the editing per message type/segment/field. It is not suitable for mass processing or test functions. This is really meant for a limited amount of fields in a productive system where business needs to correct idocs (most likely wrong reference numbers or dates).

Running in productive systems

This section requires intermediate SAP knowledge

When you run WLF_IDOC in a productive system (in SCC4 system is set to productive) some functions are restricted:

  • Change control record
  • Copy IDOC and delete segment
  • Change status

If you still want to use these functions, you must have proper authorizations. Next to that add parameter RWLFIDOC_NEW_EXPERT with value X in your user defaults (transaction code SU3).

If you are in WLF_IDOC, key in &expert into the transaction code area and you will be switching to Expert Mode where these functions are available.

Bug fixing OSS notes

Please apply following notes to fix bugs get up to date functionality:

More on idocs

See the blog on idoc tips & tricks.

SAP standard users

This blog post will explain the process for dealing with SAP standard users.

Questions that will be addressed:

  1. Why are there SAP standard users?
  2. Which users are there?
  3. How to check if the standard SAP users are dealt with properly to avoid security issues and how to solve them?
  4. How to detect if somebody is trying to logon with standard SAP user?
  5. How to deal with standard SAP user DDIC in client 000?
  6. How to deal with standard SAP user TMSADM

Why SAP standard users and which ones are there?

After initial installation of SAP there is only one way to login: is via the standard user SAP* with password PASS. After logon, create your own user and disable user SAP* by giving it a new password and lock it. SAP* can be there without profiles and roles. Also set parameter login/no_automatic_user_sapstar to 1 to avoid automatic re-creation of SAP*.

Also to set up the SAP ABAP system code the standard user DDIC is used. This user compiles the ABAP code.

For software deployments the initial setup must be done by user TMSADM (TMS = transport management system, ADM = admin).

For historical reasons also the EARLYWATCH and SAPCPIC user are still present.

How to check standard SAP user settings and how to solve issues?

SAP delivers standard program RSUSR003 to check for correct setting of these users ID’s and passwords. Transaction code for this program is also RSUSR003.

End result should look like:

If any item has a red or yellow color you should act: link to solution.

How to check if standard users are being unlocked?

You can use SAP Focused Run to have a custom metric to detect when a standard user is unlocked. You can configure an alert mail to be sent 5 minutes after the unlock happens. More information on this: read this blog.

How to detect if somebody is trying to hack a system by trying to log in using standard SAP users?

There are 2 main ways of finding if standard SAP users are being tested for system access:

  1. Somebody runs report RSUSR003 (whitebox method)
  2. Somebody tries to use the users and passwords from outside (blackbox method)
Detection of running RSUSR003

Two ways of detection of running RSUSR003:

SM21 system log will show similar entry:

In this log you can see the user of the program and by double clicking you can also retrieve the terminal ID from which the user ran the program.

More background in OSS note 2248319 – Program RSUSR003 reports “Security violation” in SM21 system log.

SM20 audit log can show similar entry (provided the start of report is configured properly):

Also here you can see the user who ran it and from which terminal.

The exact scope of program RSUSR003 is described in OSS note  2481566 – Functional scope of report RSUSR003.

Bug fix note: 3224200 – SUIM | RSUSR003 displays lock by unsuccessful logon.

Detection of black box standard SAP user testing

SM20 audit log can show similar entry (incorrect logon attempts configured properly):

User DDIC in client 000

In many blogs there is a lot of discussion on how to deal with DDIC in client 000. There is no one size fits all approach here.

SAP standard recommendation is:

“To make sure everything runs smoothly, give DDIC the authorizations for SAP_ALL during an installation or upgrade and then lock it afterwards. Only unlock it when necessary.”

This is fine for smaller systems on which little maintenance is ongoing. If more frequently support packs, upgrades and/or installations are happening this is more annoying.

The main issue is when a system is using third party solutions which are provided by external parties in transports. When DDIC is locked in client 000 and the foreign transport is imported, this import will not finish and continues forever until DDIC is unlocked.

That is why on systems with more maintenance, and less strict regimes (business without SoX and FDA, etc), DDIC will not be locked on client 000 and the password is known to basis team. DDIC should be locked in all the other clients.

DDIC unlock in main client is needed only when implementing a TCI based OSS note (see blog on OSS notes).

Background OSS note on DDIC: 1998382 – User DDIC for Transport Activities.

User TMSADM

User TMSADM needs to exist in client 000. It can be deleted in all the other clients (including the main data client). Background on SAP help.

Password change instructions for user TMSADM: 1568362 – TMSADM password change.

Cross client hacking

See this blog on how a hacker can jump from one client to the other.

Client 001 and 006 deletion

To reduce the attack surface, you can also delete clients 001 and 066. See this blog for more background information.

Standard users in the Early Watch

Standard users are also listed in the early watch. Sometimes with a little different logic. The explanation of standard users in the EWA is kept in OSS note 1610103 – EWA : Default Password of Standard Users – Detailed overview for T/S.