SAP interfacing: RFC

SAP has many different ways to interface. The RFC (Remote Function Call) protocol is one of the most wide used.

This blog will explain best practices around secure and correct setup of custom built ABAP RFC function modules.

Questions that will be answered are:

  • How to setup RFC enabled function module?
  • How to setup proper RFC error handling?
  • How to setup security in RFC enabled function module?
  • How strict is the S_RFC authorization handling?
  • Why is SAP_ALL not sufficient for RFC handling?

Creation of test RFC enabled function module

In SE37 you can setup an RFC enabled function module just like a normal function module. First create a function group. Activate that function group in SE80. Now you can create the function module. We will call our test module ZBAPIDEMO:

Important here in the first tab is to set the processing type to Remote-Enabled Module.

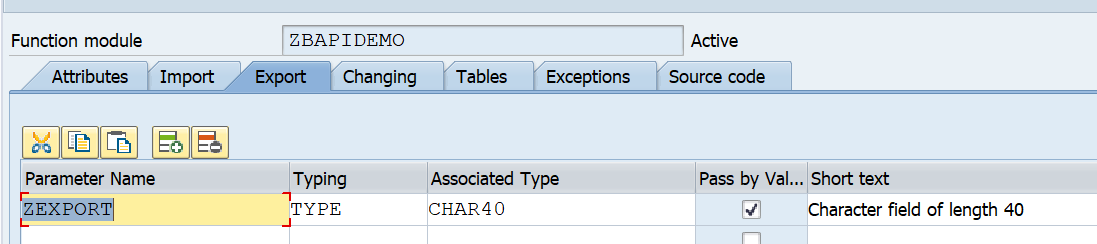
For testing we setup import and export tabs:

RFC export tab

Important here with RFC: set the Pass by value tickbox.

For tables use a suitable table type:

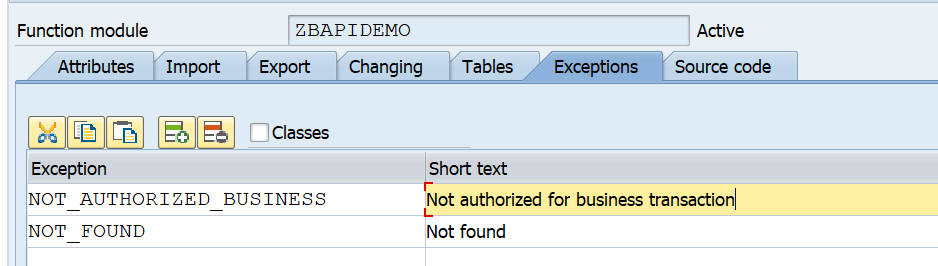
And setup the correct exceptions:

Here you can see 2 very important error messages that should always be implemented:

  1. An extra authorization check
  2. An error message when no data is found

Now we can implement the following simple source code:

   DATA: zls_coms_gen_textline TYPE coms_gen_textline.
 
   AUTHORITY-CHECK OBJECT 'S_CDMC'
   ID 'CDMC_AREA' FIELD 'A'
   ID 'CDMC_ROLE' FIELD 'U'.
   IF sy-subrc EQ 0.
 
     CASE zimport.
       WHEN 1.
         zexport = 'Hello world'.
       WHEN 2.
         zls_coms_gen_textline-entry = 'Hello world table 1'.
         APPEND zls_coms_gen_textline TO ztable.
         zls_coms_gen_textline-entry = 'Hello world table 2'.
         APPEND zls_coms_gen_textline TO ztable.
       WHEN OTHERS.
         RAISE not_found.
     ENDCASE.
 
   ELSE.
     RAISE not_authorized_business.
   ENDIF. 

What is important here in this source code:

  1. The authorization check is implemented and raises an error
  2. If no data is found the NOT_FOUND error is raised

With the SE37 test suite you can test diverse scenario’s now.

Calling RFC function module from another ABAP system

If you call this RFC function module form another ABAP sytem you have to make sure you have set and check the following exceptions:

  exceptions
      not_authorized_business = 1
      not_authorized          = 2
      system_failure          = 3
      communication_failure   = 4
      not_found               = 5
      OTHERS                  = 6.

There are 2 exceptions from the BAPI definition:

  1. NOT_FOUND (nothing found)
  2. NOT_AUTHORIZED_BUSINESS (our own implemented business authorization check)

4 exceptions should be implemented as part of the RFC framework:

  1. NOT_AUTHORIZED: this is the RFC authorization, which will be explained next chapter
  2. SYSTEM_FAILURE: the coding has caused a dump and the system returns and error message (see OSS note 2484377 – Error Message: “RFC Exception SYSTEM_FAILURE Raised; No More Memory Available to Extend an Internal Tab” Upon Executing a Data Extraction Run as an example)
  3. COMMUNICATION_FAILURE: the call to the other system fails. Most likely if you go to SM59 to the RFC destination and perform a connection test you will get a failure.
  4. OTHERS: something else went wrong

The developer should take proper care of these error situations.

Dear ABAP developers: the basis team member are also humans. They will make RFC configuration errors, they rely on the authorization team to assign the correct roles and they rely on infrastructure providers to make sure systems are up and running. Also the basis team will need to perform patching and upgrades to the system, which you as ABAP developer, are calling. So please don't blame the basis team for these exceptions, but please be a good developer and implement proper error handling. If you didn't implement proper error handling, and something went wrong on basis side, that caused your code to go wrong, think twice before putting blame on basis if your code is not handling the situation properly.

For reference: OSS note 1371131 – Correct error handling of RFC calls.

Security of RFC calls

Security of RFC calls is consisting of 2 layers:

  1. The RFC layer
  2. The business application code

You should always implement both layers!

The RFC layer is protected by authorization object S_RFC:

Here you can choose between a function group or even allowing per function module. Personally I would protect by function module. Background: create, change and display BAPI’s will normally be developed inside same function group.

There is a common misunderstanding that if you give SAP_ALL to a (background) user, this would solve the RFC authorization issues. This is not true. SAP_ALL does not contain the S_RFC rights. You have to hand them out separately.

Best practice 1: you might want to start with broad authorizations at the beginning of a development to rule out authorization issues. But you must definitely limit the rights before you make the development go productively live.

Best practice 2: as first statement inside each and every RFC function module, program a relevant business authorization check statement. This is an extra safety measure that is needed to protect important business data from authorization consultants that have handed out * authorizations in object S_RFC (* means all).

Best practice 3: check in transaction SM59 that the RFC callback protection is activated. Read this blog how a hacker can easily misuse if not properly setup.

Best practice 4: be careful on the RFC setup to avoid that hackers misuse the RFC jumping option. Read more in this blog.

More on checking the basis RFC security: read this blog.

Generic S_RFC check handling at basis level

The behavior of the S_RFC check is driven by the settings of RZ11 profile parameter auth/rfc_authorithy_check. Please make sure it has a setting of 6 or higher. Best is 9. A system with 5 or lower can be considered as insecure!

Background OSS note: 2216306 – S_RFC check and profile parameter auth/rfc_authority_check.

Setting up trusted RFC connections

Set up of trusted RFC connections are explained in this blog.

RFC performance

Check if you can use the RFC fast serialization option. This option is available for a lot of modern SAP systems. It is not activated by default. Read more on the fast serialization option in this blog.

Running SCI and ATC on standard SAP and add-ons

SCI and ATC are very powerful code scanning tools (see blog and blog). Unfortunately you cannot apply it to standard SAP and add-ons.

Analyzing standard SAP code is the responsibility of SAP, and they take good and secure code (since they provide good code, it is weird they don’t allow everybody to scan their code…). Unfortunately a lot of add-on providers do not.

The blog will explain how to scan code of standard SAP and mainly on add-ons.

Questions that will be answered are:

  • What is the background on not being able to scan standard SAP and add-on code?
  • Can I truly scan the code of a new OSS note 7 days?
  • How can I work around these restrictions and still scan the code of an add-on?

Background

The background of not being able to scan standard SAP code is explained in OSS note 1986391 – Using SLIN/SCI to check SAP standard objects. This note also explains you can scan OSS notes and transports for 7 days. After that time it is no longer possible. Unfortunately this rule also applies to add-ons.

Why run SCI on add-ons?

Why would you want to scan add-ons? Add-ons come with various quality levels. Ranging from very well written with much attention to performance and security. Some add-ons are full of performance issues and full of security leaks. Some are even allowing full dynamic read SELECT and UPDATE statement without any authorization check. This is heaven for a hacker!

The below method is meant for scanning these poor add-ons using the SCI tool for performance, robust coding and security.

ATC checks on non-SAP addons

First apply OSS note 2215288 – ABAP Test Cockpit: Analyzing Objects Using Arbitrary Prefix Namespaces.

For ATC checks, now run program SATC_AC_INIT_NAMESPACE_REG to add the namespace as registered for ATC.

See note 2439348 – SATC_AC_INIT_NAMESPACE_REG list is empty, if you get empty list.

See OSS notes: 2141202 – FAQ – ATC/CI: Analysing Objects with Custom Prefix Namespace ‘/MYSPACE/’ and 2313169 – ATC checks and ABAP Unit tests for objects in producer namespaces not possible

How to run SCI on SAP standard?

When you run the SCI tool on an add-on by selecting package or development object, you get the message that it does not contain any objects:

This is because your selection is first scanned for standard SAP and add-on objects. These are removed. So the result set is empty.

Goto transaction SE24 and select class CL_CI_OBJECTSET. Now select method BUILD_TADIRSET and display the code:

Put a break-point as statement if ENABLE_CI ne ‘X’.

Now start the SCI tool again. If the debugger stops at this statement, use debug and replace to change the content of ENABLE_CI to ‘X’. Now the skipping of SAP and add-on objects is not done. SCI will scan the code. It will still not use SLIN. But these are minor checks.

Bug fix OSS notes

Bug fix notes:

SWLT performance tuning worklist

This blog explains how to use the SWLT performance tuning worklist to find poorly performing Z code by combining SQL monitoring data from production and ATC results.

Questions that will be answered are:

  • How to setup the SWLT performance tuning worklist tool?
  • How to analyze the results from the SWLT performance tuning worklist tool?

Preparations

As preparation for the SWLT tool you must have run the SQL monitor in a productive system and created a snapshot of the data. This snapshot you can export and import in a development system (see note 2700312 – How to import SQL Monitor (SQLM) extracted data). In the development system you configure and run the ATC code check tool.

The SWLT performance tuning worklist tool will combine these results. As example we will use this poorly written Z code:

Running the SWLT tool

Start transaction SWLT:

You can reduce the scope by just taking the needed Z packages. Goto the tab Static Checks to select the appropriate result of the ATC run (for more on ATC read this blog):

Now select the SQL monitor tab to select your SQLM data snapshot you took from your productive system:

Now that all data is loaded, you can hit the execute button to start the SQL performance tuning worklist.

It might be you don't see the SQLM snapshot in SWLT. In that case create a new snapshot from SWLT directly.

The tool will now start to merge the results. In the example above you can see the following result:

In the total result select a line. On the bottom left you can see the SQL monitor results. Bottom right you can see the ATC check result. Clicking on the underlined program or SQL statement will bring you to the poorly performing ABAP code point.

Bug fix notes

3060630 – Runtime error RUNT_INTERNAL_ERROR while fetching SQLM data (e.g. via SWLT)

SQLM SQL monitor

This blog will explain about the SQLM tool to monitor expensive SQL statements in a productive environment.

Questions that will be answered are:

  • How to start and configure the SQLM tool?
  • How to analyze the results?

Configuration of SQLM tool

The SQLM tool does not require specific configuration or installation if you have a bit modern SAP system. To activate it start transaction SQLM and click on the Activate button for All Servers:

The trace is active now until the given time frame.

Example use of the SQLM transaction

First we start by writing a very bad performing Z program:

This program is really inefficient. After activation of the SQLM monitoring we run this program a few times.

Now we goto the SQLMD transaction (or from SQLM and then press display data button) to display the SQL monitoring results:

Selection can be done on total number of executions, execution time, amount of records. Result:

You see now the impact of our badly written program. Double click on the line will jump to the ABAP code point.

Creating snapshots

At the bottom of the SQLM start screen there are the buttons to create snapshots:

This results into the Snapshot screen:

You can create a snapshot here for later re-use. You can also download the snapshot to a different system by using these buttons: first export to file:

When you have the file, goto the target system and start SQLM and press create snapshot. Now use the option Create with Data Source File Import.

It is common practice to capture data in production by a basis administrator who exports it. Then the data download is handed over to an ABAP developer using the data as upload in SQLM database in the development system to improve poorly performing Z code. The developer can use the SWLT tool (see blog) to combine the SQLM data with the static code review data taken from the ATC tool (see blog).

Follow up use in SWLT

The SQLM data can be used as input in the SWLT tool: SQL performance worklist tool. This tool combines the SQLM data with the ATC tool results. Read more about SWLT in this blog.

Background information

More background information can be found in OSS note 1885926 – ABAP SQL monitor and 3242700 – ABAP SQL Monitor: Implementation Guide and Best Practices.

Useful blog (which is start of blog series on SQLM): link.

Impact on performance and memory is minimal. Description is fully documented in OSS note 3100598 – Memory Requirement and Performance Impact of the SQL Monitor.

OSS notes

Relevant OSS notes:

S4HANA blacklist

With S4HANA SAP has deprecated some parts of their old code. In some weird cases this old code might still be required.

This blog will explain on the S4HANA blacklist. Questions that will be answered are:

  • How do I see a dump is caused by the S4HANA blacklist?
  • Where to find more background information on the S4HANA blacklist?

The S4HANA blacklist dump

If for whatever reason the S4HANA system gives an ABAP dump with the error SYSTEM_ABAP_ACCESS_DENIED, this is a S4HANA blacklist dump. See note 2476734 – Runtime error SYSTEM_ABAP_ACCESS_DENIED. Or a reference to OSS note 2295840 – Outbound / Inbound calls from external to RFC FM are blocked when the FM is blacklisted and the UCON-Check is active.

Blacklisted RFC calls

When calling a blacklisted RFC from an external application you can get similar dump with reference to OSS note 2295840 – Outbound / Inbound calls from external to RFC FM are blocked when the FM is blacklisted and the UCON-Check is active. This note itself is old and refers to newer OSS note 2416705 – Outbound / Inbound calls from external to RFC FM are blocked when the FM is blacklisted using Blacklist Object. You can run program RS_RFC_BLACKLIST_COMPLETE to see which function modules are blacklisted:

2259818 – RFC enabled Function Modules with incompatible signature change compared to its version in ERP are blocked from external access.

What to do when you hit a blacklisted item?

The best approach is to avoid doing what you did and look for the functional alternative provided by SAP. Search for the correct simplification item OSS note. In almost all cases SAP provides a solution.

Activating a blacklisted item

OSS note 2249880 – Dump SYSTEM_ABAP_ACCESS_DENIED caused through Blacklist Monitor in SAP S/4HANA on premise, contains the procedure to activate a blacklisted item. For the RFC calls follow the instructions of OSS note 2408693 – Override blacklist of Remote Enabled Function Modules.

Please make sure you have both the clearance from SAP and the system owner in writing before executing this procedure. Support can be lost and system upgrade in the future can be facing severe blocks. Only execute as last resort after explicit approval.

Include usage data in S4HANA custom code migration FIORI app

With the new S4HANA custom code migration FIORI app you can include system usage data (from productive system) to see which code blocks are used and which ones are not.

This blog will give answers to the following questions:

  • How to collect usage data from productive system?
  • How to include the usage data in the S4HANA custom code migration FIORI app?

This blog assumes you have already setup the S4HANA custom code migration FIORI app. If you have not done this, follow the instructions in this blog.

Collecting usage data in production with transaction SUSG

General recommendations for the use of transaction SUSG can be found in OSS note 2701371 – Recommendations for aggregating usage data using transaction SUSG. SUSG assumes you have already activated the SCMON ABAP call monitor. If that is not done, read this blog.

In your productive system start transaction SUSG and activate the usage data aggregation:

If you don’t have sufficient authorizations, you might get this weird screen:

If you see this screen, first check your user authorizations.

SUSG performance impact

SUSG performance impact is negligible. SCMON might have an impact. See the blog on SCMON.

Background: 3100194 – Memory Requirement and Performance Impact of transaction SUSG.

SUSG installation

If SUSG does not start in your productive system it needs to be installed first. To install SUSG apply OSS note 2643357 – Installation of Transaction SUSG. This is a TCI based OSS note (see blog).

After the TCI note also apply these OSS notes:

Creating the snapshot

Now that the data collection and aggregation is activated, you will need to be patient. Let the system collect the data for the next few days. Now goto transaction SUSG and check the log that the aggregation went fine:

Now you can create a snapshot in the Manage Snapshots section:

Create the snapshot and download it to a file on your desktop or laptop. If wanted you can setup RFC connection as well.

The security and basis team normally does not like any RFC going from production system to non-production system. So the file option is normally the best way.

Loading the data into your upgraded S4HANA system

In your S4HANA system where your custom code analysis runs now start transaction SUSG and make sure it is active. Now you can upload the snapshot from the productive server you have downloaded in the previous step.

Please make sure that the OSS notes on both your productive system and your S4HANA system are identical. The notes have changes to file format of the download file. If the notes are notes identically applied, you will have file format upload issues. Recommendation is to apply all recent SUSG note to both your productive server and the S4HANA system.

S4HANA custom code migration app with usage data

Now you can finally launch the S4HANA custom code migration app. Create a new analysis. In the usage data part of the app, you can assign the snapshot you have uploaded in the previous section:

Now start the custom code analysis and let it run.

The end results of code being used or not can be seen in the column Usage Information in the Analyze Findings section:

Background information

More background on SUSG setup can be found on this blog.

Deletion of SUSG data

Deletion can be done after applying OSS note 3130631 – SUSG: Report to delete programs from usage data.

Activating and using the S4HANA custom code migration FIORI app

This blog will explain about the S4HANA custom code migration FIORI app. Questions that will be answered in this blog are:

  • How to set up the S4HANA custom code migration app?
  • How to run the S4HANA custom code migration app?
  • How do the results of the S4HANA custom code app look like?

Activation of the S4HANA custom code migration FIORI app

The custom code app official specification can be found on the FIORI reference library.

First make sure the basis setup of embedded FIORI in general are done on your S4HANA system. See this blog for background.

And make sure the ATC settings for S4HANA code migration are done. See this blog for background.

All the prerequisite notes for the tool itself are listed in OSS note 2436688 – Recommended SAP Notes for using S/4HANA custom code checks in ATC or Custom Code Migration app.

Next step: in transaction PFCG create a new role (for example Z_CUSTOM_CODE_APP). Add catalog SAP_BASIS_TCR_T as a launchpad catalog:

Save and activate the role. Assign the users to the role.

In transaction /IWFND/MAINT_SERVICE add the following services (and activate them):

Component External Technical Name
Custom code migration projects SYCM_APS_C_PROJECT_CDS
Analysis of SAP S/4HANA custom code check findings SYCM_APS_C_ATC_FIND_ALP_CDS
Custom code scoping by request entry points SYCM_APS_C_SCP_BY_EP_CDS

Custom code scoping by packages SYCM_APS_C_SCP_BY_PK_CDS

In transaction SICF activate the following nodes:

NW_APS_CCM_PRJ

NW_APS_EXT_LIB

NW_APS_LIB

The core activation actions are now done.

Start transaction /UI2/FLP to start the FIORI launchpad. You will not find the tile. Change the homepage and add the following tile from the catalog:

Before starting, make also sure that in ATC setup the RFC object providers are setup:

You can name the ID, description and group ID the same if you want. Make sure to use RFC destination none.

Creating a project in the app

Now you can start creating a project in the app. Click on the + symbol to add a project;

In the destination fill out the system you have put into the ATC object provider configuration. Than save the project and let it run. In the background the full ATC check is now carried out. This can take some time. You can refresh the project to see the status:

Scoping the results

In the scope block you can exclude packages by clicking on the Change scope button:

Packages that might be excluded:

  • Z packages from SAP
  • Z packages from 3rd party tools

Analyzing the results

When the run is done, you can now analyze the results on the Analysis tab:

A bit below on the Analysis tab is the burn down chart:

For the burn down chart you need to run the custom code run again on several days. Check for tool issues and solve them. Solving tool issues makes the amount of issues go up as you can see on the sample screen above.

Important here is that you have to press the Analyze Findings button to go into the detailed analysis overview:

On the top are the graphical overviews. In the bottom is the detailed list:

You can use the download to excel button for further processing.

During the custom code clean up you can redo the same project, by rerunning the analysis. Or you can decide to run a new project.

Link to Eclipse

For the link to Eclipse to work, each developer must allow this on his Eclipse settings. Follow the instructions in OSS note 2934945 – “Open in ABAP in Eclipse” in Custom Code Migration APP.

Including usage data from productive system

You can also add actual usage data from a productive system in the custom code management app. See this blog.

Known issues and bug fixes

For UI bugs check OSS notes:

Setting up S4HANA custom code adjustments

You have just upgraded to S4HANA in your sandbox or development system. SPAU and SPAU_ENH processing are done. Next step is the S4HANA custom code adjustments.

Questions that will be answered in this blog are:

  • How to import the SCI variants for S4HANA custom code adjustments?
  • How to import the latest simplification database into your system?
  • How to run the S4HANA custom code adjustments in ATC tool?
  • How to enable quick fixes in Eclipse?

Importing the SCI variants

Goto transaction SCI and select the option Utilities and then Import Check Variants. This action will import the required variants. Check that the variants are present now.

In case you don’t want to do the field length extensions checks, choose the variant with _NO_FLE at the end.

1909: 2925563 – Check variants for S/4HANA custom code checks without field length extensions.

2020: 2959341 – Check variant for SAP S/4HANA 2020 custom code checks.

2021: 3090106 – Check variant for SAP S/4HANA 2021 custom code checks.

Otherwise: in the SCI variant, you can leave everything as delivered out-of-the-box with the exception of the material length option. If you keep the material field business wise to 18 (which most customers do), you need to change the variable from 40 to 18.

You can apply the bug fix notes listed in 2436688 – Recommended SAP Notes for using S/4HANA custom code checks in ATC or Custom Code Migration app.

Setting up the simplification database

Follow the instructions of OSS note 2241080 – SAP S/4HANA: Content for checking customer specific code, to download the latest content for the simplification database.

Use transaction SYCM to upload the file. Select option Simplification Database and then Import from ZIP File.

Running the ATC tool

Now you can start to setup the ATC tool. For details see this blog.

The ATC variant to run should like like this:

Important here:

  • Select the desired S4HANA readiness check SCI variant
  • Set the package to Z* to select your custom code
  • Tick the box for Calculate quick fix proposals

Now you can start the ATC run:

Set the results to Active to see all the results in Eclipse as well. Pending on your system size lower the default number of processes from 10 to for example 5.

If you run into ATC tool issues for the S4HANA custom code adjustments run: first increase memory parameter rsdb/obj/buffersize in RZ11 to at least 150 MB. Then run again.

Processing the results

The ATC tool will now give a lot of results:

The results from the ATC tool can be distributed to more members by changing the Contact Person. To do this select one or more findings and right click on the Contact Person column, and select the option Change Contact Person.

The basic order of processing the results:

  1. Check simplification OSS note
  2. Fix code
  3. Apply relevant pragma (directly or in Eclipse via quick fix)
  4. Apply exemption

For the exemptions: you can raise them, but different person needs to approve them.

When you are using Eclipse, you might run into issue with exemption request. See OSS note 2815887 - ATC: No Possibility to Request Exemptions in Eclipse for the fix.

Statistics from the ATC runs

If you run the ATC tool weekly, you can use it to track the progress. In the ATC results screen there is a specific button Statistics View:

Default sorting is by type of issue to be solved:

This view can also be sorted on Contact Person. This will enable you to check the progress of each developer with his or her work list.

Using quick fixes with Eclipse

Using quick fixes with Eclipse is a fast way of going through the list. The Eclipse list is based on Contact Person and active results. So you only see in Eclipse the results for your user account.

In Eclipse first select the appropriate views:

Now you can start processing. You will get online help and you can apply the quick fix proposed automatically in stead of keying it in by hand.

You might run into an initial bug with a dump, which is solved by applying OSS note 2647710 - Simple transformation: Inconsistent ST loads. 

The quick fixes are updated with both bugs and new functions. Please check out the new versions of the following OSS notes:

Nice blog on the quick fixes: follow this link.

To enable ABAP backend for Eclipse: follow this link.

Using the S4HANA custom code migration app

You can also use the S4HANA custom code migration app. After completing the setup above and activating the S4HANA embedded FIORI (see this blog), you simply follow the steps in this blog for the setup.

ABAP clones

In the past copies of standard SAP might have been made. These are so called clones. You can use the clone finder tool to detect the clones. Consider to delete the clones completely. Most of the times the clone is no longer required. This will save you work on the code migration. How to run the clone finder tool can be read in this dedicated blog.

Use of unreleased standard SAP objects

Developers might have been using standard SAP objects, which formally have an unreleased status, and might no longer be supported by S4HANA. Read this blog to find out how you can scan your custom code for use of unreleased standard SAP objects.

Further background information

More information can be found:

SAT ABAP runtime analysis

The SAT ABAP runtime analysis tool can be used to identify performance problems in ABAP programs.

Questions that will be answered in this blog are:

  • How to run the SAT tool?
  • How to read the results of the SAT tool?

Starting the SAT tool

The SAT ABAP runtime analysis tool can be started with transaction SAT:

Top left there is a Tips & Tricks button. This will bring you the to the following tool:

Here you can compare the optimal and not optimal way of coding. By hitting measure runtime button you can actually compare in real time the difference between the 2 methods.

The performance issue program

To test the tool, we first write a simple test program:

REPORT zperftest2.

DATA: zlt_vbak TYPE TABLE OF vbak.
DATA: zls_vbak TYPE vbak.
DATA: zlt_vbap TYPE TABLE OF vbap.
DATA: zls_vbap TYPE vbap.
DATA: zls_vbap2 TYPE vbap.

SELECT * FROM vbak INTO TABLE zlt_vbak UP TO 100 ROWS.

LOOP AT zlt_vbak INTO zls_vbak.
  SELECT * FROM vbap INTO zls_vbap.
    DO 10000 TIMES.
      zls_vbap2 = zls_vbap.
    ENDDO.
  ENDSELECT.
ENDLOOP.

Now we start the SAT tool, enter the program name. Make sure the tick box evaluate immediately is on and press Execute.

Now the measurement will start.

Result of the trace tool

The result of the trace tool is as follows:

On the left side you see the split in where the program spends it time. Here you can see that most of the time is spend on internal processing and not on SQL statements. SQL statement can be analyzed from the SAT tool or from the ST05 SQL trace tool.

By double clicking on the the internal access the right hand side of the screen is filled. Here you can see in which code blocks the most net and gross time is spent. It does not always point you to the exact statements that are not ok, but it can point you to the program that is causing the biggest delay.

In our case the DO 10000 TIMES loop is the performance killer. With only SQL tracing this cannot be found.

Runtime analysis for web applications

For runtime analysis for web applications, read this dedicated blog.

Relevant OSS notes

Check and if needed you can apply these OSS notes to solve bugs in the SAT tool:

Analyzing code before upgrade or support package: CDMC toolset

This blog will explain on the use of the CDMC toolset you can run analyzing your custom code, before starting upgrade or support package.

CDMC toolset

Start transaction CNV_CDMC to goto the CDMC overview.

Goto ad hoc analysis:

CNV_CDMC start screen

Start SAP modification run

Determine SAP modifications run

Wait for run to finish. If done, click the Display Results.

Run ready

View results:

Run results

Setback of the modification overview: also OSS notes are marked as modifications.

Other useful runs: Syntax check and Inactive customer objects.

If you run these checks before an upgrade you can save quite some annoying issues during the upgrade itself.

OSS notes

Relevant OSS notes: