This blog is a continuation of the generic setup explained in the blog on this page.
Many SAP components running on Linux (Host Agent, Web Dispatcher, Message Server, and HANA) store their certificates in local PSE files instead of STRUST. To automate certificate enrollment and renewal, these components use two tools:
sapgenpse → creates PSE files and generates CSRs
sapslcscli → enrolls and renews certificates through SAP Secure Login Server (SLS)
This page describes the generic and simplified approach for automating certificate enrollment and renewal for:
SAP Host Agent
SAP Web Dispatcher
SAP Message Server / ICM (Linux)
SAP HANA pse
All of them use the same command‑line workflow.
Process:
1. Create the Registration PSE (ra.pse)
This PSE is used by the system to authenticate with Secure Login Server (SLS).
-g 365 = renew 365 days before expiry. (you can adjust it) Each SLS certificate profile has its own metadata URL. Renewal replaces the certificate in the PSE automatically
7. Automate with a Cron Job (Linux Scheduler)
To enable automation, configure a cron job that periodically executes the renewal command with the corresponding SLS certificate profile.
We use background job in SAP ABAP and Job Scheduler in SAP JAVA system. In case of non-ABAP non-JAVA systems we can use OS tool like Cron jobs to execute this script on daily basis.
Explanation of Each Placeholder:
Placeholder
Meaning
<PSE_PATH>
Directory where PSE files are stored (e.g., /usr/sap/<SID>/<INSTANCE>/sec)
<sapslcscli_path>
Directory containing the sapslcscli executable (e.g., /usr/sap/<SID>/<INSTANCE>/exe)
<SLS_Renewal_Profile_URL>
Metadata URL of the specific SLS certificate profile used for renewal
-g 30
Renews the certificate 30 days before expiry (you can adjust this)
Now all certificates can be renewed automatically using command line tool of SLS server and it will save manual efforts by enabling automation using SLS certificate life cycle management functionality.
This blog is a continuation of the generic setup explained in the blog on this page.
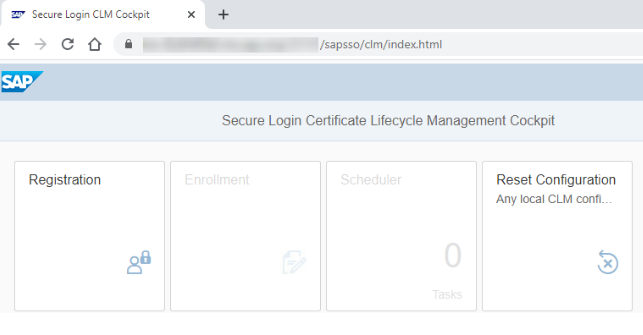
To enable certificate automation in an AS Java system, you must first deploy the Secure Login Library 3.0. (official help.sap.com link). The operating‑system‑independent package is delivered as an SCA file, which can be installed on AS Java through the telnet deployment tool.
Once deployed, the system automatically provides access to the CLM application, available at: https:/<host>:<port>/sapsso/clm
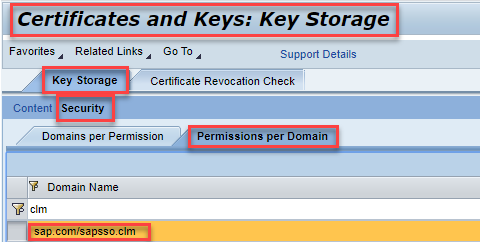
In the NWA, go to Configuration → Certificates and Keys. Under Key Storage, open Security → Permissions by Domain, search for the CLM application, and grant it full access to the keystore views that should be renewed automatically.
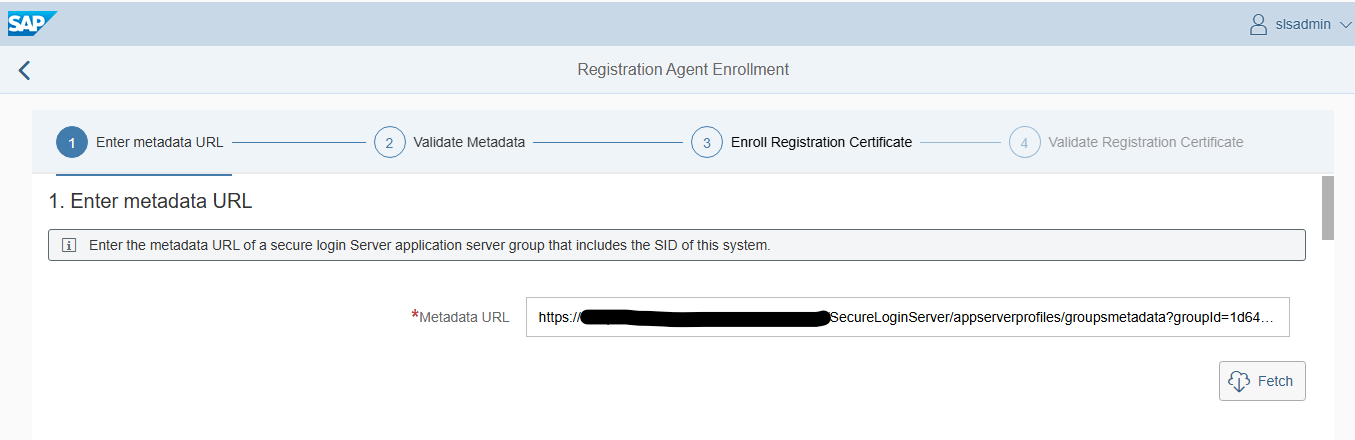
Open the CLM application in the browser. Start by registering the system (initial enrollment).
Enter the metadata URL and click Fetch.
When prompted, log in with a user allowed to perform CLM enrollment.
Click Register, then Save
To renew certificates, go to the Enrollment tile.
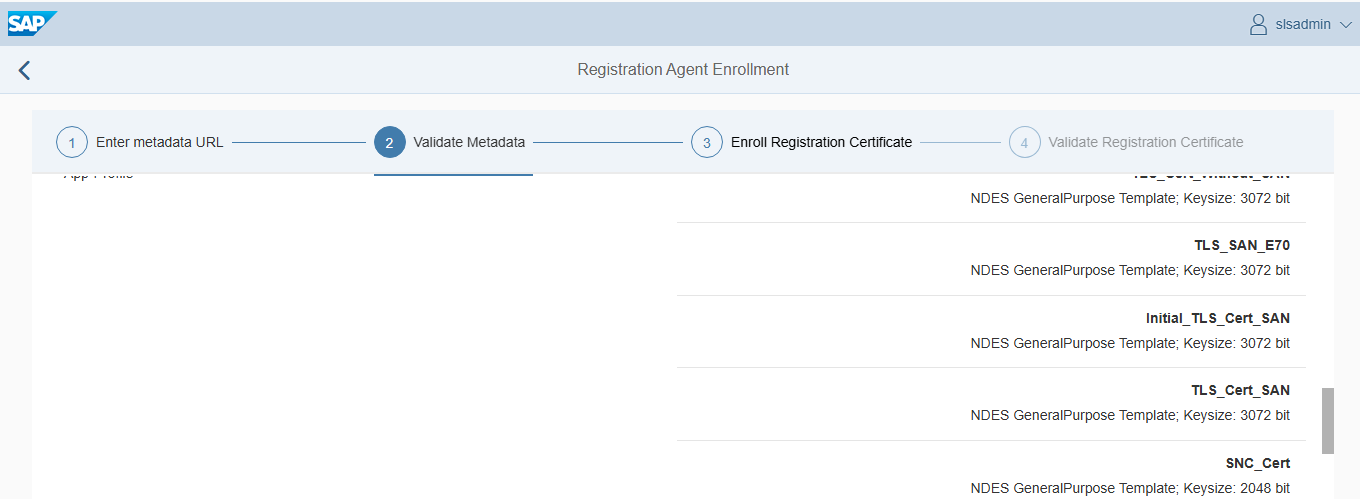
The metadata URL is already stored, so select the keystore view and the certificate you want to renew.
After choosing Enroll Certificates, the updated certificates appear.
You can review them using Show Details.
Finally, you may create a scheduled task so renewals run automatically.
The task executes under the currently logged‑in user.
Conclusion
After this configuration, the certificates in AS Java should be renewed regularly before reaching the end of their lifetime.
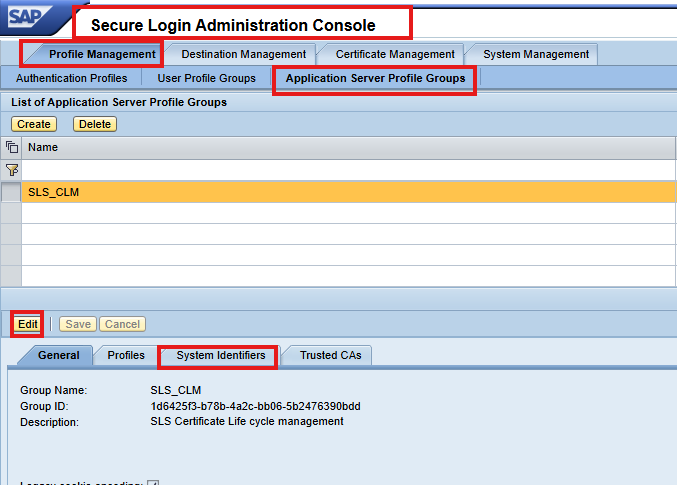
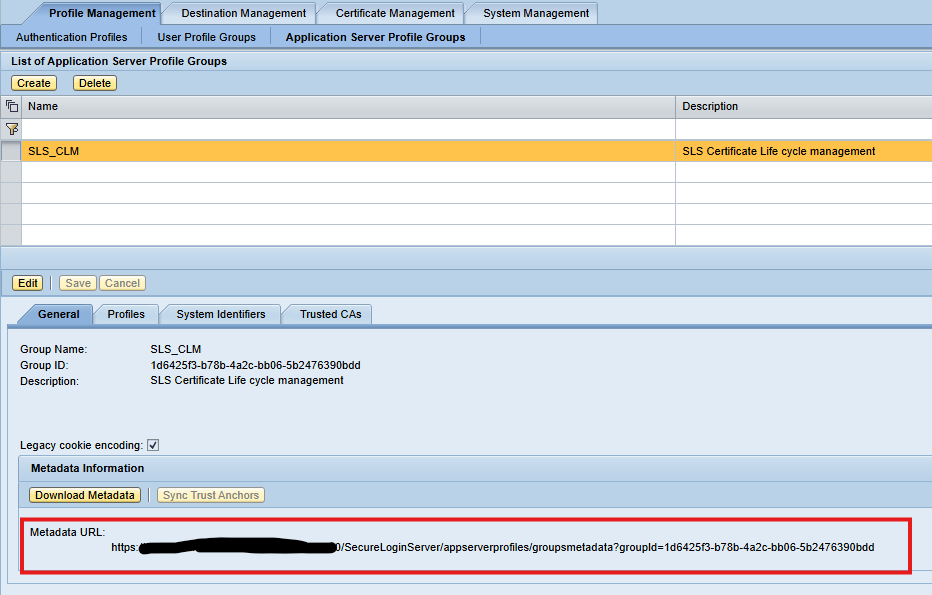
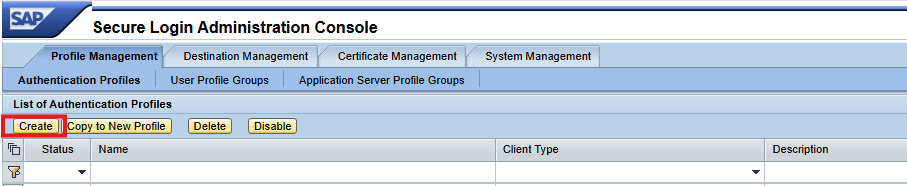
To organize certificate profiles and control which SAP systems participate in the automation process, you need to create an Application Server Profile Group in the Secure Login Administration Console (SLAC).
This blog is a continuation of the generic setup explained in the blog on this page.
In SLAC, navigate to: Application Server Profile Groups → Create New Group
Give the group a name that clearly identifies its purpose.
2. Assign System Identifiers
Under System Identifiers, add the SIDs of all SAP systems that will participate in certificate renewal. Important notes: SIDs can contain uppercase letters and digits.
3. Configuration on AS ABAP
Configuring ABAP for CLM automation involves running two key reports. Most recent NetWeaver releases already include them, but to ensure you are using the latest versions, SAP recommends implementing the corrections from SAP Note 2452425 – Collective Note – SAP SSO Certificate Lifecycle Management for ABAP.
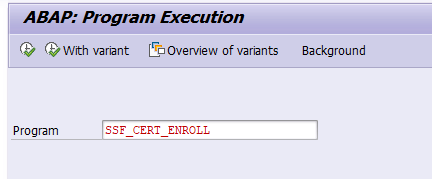
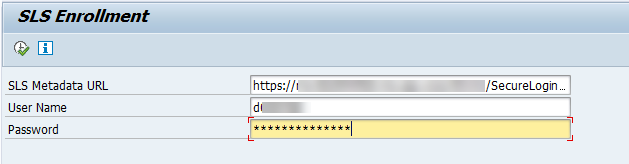
Run the SSF_CERT_ENROLL Report
This report performs the initial connection between the ABAP system and Secure Login Server (SLS).
Metadata URL of the Application Server Profile Group in SLS
Technical user with password authentication that is authorized to perform the enrollment
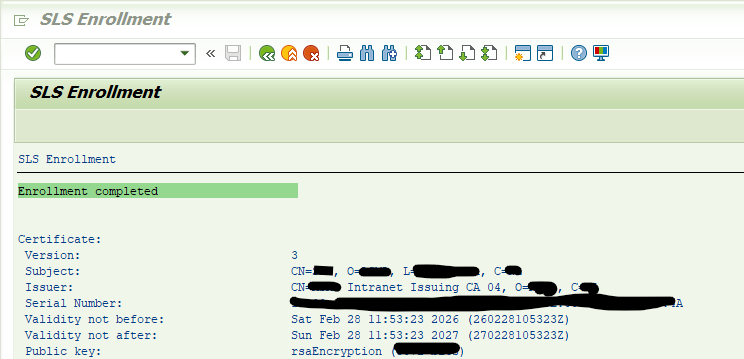
Running this report enrolls the system for the first time and retrieves the required certificate information.
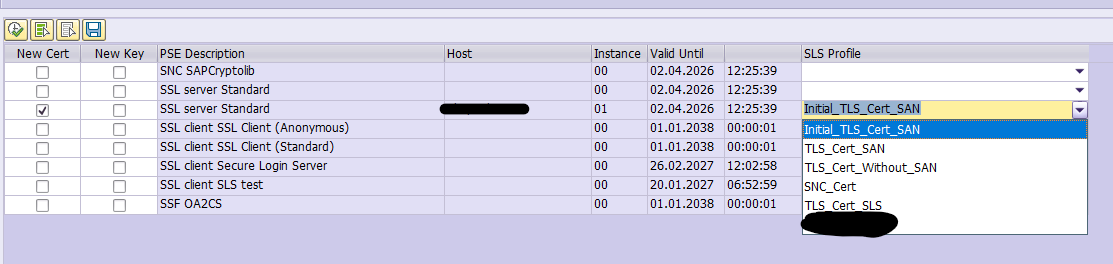
Once the enrollment report has been executed successfully, the system displays an overview of all certificate objects that are available for renewal. This screen also shows the certificate profiles assigned to the different PSEs.
You will see a list of certificate entries along with the available certificate profiles. For each entry:
Choose the appropriate certificate profile
Select the certificates you want to renew
This allows you to control exactly which PSEs should be processed.
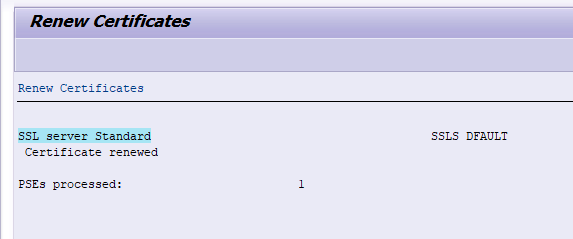
2. Execute the Renewal
After starting the renewal process, the system will update the selected certificates through the Secure Login Server. When the renewal completes successfully, you should receive a confirmation message for each certificate that was processed.
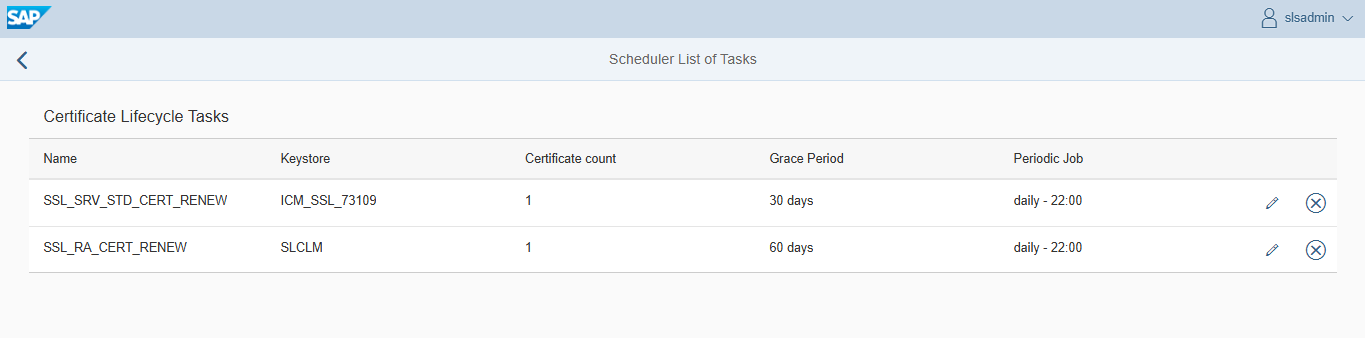
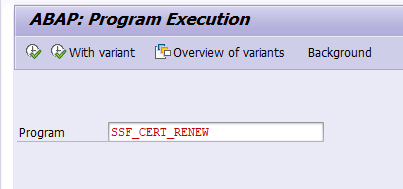
3. Schedule Automated Renewal
To avoid manual renewals in the future, you should save the selection in a variant and set up a scheduled job of program SSF_CERT_RENEW. You need a batch job per application server and per certificate type.
Conclusion
After this configuration, the certificates in AS ABAP should be renewed regularly before reaching the end of their lifetime.
Digital certificates play a critical role in securing SAP systems—whether for HTTPs communication, SSO, Cloud Connector integration, or internal system‑to‑system traffic. As organizations scale, manual certificate renewal becomes error‑prone and difficult to manage.
This guide explains how to automate the entire lifecycle of SAP certificate monitoring, renewal, deployment, and validation using standard tools available on any SAP system. The approach is applicable to SAP ABAP, Java, HANA, Web Dispatcher, Content Server and Host Agent environments.
This blog will explain the overview and generic setup. The follow up blogs will describe:
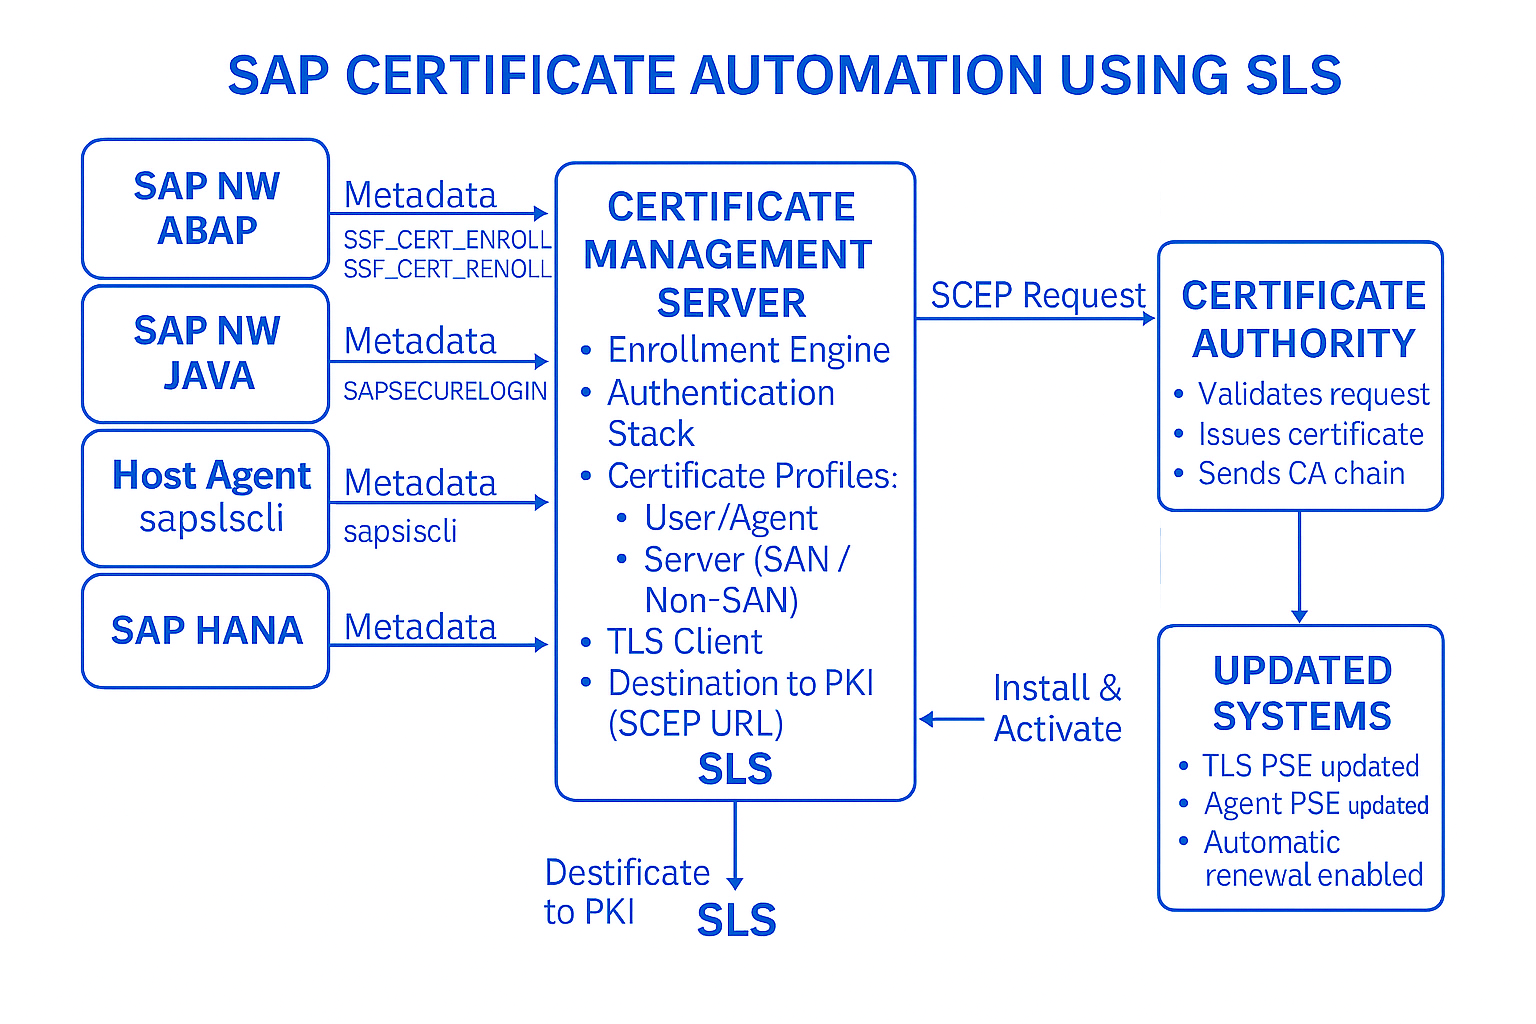
SAP Secure Login Server (SLS) is part of the SAP Single Sign-On product. This is a licensed product, for more information read OSS note 1876552 – License Requirement and Download of Single Sign-On 3.0 from the SAP Software Center. Within SSO, SLS serves as the central component for Certificate Lifecycle Management (CLM), enabling automated renewal of certificates used by:
AS ABAP systems
AS Java systems
SAP Web Dispatcher
SAP Host Agent
Other SAP components requiring HTTPS or SSL
For automation, SAP SLS communicates with a PKI infrastructure. A widely used option is Microsoft NDES, which supports enrollment using the SCEP (Simple Certificate Enrollment Protocol).
This blog describes the configuration in the Secure Login Server and how to connect an AS ABAP as well as an AS Java. Configuring a Remote CA.
This blog assumes that you are familiar with the general Certificate Lifecycle Management process. Before setting up Certificate Lifecycle Management (CLM) with Secure Login Server (SLS), make sure the following requirements are met:
1.1 Secure Login Server Installed You need a working installation of SAP Secure Login Server. SLS can run on any supported, modern SAP NetWeaver AS Java system. Read OSS note 3529951 – SAP Single Sign On 3.0 product compatibility for exact specifications.
1.2 Administrative Access You need a user who can access the Secure Login Administration Console (SLAC) to configure CLM settings.
1.3. Supported SAP Releases Your SAP systems must support the CLM client components:
A user with SLAC_CERT_ADMIN/SLCLM_ADMIN/SLAC_SUPERADMIN or equivalent permissions in the Secure Login Administration Console.
2. Configuration of Destination (Connecting SLS to the PKI / NDES Server
(This step must be completed before creating certificate profiles) Before defining any certificate profiles in Secure Login Server (SLS), you must configure a destination that allows SLS to communicate with your PKI infrastructure (typically Microsoft NDES). SLS uses this destination to forward CSR requests and to retrieve issued certificates, acting as a broker between SAP systems and the PKI server. This is a mandatory step because without a properly configured destination, SLS cannot reach the PKI, and no certificate enrollment or renewal will work.
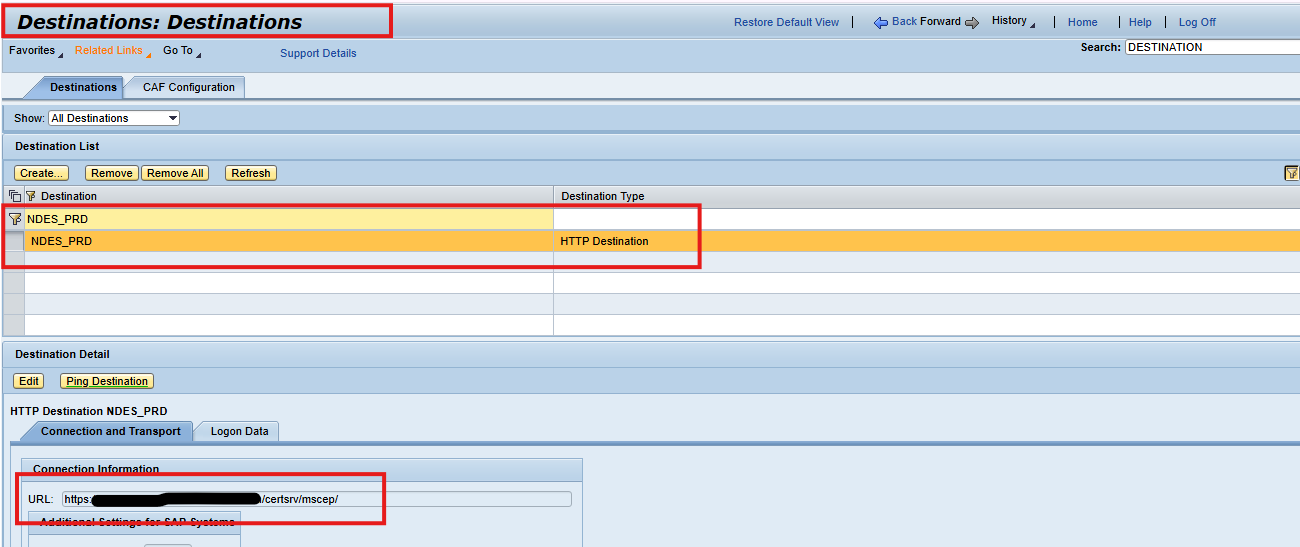
Open the Destinations Area in NWA In the SLS (AS Java) system:
Go to NetWeaver Administrator (NWA) Navigate to: Configuration → Infrastructure → Destinations
This area allows you to create HTTP/S destinations that SAP components use to reach external systems.
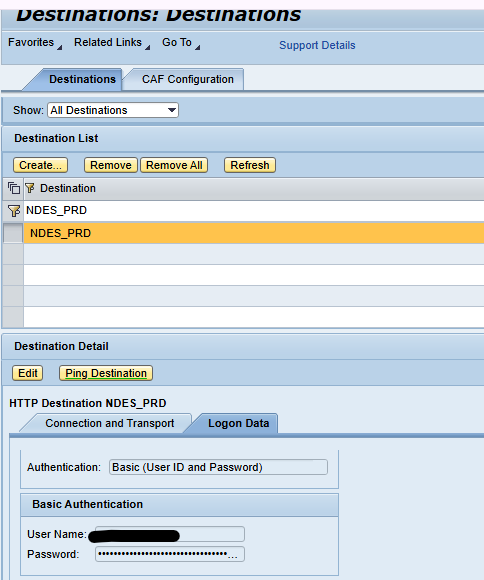
Create a New Destination Create a new destination dedicated to your PKI/NDES server. Recommended Naming Convention Use a name that reflects your PKI or environment (e.g.,): NDES_PROD NDES_QA PKI_SCEP
This improves clarity when assigning the destination later in SLS certificate profiles.
Configure Destination Type Set the destination type to: HTTP Destination, Since NDES SCEP endpoints are exposed over HTTPs, this ensures compatibility.
Enter the SCEP URL of the NDES Server In the Connection Information section, enter the full SCEP endpoint URL of your PKI/NDES server. For example (generic format): https://<ndes-hostname>/certsrv/mscep/
This URL points to the NDES SCEP service used for certificate enrollment.
(Optional) Configure Logon Data Depending on your PKI security configuration, you may need to configure:
Basic Authentication with a technical service account Certificates for mutual TLS. No authentication if internal trust is used. This must align with your PKI design.
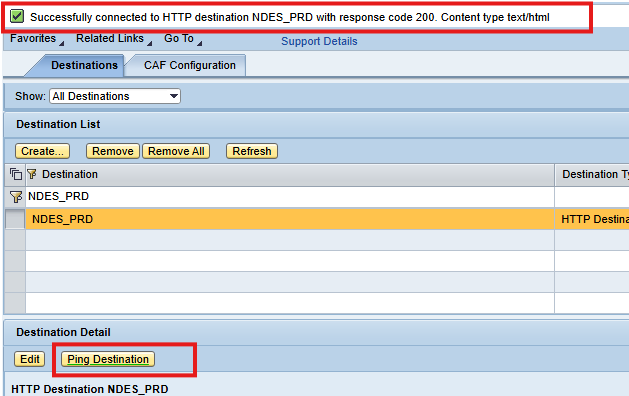
Test the Destination After configuring:
Click “Ping Destination” Ensure the HTTP/HTTPs connection is successful If the response is reachable, SLS can now communicate with NDES
Remark: even though HTTPs is configured, the success message still shows HTTP.
SLS relies on this destination for all CLM certificate operations.
Why this destination is critical This destination is used internally by SLS for:
Forwarding Certificate Signing Requests (CSR) to NDES Receiving signed certificates Validating enrollment responses Triggering certificate renewals Communicating over the SCEP protocol
Without this destination, all profiles (TLS, SNC, Client) and enrollment workflows will fail because SLS would have no path to the PKI infrastructure.
How It Fits Into the Overall CLM Workflow Once the destination is created: SAP System → SLS → (Destination) → NDES/PKI → CA → SLS → SAP System
3.1 Configuring Secure Login Server for CLM
Before you configure anything in the Secure Login Administration Console (SLAC), you must prepare SLS to accept certificate‑based authentication from SAP systems. This requires creating a dedicated logon stack.
The formal SAP help document link can be found here. The steps below describe the summary main steps with clarifying screen shots.
1. Create a Logon Stack in SLS
1.1 Create a Logon Stack in NWA
Begin by opening the NetWeaver Administrator (NWA) of the Secure Login Server and navigating to:
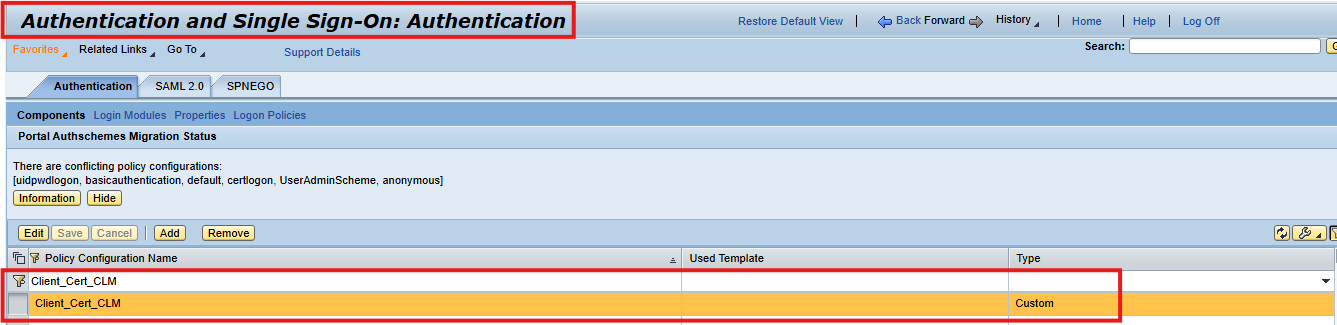
Configuration → Authentication and Single Sign‑On → Logon Stacks
Here you create a new logon stack. Choose a name that clearly indicates it is intended for CLM system authentication, such as Client_Cert_CLM
1.2 Steps to Create the Logon Stack
Open the NetWeaver Administrator (NWA) for SLS.
Navigate to: Configuration → Authentication and Single Sign‑On → Logon Stacks
Create a new logon stack with a name that clearly indicates it is intended for CLM client authentication (for example, CLM_ClientAuth).
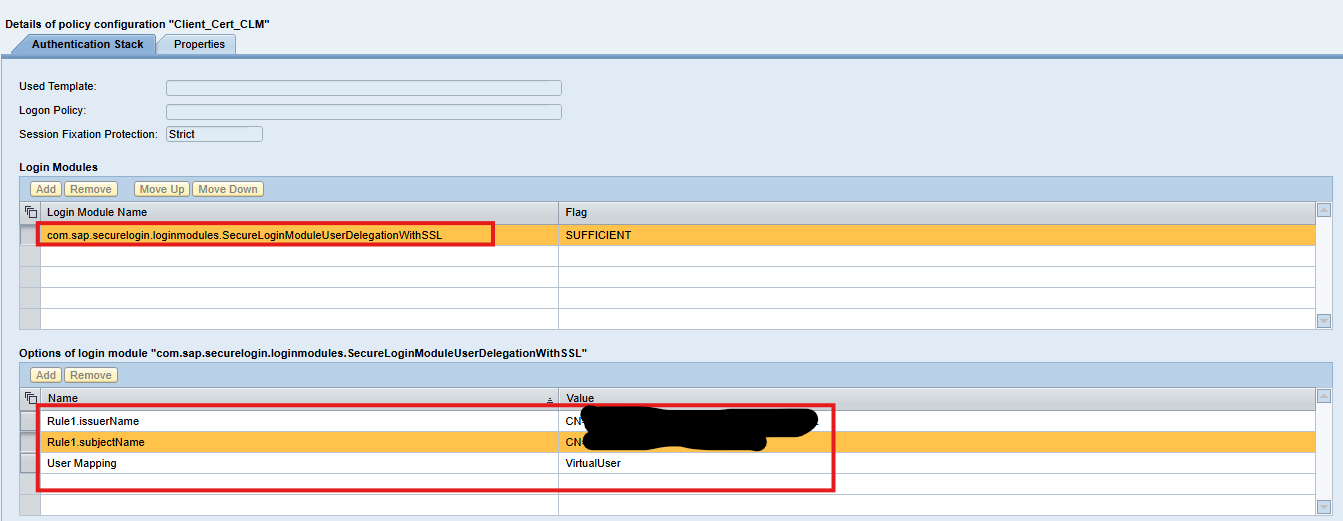
Add a single login module to this stack: SecureLoginModuleUserDelegationWithSSL
**Configure the Three Key Attributes** This module requires three important attributes that control how certificates are validated: 🔹 Rule1.subjectName
Used to filter acceptable certificate subjects using a regular expression. If you set it to the wildcard pattern: (.*)
it effectively accepts any subject. Even with the wildcard, the Common Name (CN) of the system certificate must still match one of the system entries you later configure in the Secure Login Administration Console (SLAC).
🔹 Rule1.issuerName
Controls which certificate issuers are allowed. Typically also set to: (.*)
This disables strict issuer filtering and allows any issuer that SLS already trusts through its root CA store.
🔹 UserMappingMode
Must be set to: VirtualUser
SAP systems do not exist as users in the UME. Therefore, SLS maps each system certificate to a virtual identity, and these identities are filtered and managed later in SLAC.
1.3. Purpose of the Logon Stack
This logon stack is used by every application profile in CLM. It ensures that SAP systems can authenticate securely when requesting new or renewed certificates. This logon stack forms the authentication foundation for all certificate lifecycle operations in SLS. Every CLM application profile will reference it. By configuring:
The SecureLoginModuleUserDelegationWithSSL module, The subjectName and issuerName rules, and Virtual user mapping
You ensure that: ✔ SAP systems authenticate themselves correctly via SSL client certificates ✔ Certificate enrollment and renewal requests are validated through the defined rules ✔ System‑to‑certificate mapping is handled through virtual identities (since systems do not exist in UME) ✔ CLM workflows function seamlessly from initial enrollment through automatic renewal ✔ Every SAP component—ABAP, Java, Web Dispatcher, Host Agent, HANA—can make use of this same logon stack This logon stack is therefore reused across all application profiles in CLM, ensuring consistency and secure handling of certificate requests throughout the entire SAP landscape.
1.4 Configuration of Certificate Profiles
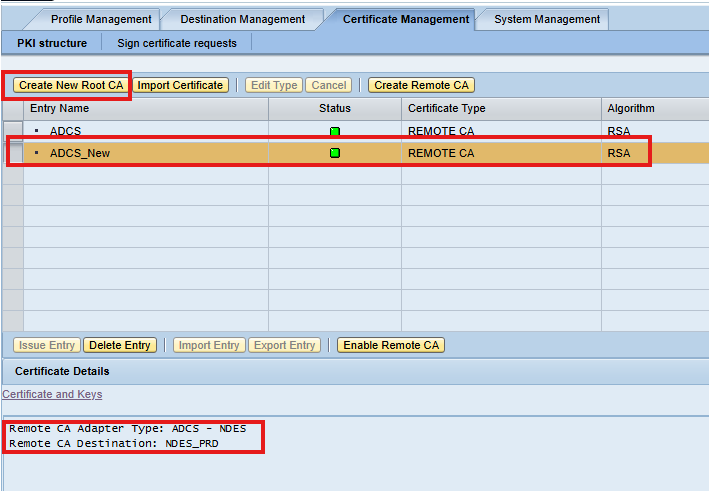
After preparing the logon stack, the next step in setting up Certificate Lifecycle Management (CLM) is to define the certificate profiles inside the Secure Login Server (SLS). These profiles describe what type of certificates SAP systems should request and how SLS should communicate with the backend CA/NDES to obtain them. Each certificate profile represents a specific certificate purpose (such as SNC or TLS) and includes the rules that control certificate enrollment, renewal, and template mapping.
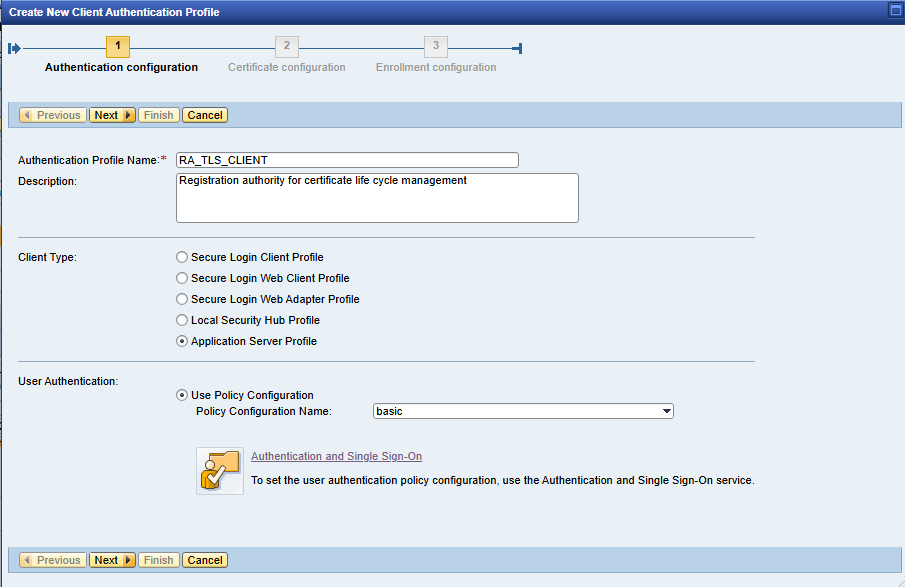
Registration Agent Profile (Used for Enrollment Requests) The first profile that must be created is the Registration Agent (RA) profile. This profile is responsible for handling initial certificate enrollment requests coming from SAP systems. It acts as the “front door” for: Receiving enrollment metadata from SAP components, forwarding Certificate Signing Requests (CSR) to NDES and Returning the signed certificate back to the SAP system. Every system type—ABAP, Java, HANA, Web Dispatcher, Host Agent—uses this RA profile during enrollment.
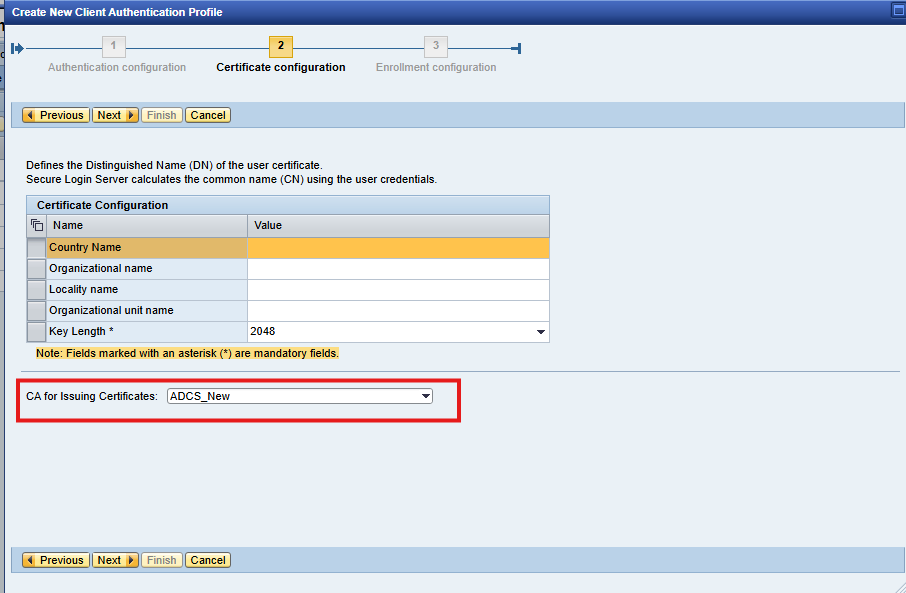
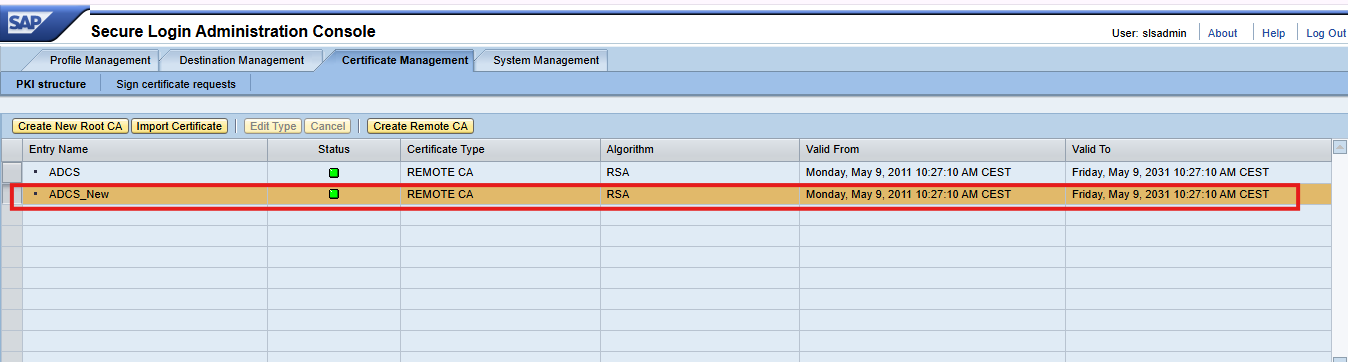
fill the required entry as per organization details. and CA for issuing certificates create PKI structure under certificate management
Create Certificate Profiles for Each Required Certificate Type
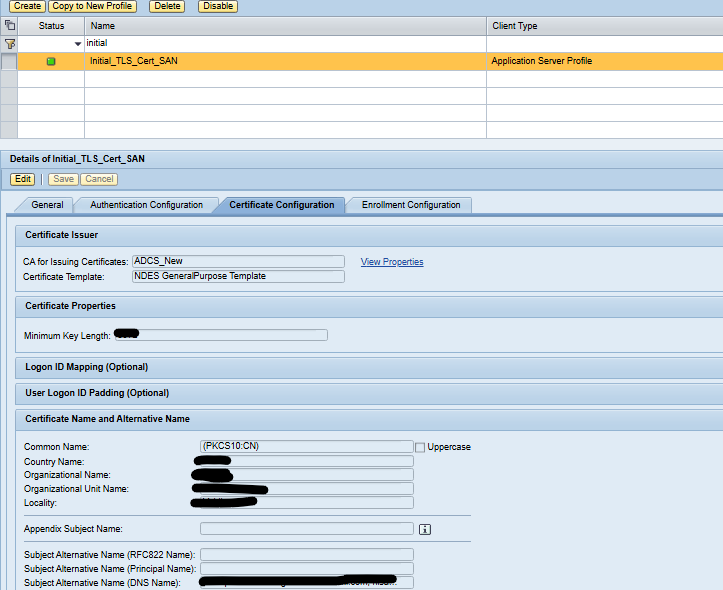
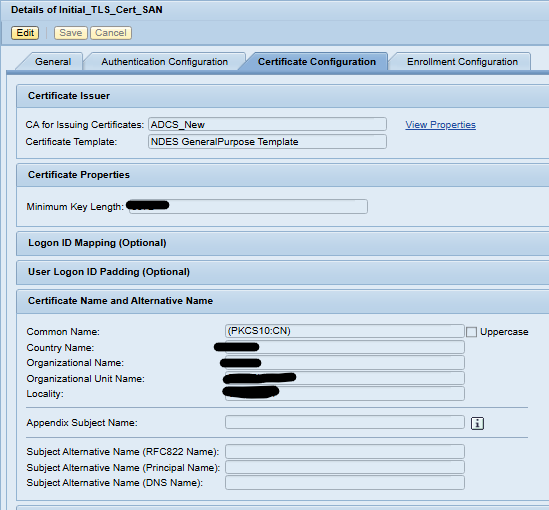
✔ Initial_TLS_Cert_SAN
Used for First‑Time SAN‑Based Enrollment & Renewal and This profile is required for the very first certificate issuance when: You are enrolling a system for the first time and want the initial certificate to follow SAN requirements (as enforced by modern PKI policies)
✔ SNC Certificate Profile
Used for systems that use Secure Network Communication (SNC) with X.509 certificates.
✔ TLS Server Certificate Profile
Disclaimer: This page covers only the architecture and configuration required for SAP certificate automation. For the full enrollment and renewal procedure, please refer to 👉 “SAP Certificate Enrollment & Renewal Automation Process” page dedicated to the operational workflow.
SAP support will need to access your systems via the remote support connection to give support to solve bugs, execute remote analysis, etc. If you want to force this connection to SNC, follow the instructions from OSS note 2562127 – R/3 Support with SNC/SSO.
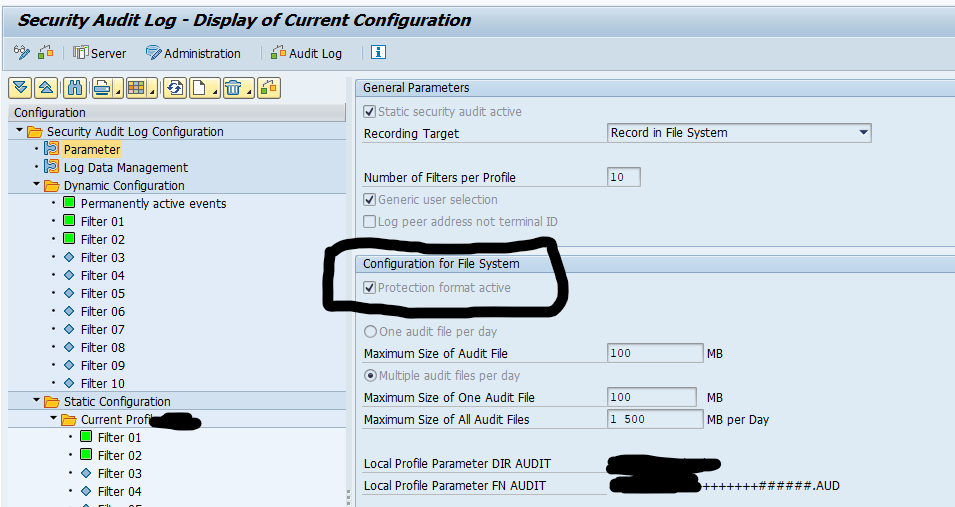
Step 1. In RZ11 set parameter rsau/integrity to 1.
Step 2. In transaction RSAU_CONFIG set the Protection format active tick box in the Parameter section:
Step 3. In transaction RSAU_ADMIN and create the HMAC key:
Step 4. Save this HMAC key properly including the passphrase!
Checking and validation steps
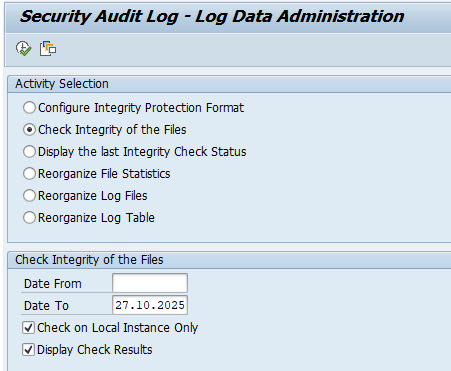
To validate if the audit log files integrity is ok (no tampering has been done), start transaction RSAU_ADMIN and select the option: Check Integrity of the Files:
Now run and see the results.
You can also run program RSAU_FILE_ADMIN in batch mode (for example every weekend), so that the integrity checking is done on regular basis. In that case, you can use the faster option to Display the Last Integrity Check Status.
In a high secure environment data access to SE16 and SM30 needs to be restricted. In many cases either IT or business still needs to maintain data via SM30 mechanism or some support people still need to see certain table data.
This blog will explain a more dedicated approach to create a dedicated transaction for each table. The generic SM30 and SE16 access can be revoked and replaced with targeted authorizations for the specific table and transaction.
Setup transaction to call SM30 for single table
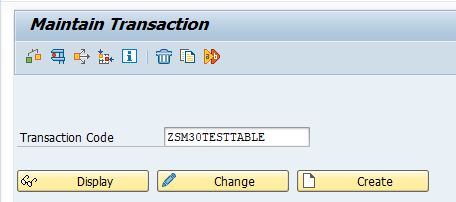
Start transaction SE93 and enter the transaction you want to created and push the Create button:
On the next screen provide a description and choose the option Transaction with Parameters:
Now fill out the transaction detail:
The text is free of choice. In the transaction put SM30 (we will create a parameterized version) and select to skip initial screen. You can inherit the GUI attributes. In the default values put VIEWNAME and in the value the table you want to update. Add the second value for UPDATE with value X.
Save your work and test the transaction.
By entering the transaction code you now jump to the maintenance of the table (in our case the ZTESTTABLE as specified).
Setup transaction to call SE16 for single table
For SE16 repeat the above steps:
The text is free of choice. In the transaction put SE16 (we will create a parameterized version) and select to skip initial screen. You can inherit the GUI attributes. In the default values put DATABROWSE-TABLENAME and in the value the table you want to update.
Authorization team work
The authorization team can now remove SM30, SE16 and generic table access. Only table maintenance for this specific table is required along with access the newly created Z transaction.
ST01 and STAUTHTRACE transactions can be used for short term in-depth authorization traces. The problem is that these traces are very detailed and generate a lot of data.
For some use cases, you need to know what authorizations are needed for a user for longer period of time. Example: you have some background users with too many authorizations and your are tasked to reduce this. Then you want to enable a long term trace that records which authorizations are used by this user ID. You are not interested in how many times and when, but just need a complete list over a very long time (for example 2 months). Another example is when you are tasked to S_TABU_NAM full * authorization with actual table names. How to find out which tables are actually needed?
This is the goal of the STUSERTRACE: long term recording of authorization checks called including detailed table level.
STUSERTRACE enabling settings
The activation is described in OSS note 2220030 – STUSERTRACE: User trace for authorization checks. The first step is to switch parameter auth/auth_user_trace to value F. There is an option to set to Y for full, but don’t do this since then you might run into performance issues. F is the value where filtering happens.
As explained in OSS note 2220030 there is a minor performance impact. To limit the impact, use filtering.
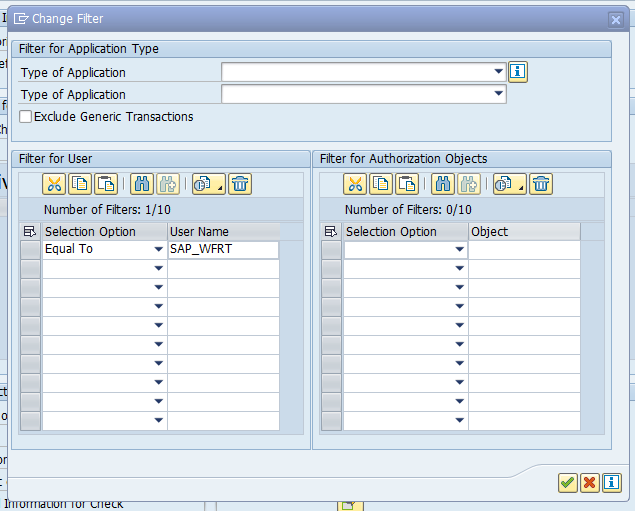
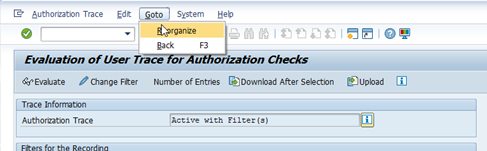
Now start transaction STUSERTRACE to set the filters: