SAP favorites

Any user can add favorite transactions to his personal menu. This can be done in the SAP menu by right clicking on the menu and select the option add to favorites.

Sharing favorites

A user can share favorites by downloading them and sending the file to another user to upload. Upload or download to PC: go to menu Favorites and select Download to PC or Upload from PC. Reference OSS note 456728 – Easy Access: download/upload of favorites.

Technical parts of favorites

The tables for favorites are explained in OSS note 2169093 – User favorites are missing:

  • SMEN_BUFFC – Table for Storing Favorites
  • SMENFAVDAT – Date of Last Change to Favorites
  • SMEN_BUFFI – Links for Favorites

Currently there is no know mass download/upload program for user favorites. Custom program can be written using function modules MENU_FAVORITES_DOWNLOAD and MENU_FAVORITES_UPLOAD.

Favorites across versions

When upgrading to a newer SAP version, transactions get updated as well. Example in SAP ECC transaction XK01 is used for creating vendors. In S4HANA this is replace with transaction BP.

SAP table PRGN_CORR2 contains these translations:

Background OSS note: 3454002 – List of obsolete transaction codes and authorization objects.

With an upgrade the user favorites are not updated automatically.

Enable SNC settings for SAP Cloud Connector

Secure Network Communication (SNC) is a key requirement in enterprise landscapes where SAP BTP interacts with ABAP systems via SAP Cloud Connector (SCC). Enabling SNC ensures encrypted RFC communication, mutual authentication, and end‑to‑end protection of sensitive data.

This blog provides a generic, implementation‑ready guide for enabling SNC between SAP Cloud Connector and SAP ABAP systems.
It combines the official SAP documentation with hands‑on technical steps commonly followed in real projects.

Background OSS note: 3536285 – SAP Cloud Connector – How to set up general SNC settings for SAP Cloud Connector.

Why Enable SNC?

SNC provides:

  • ✅ Encryption of RFC traffic
  • ✅ Strong authentication between Cloud Connector and ABAP systems
  • ✅ Integrity protection
  • ✅ Compliance with corporate security policies
  • ✅ Reduced risk of man‑in‑the‑middle attacks

SNC is increasingly mandatory in SAP landscapes, especially when integrating BTP services with ERP systems.

High-Level Steps

Below is the complete workflow followed during SNC enablement.

1. Create SEC Directory and Deploy Required SAP Cryptographic Files

On the SAP Cloud Connector host:

  1. Create a secure SECUDIR directory(/usr/sap/sec/)
  2. Download and extract the SAP Cryptographic Library from the Download Center (search for sapcryptolib).
  3. Make sure the Cloud Connector process is running.
  4. Place the required SAP CommonCryptoLib files inside(/usr/sap/sec/):
    • libsapcrypto.so (Linux)
    • sapgenpse tool

This directory holds the Personal Security Environment (PSE) used by SNC.

2. Configure Environment Variables

Set the following environment variables:
SECUDIR=<path to sec directory>
SNC_LIB=<path to SAP crypto library>
setenv SNC_NAME=<p:CN..>

Restart the Cloud Connector service after updating.

3. Generate SNC PSE in Cloud Connector

Using sapgenpse, generate a PSE & Sign the Certificate through Your Internal Certificate Authority.

This converts the self‑signed PSE into a fully trusted SNC PSE.

Please read the blog on Certificate Automation for Linux based: https://www.saptechnicalguru.com/automating-sap-certificate-management-using-sls/ for the detailed instructions.
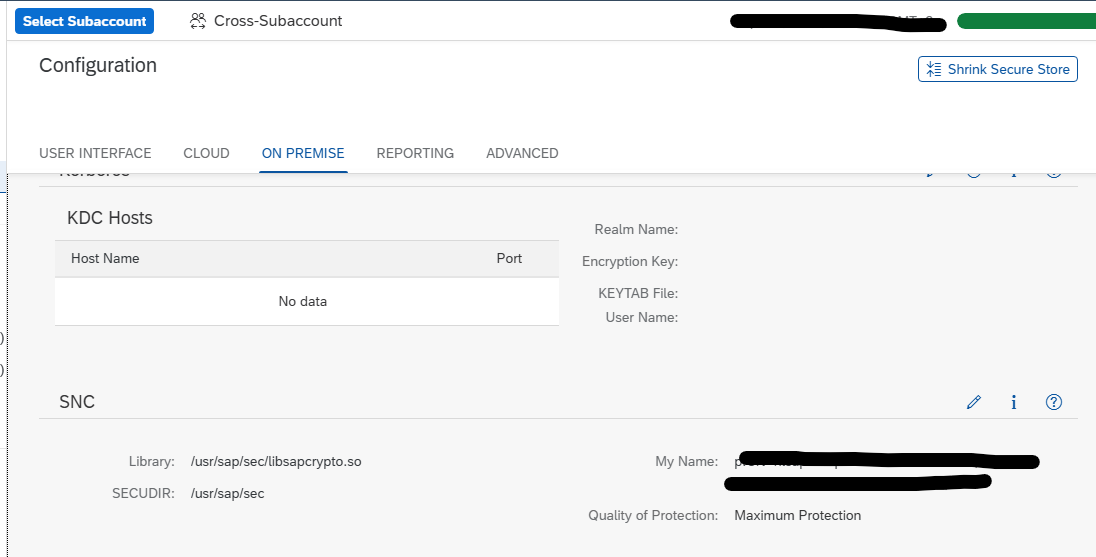
4. Validate SNC Configuration in Cloud Connector

In the SCC Admin UI:

Configuration → On-Premise → SSL/SNC

Verify:

  • SNC is enabled
  • SNC name (p:CN=…) is visible
  • PSE is correctly detected
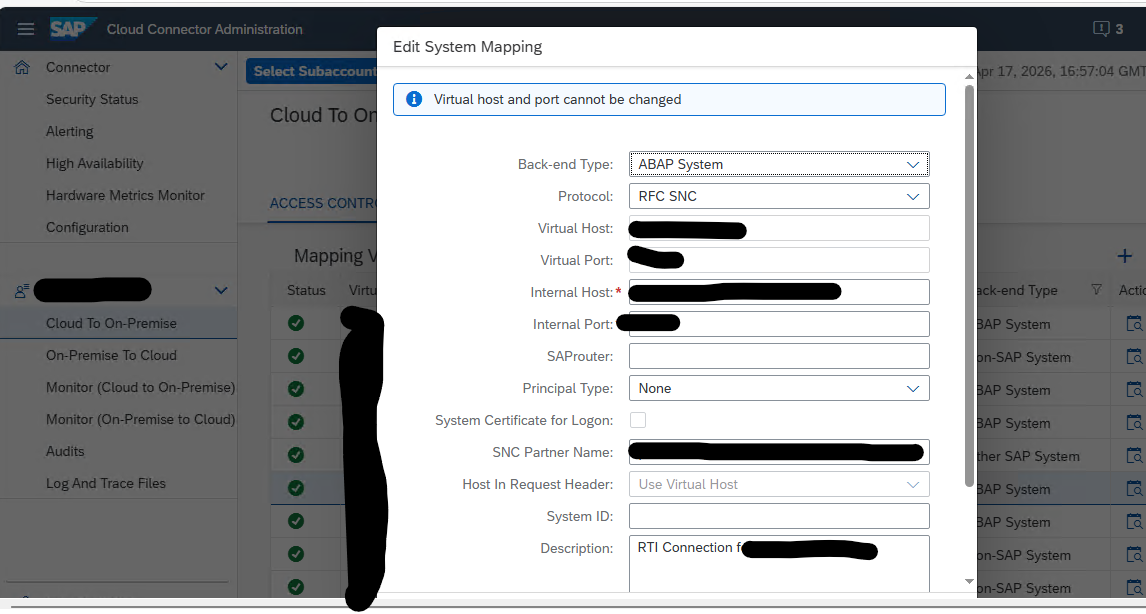
5. Enable SNC in BTP Subaccount (On‑Prem → Cloud Direction)

In SAP BTP Cockpit:

Connectivity → Cloud Connectors → ABAP Systems

For each RFC connection:

  • Enable “Use SNC”
  • Maintain SNC partner name of the ABAP system
  • Upload the ABAP system’s SNC certificate if required

6. Configure SNC in the ABAP System (Transaction SNC0)

In the on‑premise ABAP system:

  • Maintain SNC names
  • Import Cloud Connector certificate into the ABAP Trust Manager
  • Ensure profile parameters such as snc/enable and snc/identity/as are set

Restart the cloud connection if profile parameters are updated.
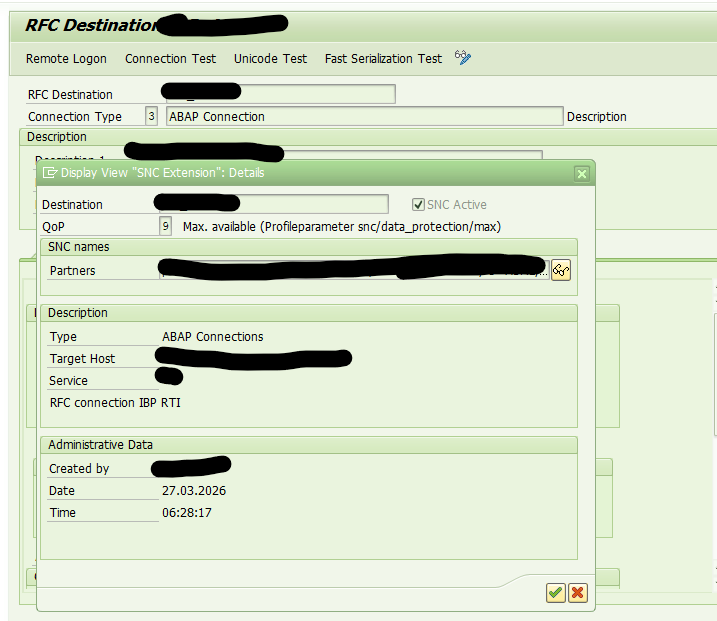

7. Enable SNC in RFC Destinations (SM59)

For each RFC destination:

  • Activate SNC
  • Maintain the partner SNC name
  • Set Quality of Protection (e.g., 3 – integrity + encryption)

Test the RFC connection to verify SNC handshake.


8. Enable SNC in BTP (Cloud → On‑Prem Direction)

For outbound connections from BTP:

  • Enable SNC
  • Configure the SNC partner name (ABAP system)
  • Set QOP (quality of protection)

Test communication via integration flows or services.


9. Functional Validation by Application Teams

Functional teams should validate:

  • All RFC-based interfaces
  • Connectivity from BTP services (e.g., IBP, CPI)
  • Replications and data transfers

All connections should show SNC encryption enabled.

TLS v1.3 setup

Transport Layer Security is used for web traffic. TLS v1.3 is a modern way of implementing this. It is safer and faster than the older TLS v1.2.

AspectTLS 1.2TLS 1.3
Year standardized20082018
Handshake latency2 round trips (typically)1 round trip (or 0‑RTT)
Cryptographic algorithmsMany (incl. weak/legacy)Only modern, secure algorithms
Forward secrecyOptionalMandatory
Security postureFlexible but complexSimpler, safer by design
CompatibilityVery wideRequires modern stacks
The problem with TLSv1.3 is that old infrastructure and applications still do not support it properly. Please be careful with testing when activating.

General SAP background notes:

TLS v1.3 for ABAP

Background OSS notes:

Do look at the regressions listed in OSS note 3318423 – Is TLS 1.3 Supported by SAP Kernel for ABAP and SAP S/4HANA? – SAP for Me. Most of them are fixed by applying latest kernel and/or crypto library update.

OSS note 3346659 – TLS Ciphersuite String Configuration for SAP AS ABAP Systems and for SAP Kernel Software Components contains section to enable TLS v1.3 next to TLS v1.2. This might be a good intermediate implementation step.

For some reasons there might be issues with custom code using HTTP_GET, HTTP_POST or similar. See OSS note 2582368 – SapSSL update for client-side sending of TLS extension SNI by saphttp, sapkprotp, sldreg. Workaround according to this note is to use HTTP2_GET and HTTP2_POST from function group SCMS instead.

TLS v1.3 for HANA

Background OSS notes:

TLS v1.3 for other SAP products

TLS v1.3 support for other SAP products (list is not extensive, search on me.sap.com if your product is not yet in the list):

Data archiving: Idocs

This blog will explain how to archive idocs via object IDOC. Generic technical setup must have been executed already, and is explained in this blog.

Object IDOC

Go to transaction SARA and select object IDOC.

Dependency schedule:

Main tables that are archived:

  • EDIDC (idoc control record)
  • EDIDS (idoc status record)
  • EDID4 (idoc content)

Technical programs and OSS notes

Write program: RSEXARCA

Delete program: RSEXARCD

Read program: RSEXARCR

Reload program: RSEXARCL

Relevant OSS notes:

Application specific customizing

In transaction WE47 the idoc status must be set to archive-able:

Executing the write run and delete run

In transaction SARA, IDOC select the write run:

Select your data, save the variant and start the archiving write run.

Give the archive session a good name that describes idoc type and year. This is needed for data retrieval later on.

After the write run is done, check the logs. IDOC archiving has average speed, and high percentage of archiving (up to 100%). Mostly errors are not archived due to status (transaction WE47).

Deletion run is standard by selecting the archive file and starting the deletion run.

Data retrieval

Data retrieval is via program RSEXARCR is extremely poor. Setup archive infostructure SAP_IDOC_001, and use transaction SARI (with IDOC and SAP_IDOC_001) to search and retrieve the idocs:

Or use WE09 transaction and include the selection for Archive:

Support maintenance overview on me.sap.com

On me.sap.com there is a support maintenance overview page. You can reach this page via this direct URL: Reporting – SAP for Me. A full explanation of all functions can be found on this blog. The below is the quick manual.

Support maintenance overview

When you start the page you get the total overview:

By clicking on a segment, you can zoom in:

By clicking on the system number you can go to the system administration details:

This can be used to update wrong old information, or to delete systems which have been decommissioned, but are still present in the SAP administration.

Navigation options

You can navigate from the System to the products and addons. Do this by selecting the system in the left part:

Another option is to start with the leading product or addon to see on the left side, which systems have this component installed: