EHP switches can deliver great new functionality. But not all of them are for free. This blog will explain, how you will know which ones are included in the standard license, and which ones not.
Attached to this OSS note is the most recent version of the PDF listing which switches are part of the standard license, and which switches require an extra license.
How to read the document?
The document is sorted per business area. Best way is simply use the find button in the PDF and search for your switch.
Example of 2 switches that don’t have license impact:
The pricing comment and License (material number) column are empty. These switches are part of standard license.
Example of switch with license impact:
For this switch your company should be in possession, or acquire the license mentioned in the last column.
EHP switches best practices
Since EHP switch can have license impact the following best practices is suggested:
Restrict SFW5 EHP switch activation access to basis team only (display for all is ok)
Explain basis team the fundamentals of the licenses and EHP switches
Determine in your company who must approve EHP switch on and make clear to basis team only to execute the activation after this approval
If you have switched on a switch with licenses and don’t want to use it, check if it is a reversible switch. Then simply undo this. If it is not reversible, don’t use the corresponding functionality. The latter is much harder since you need to restrict authorizations to that function very carefully.
In the previous blog the new SAP license model for indirect access. The biggest challenge after reading the blog will be: how can I know the impact for my situation and my SAP system?
For this purpose SAP has developed an estimation tool.
Questions that will be answered in this blog are:
Which note do I need to apply to get the estimation tool?
How do I run the estimation tool?
Why is the tool estimation only?
Warning: this tool only gives estimation. The tool cannot take into account specific configurations you have done to standard SAP that influence the outcome. Also the tool cannot take into account potentially company specific agreements you have made with SAP.
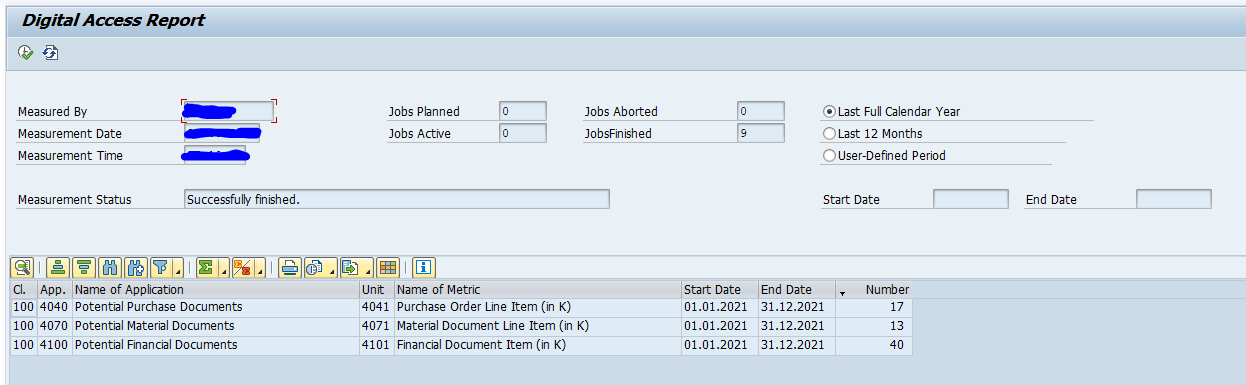
Digital access report
Start transaction RSUVM_DAC for the digital access report:
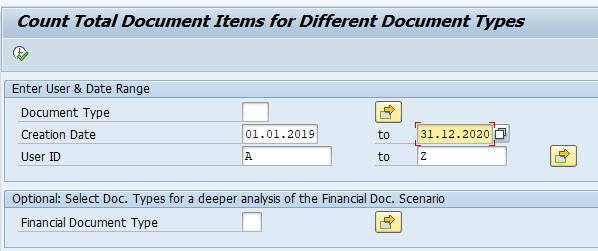
Double click on the line will get you to the details.
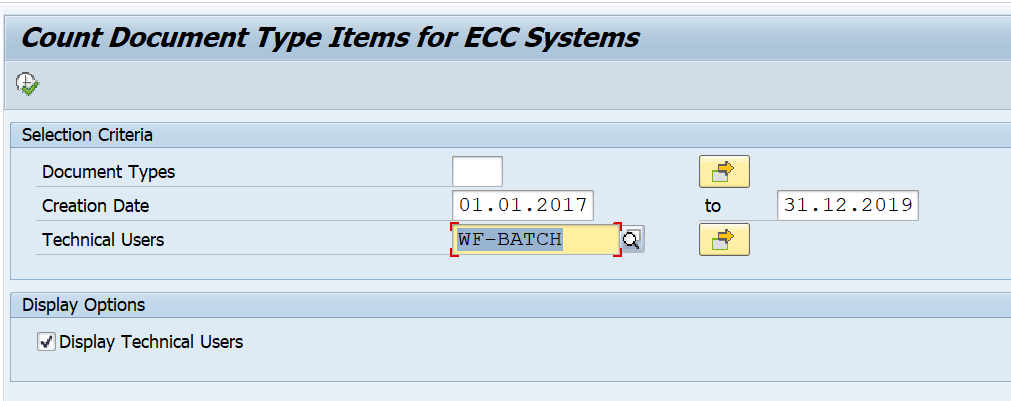
Depending on your SAP version and support package the tool is already available, or you need to manually install it. In case of manual installation, first manually create package Digital_Access in SE80. The next OSS note to install is depending on your version (S/4HANA or ECC):
The counting estimation in the ABAP is simply executing a select count for the time frame and user on the respective tables for specific document types.
Example below is the counting of purchase order line items:
Here you can see only lines from EKPO with type lc_bstyp_f (which has value ‘F’) are selected. If you have configured your system differently (for example copied F to Z and are using Z) the count program will not find and report this.
This is the reason why the program is only to give you an estimation.
Tool updates
Regularly check the tool OSS note for new updates of the note version. Other relevant notes and bug fixes:
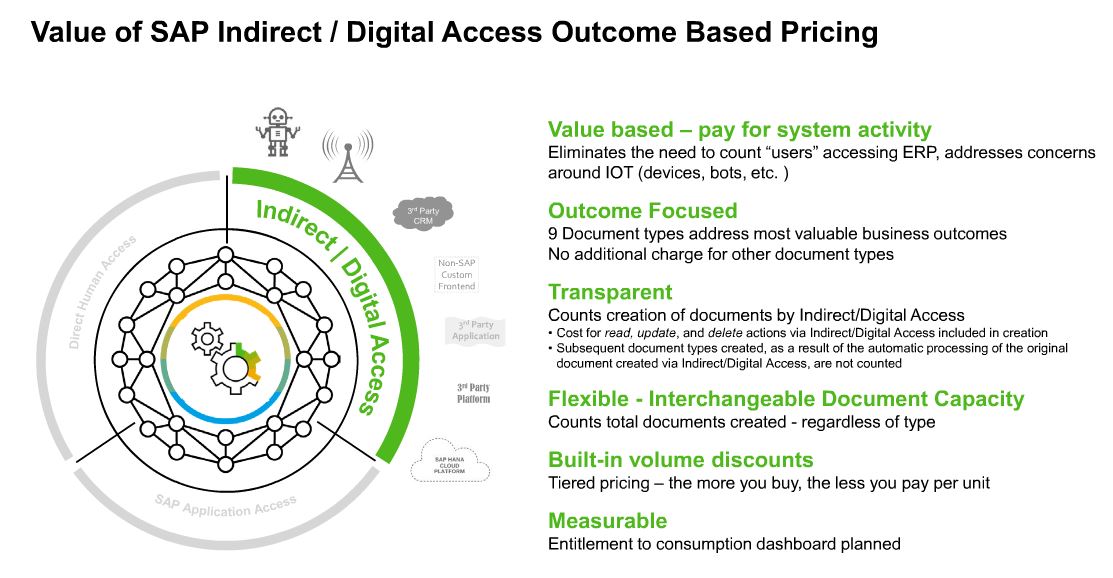
This blog will explain about the new SAP license model for indirect access, also known as Digital Access license.
Questions that will be answered in this blog are:
Where to find reference material on the new SAP license model?
How does the new SAP license model look like?
What are the exact definitions inside the documents for digital access?
IMPORTANT:
The explanation in this blog is to help you understand. This is not a replacement of the official SAP site. Please always check the latest official SAP site on the latest status of licensing. The document to search for in the SAP site is called SAP licensing guide (a guide for buyers).
For measurement of digital access in your system read this blog.
Formal definition:

Digital Access to SAP ERP (“ERP”)

This Package grants (a) humans a license to Use ERP through Non-SAP Application(s) that is/are directly integrated to ERP without the need to be licensed as a “Named User” of ERP and (b) non-humans (e.g. bots, sensors, chips, devices, etc.) a license to Use ERP directly or through Non-SAP Application(s) that is/are directly integrated to ERP and without the need to be licensed as a “Named User” of ERP (collectively, “Digital Access of ERP”).
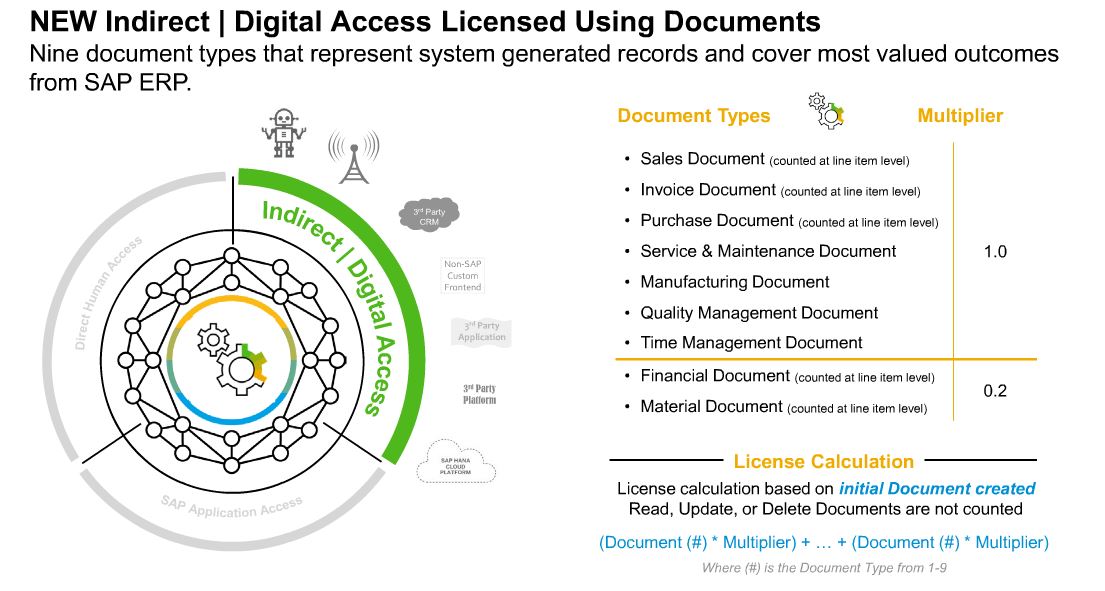
All Digital Access of ERP will be licensed based exclusively upon the number of Documents created annually by such Digital Access of ERP. Documents are unique records (i.e. unique digital line-items/objects) as defined in the “Document Definitions” column of the below table. Each Document shall count as one (1) Document, except for Material Documents and Financial Documents which shall each count as two tenths (0.2) of a Document. However, where the automated processing in ERP of a Document from one Document Type results in the subsequent creation in ERP of one or more additional Documents of different Document Type(s), such additional Documents shall not be counted.
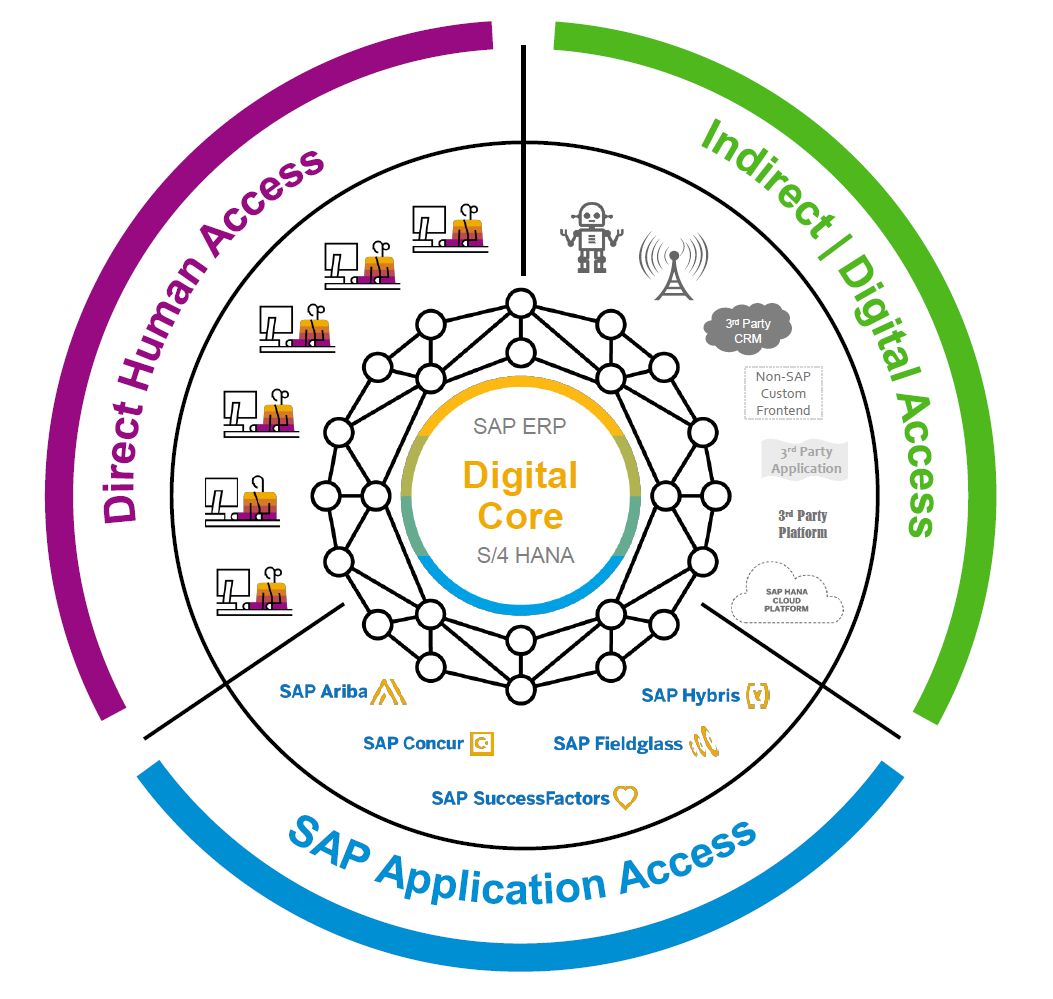
Where a Non-SAP Application is connected to ERP via a Connectivity App, such Non-SAP Application is still deemed directly integrated to ERP for purposes of this provision. Any humans and/or non-humans using ERP through application(s) (e.g. Ariba, Concur, Successfactors, Hybris) that is/are integrated to a Non-SAP Application that is directly integrated to ERP do not need to be licensed as a “Named User” of ERP.
In practice this should means documents posted via generic interface user, IOT device, 3rd party application, cloud application posting data in SAP system, etc.
By simply counting documents and agreeing on a price per document, this will simplify the ever ongoing discussion on indirect access.
Document definitions
SAP starts with 9 documents. You can find the list and definition in the table below.
Document Types
Document Definitions
Sales Document
A Sales Document is (i) a line item record that represents the material and/or service being sold or quoted and/or (ii) a record that represents an individual order/release against a scheduling agreement which indicates the material and/or service being sold.
Purchase Document
A Purchase Document is (i) a line item record that represents the material and/or service being ordered or requested and/or (ii) a record that represents the release against a scheduling agreement which indicates the material and/or service being procured.
Invoice Document
An Invoice Document is a line item record that represents the material and/or service being billed.
Manufacturing Document
A Manufacturing Document is (i) a record which represents the production-related details associated with manufacturing a material, including: the type, quantity and color of what to produce, when to produce it, where to produce it and/or other distinguishing characteristics, and/or (ii) a record that represents a confirmation which indicates the status of the processing activities associated with manufacturing orders.
Material Document
A Material Document is a line item record that represents a specific material being received, issued or transferred to, from or within a storage location or plant.
Quality Management Document
A Quality Management Document is (i) a record that represents the details of a nonconformance being reported including the information required for problem solving and/or (ii) a record that represents results of an inspection.
Service & Maintenance Document
A Service & Maintenance Document is (i) a record that represents the details of work to be performed including the information needed to plan, execute and bill for a service or maintenance request , and/or (ii) a record that represents the details of a problem being reported including the information required for problem solving and/or (iii) a record that represents the status of the processing associated with service orders and maintenance orders and/or (iv) a record that represents a claim by a customer for repair or replacement or compensation for under-performance, pursuant to terms in a warranty document.
Financial Document
A Financial Document is a record that represents accounting information in a financial journal.
Time Management Document
A Time Management Document is (i) a record that represents an employee’s time worked and assigned to business related objects and/or (ii) a record that represents a confirmation (e.g., a progress update) which indicates the status of the processing activities associated with manufacturing orders.
This blog will explain on the new USMM2 user license measurement procedure.
Questions that will be answered are:
When do I get the new USMM2?
How to technically activate the new USMM2?
How to run the new USSM2?
In the previous blog on USSM the user classification principles are explained. These principles are still valid for USMM2. If you want to know more about the technical working and mechanics behind the user measurement, read this blog.
Activation of USMM2
USMM2 is activated if you install a recent support package: SAP_BASIS release 7.50 (SP 11), 7.51 (SP 06) and 7.52 (SP 02). With the import of the support package the old USMM is simply replaced with the new one. Official background document from SAP: please follow this link.
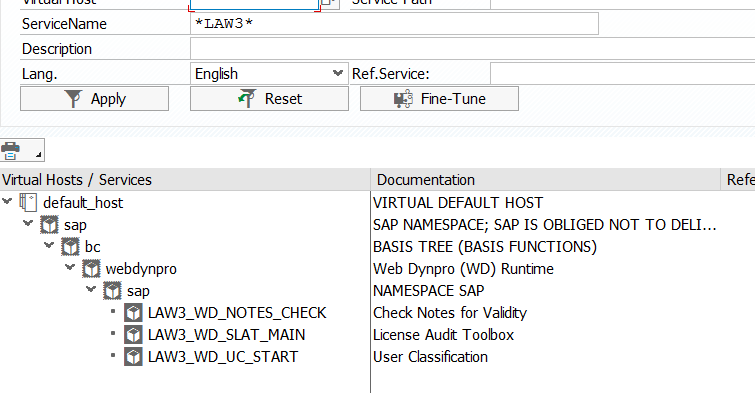
The old transaction USMM is still available using transaction USMM_OLD. The only action to do is to activate the new SICF nodes:
New USMM master data
After starting USMM you reach the new start screen:
The basic options are still the same. Here you set the basic master data for the user measurement.
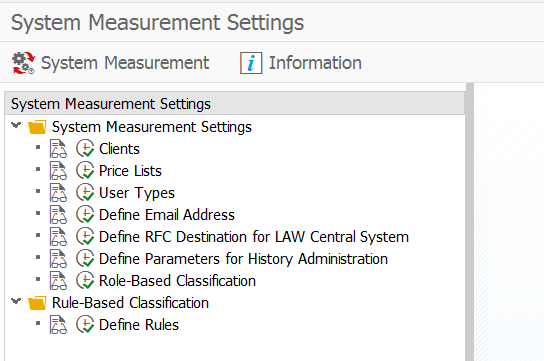
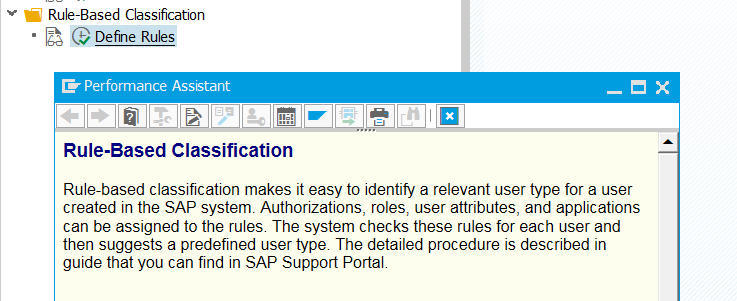
Newer feature is the rule-based classification:
More information from SAP on this feature: follow this link.
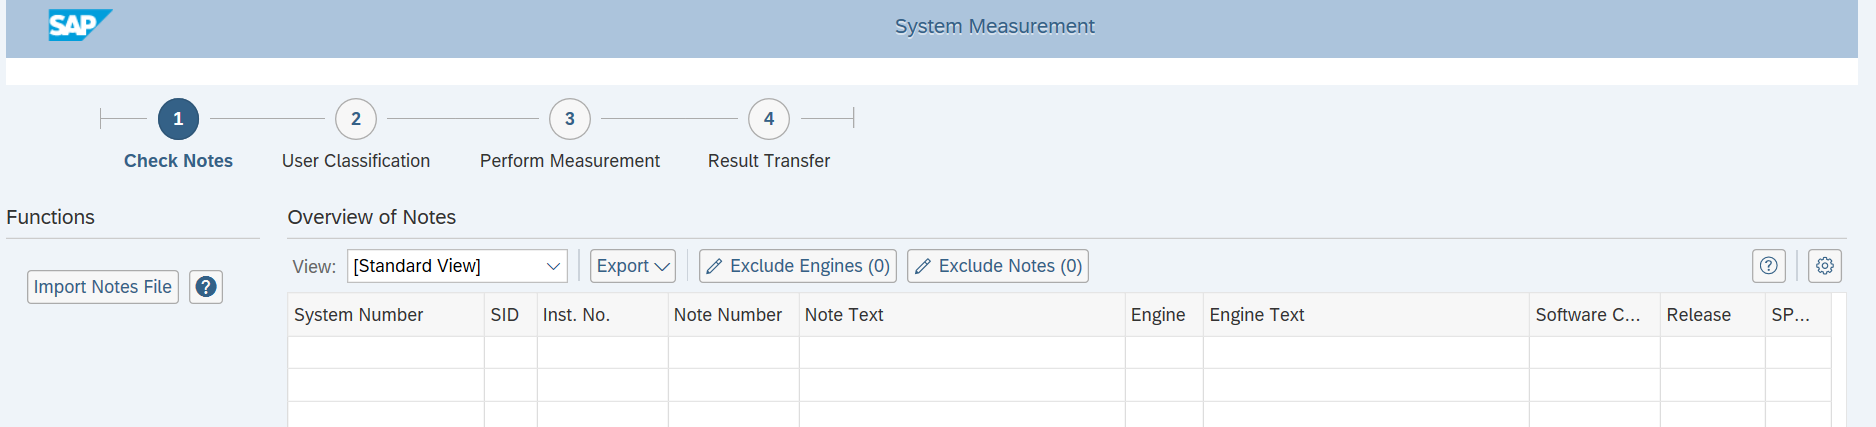
Executing the new system measurement
From the USMM start screen hit the system measurement button. The new web part of USMM will start.
The first part is to update the USMM tool and measurement programs.
Yes, also the user measurement programs are written by SAP and are definitely not bug free.
If the measurement program measures too much, apply the notes you find. If the measurement program measures not accurately and SAP does not inform you to apply the note, then you cannot help it that SAP makes a mistake and charge you too little.
When SAP asks you politely to apply the OSS note best to comply to the request.
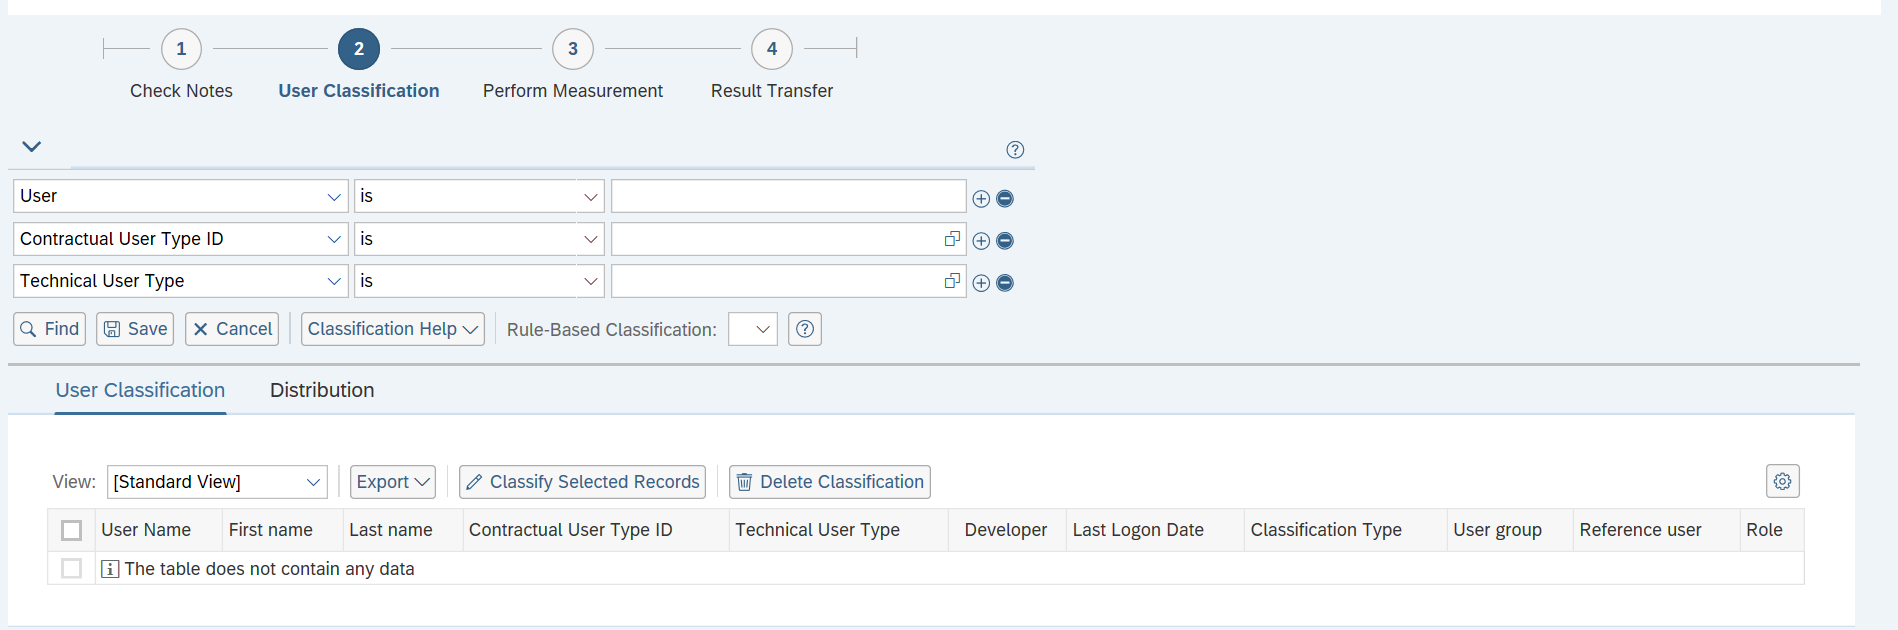
In the second step you can do the user classification check and adjust when needed:
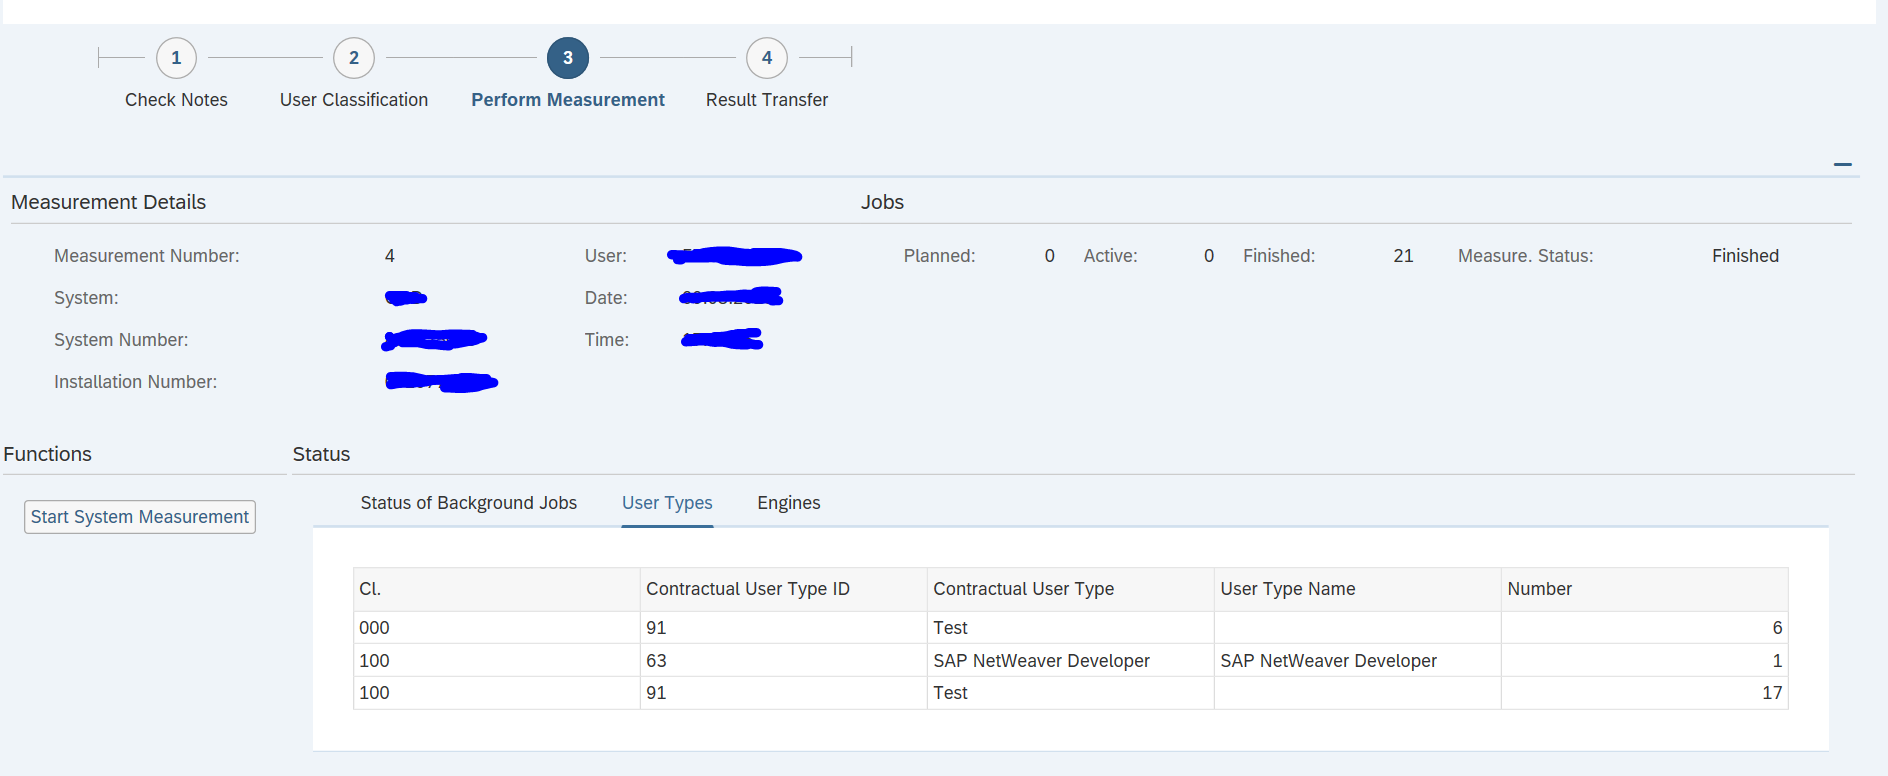
The third step will fire the regular measurement jobs:
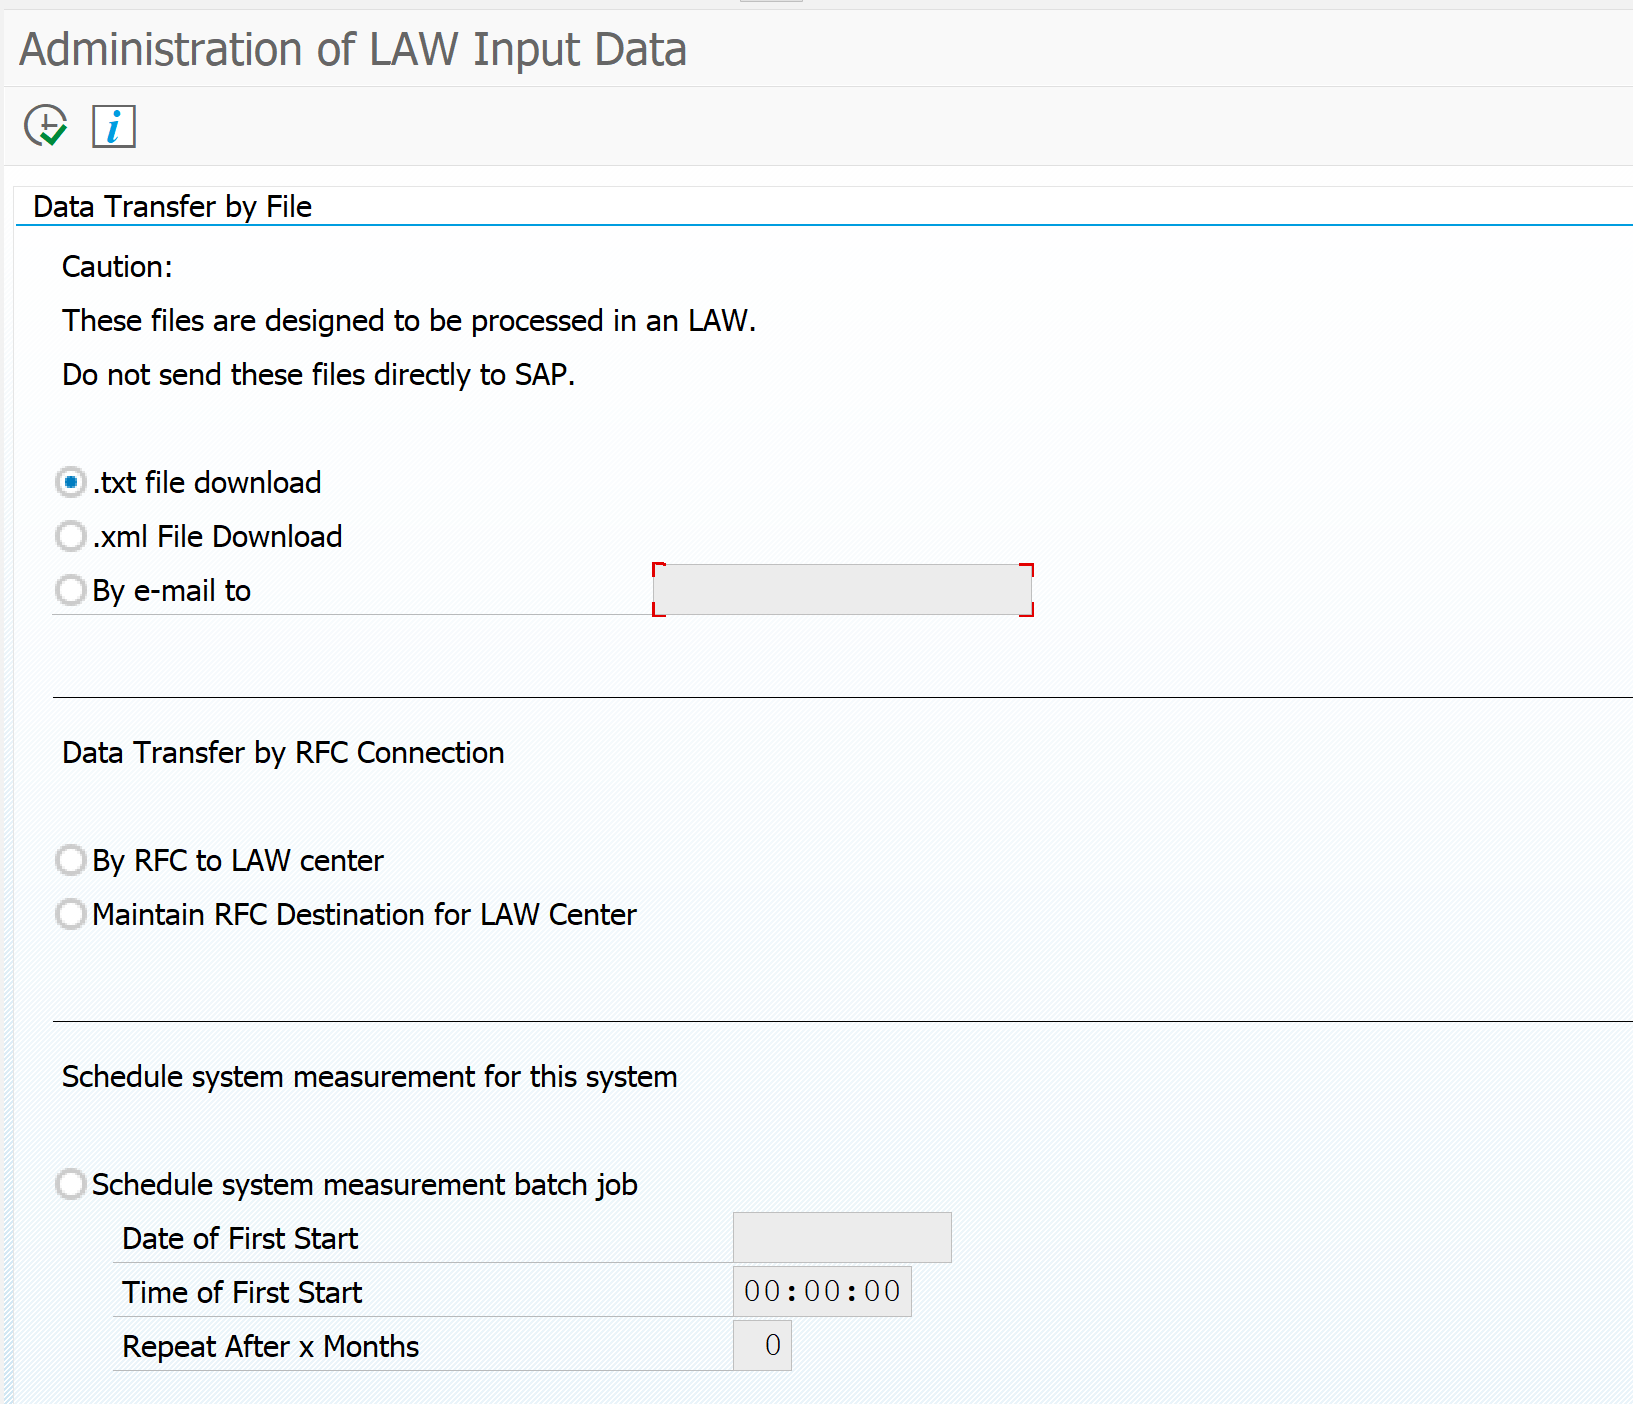
In the last step you can transfer the results or download the LAW file:
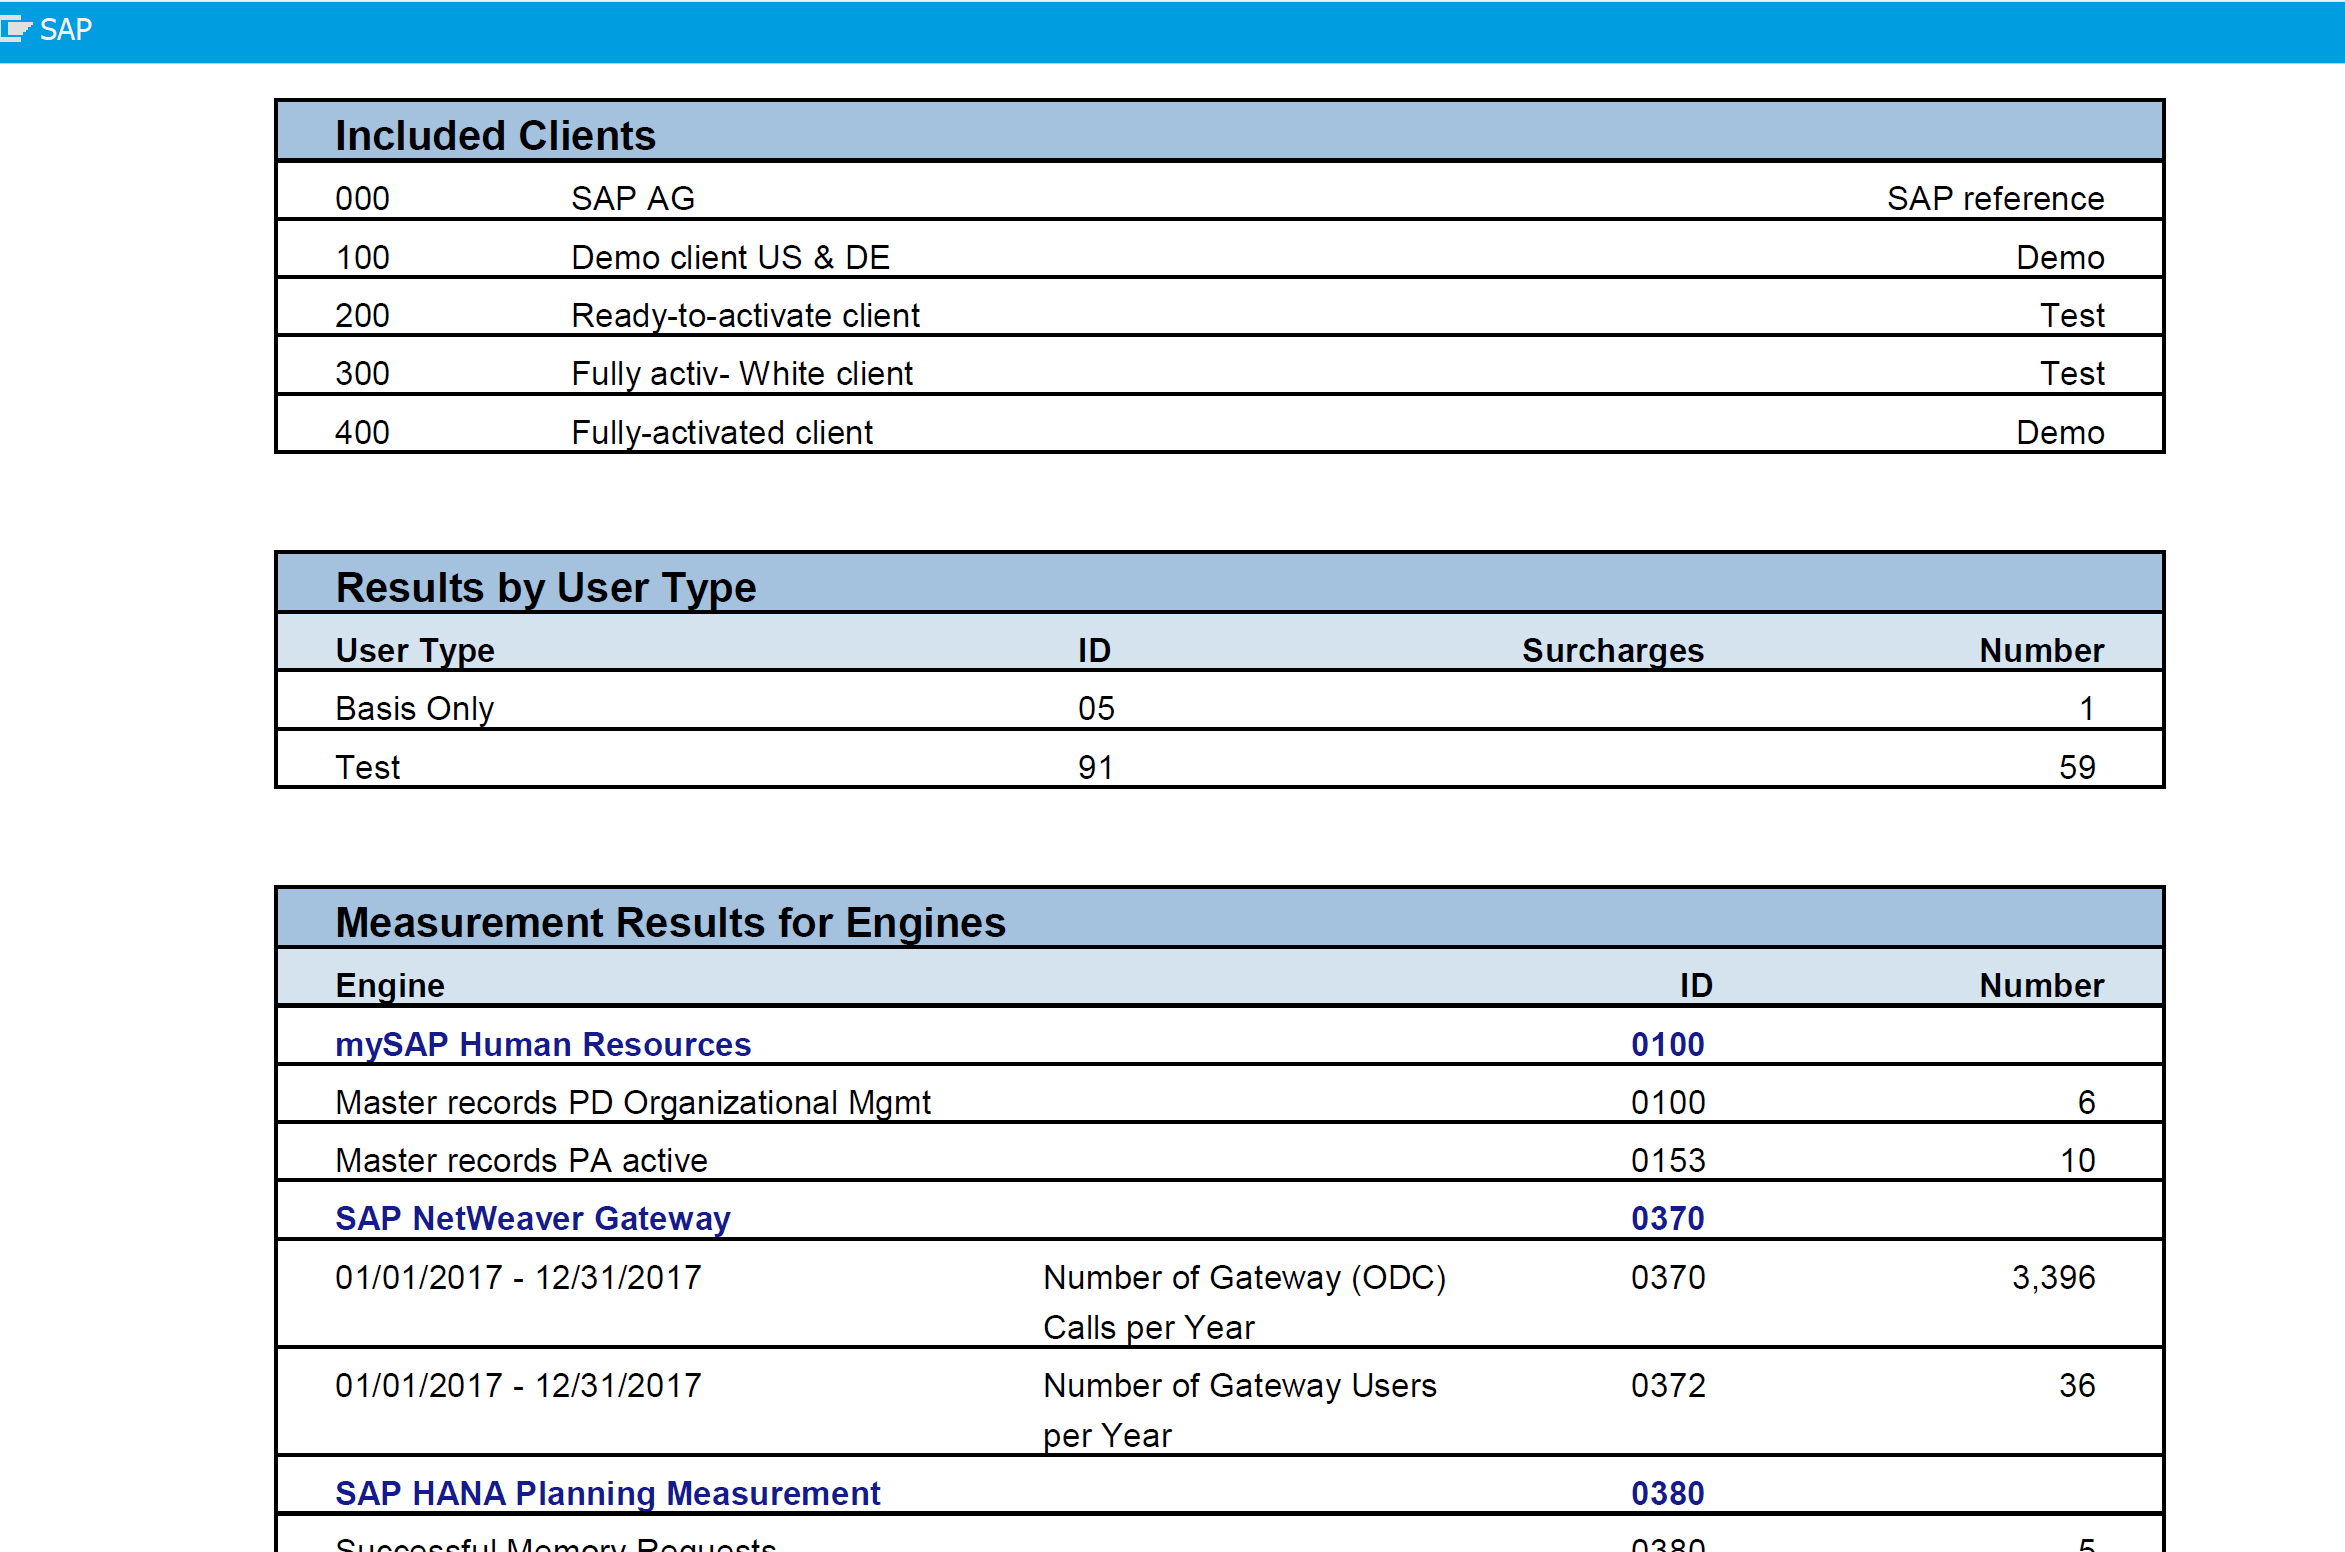
You can use transaction USSM_PDF to get a PDF format of the user measurement.
License measurement tips & tricks
For license measurement tips and tricks, read this dedicated blog.
LUI License utilization information
The LUI (license utilization information) tool is an online SAP tool that has all the information on your on premise and cloud licenses information combined. For cloud the usage is automatically visible. For on premise systems you can upload the usage via the SLAW files. This can give you insights into under-consumption and over-consumption of licenses. Read more in this blog.
Developer licenses
USMM2 runs typically on a productive system. For developer licenses the process is more tricky. Also due to the fact that SAP in S4HANA removed the simple DEVACCESS measurement. Read more in this blog.
This blog will explain about the SLAW2 tool as successor of the SLAW tool used for license measurement consolidation. For background information on SLAW tool, see this blog.
Questions that will be answered in this blog are:
How to technically activate SLAW2?
How to setup system master data in SLAW2?
How to consolidate user measurement data in SLAW2?
How to use the SLAW2.0 information system?
Differences between SLAW and SLAW2?
SLAW2
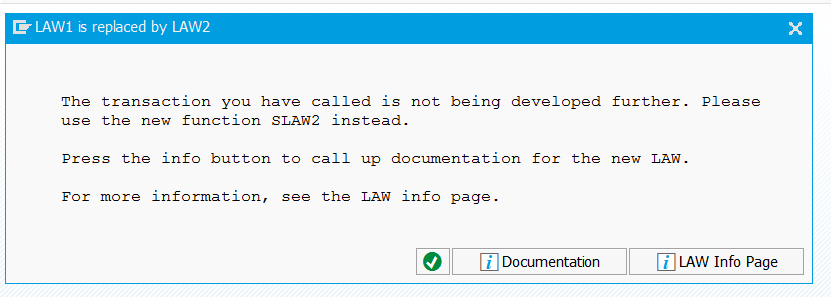
Depending on your system, when you start the SLAW transaction, you might be mandatory routed to SLAW2.
In this case you are forced to use SLAW2.
Basic activation of SLAW2
Before you can use SLAW2 web part you have to enable the corresponding SICF nodes:
SLAW2 system settings
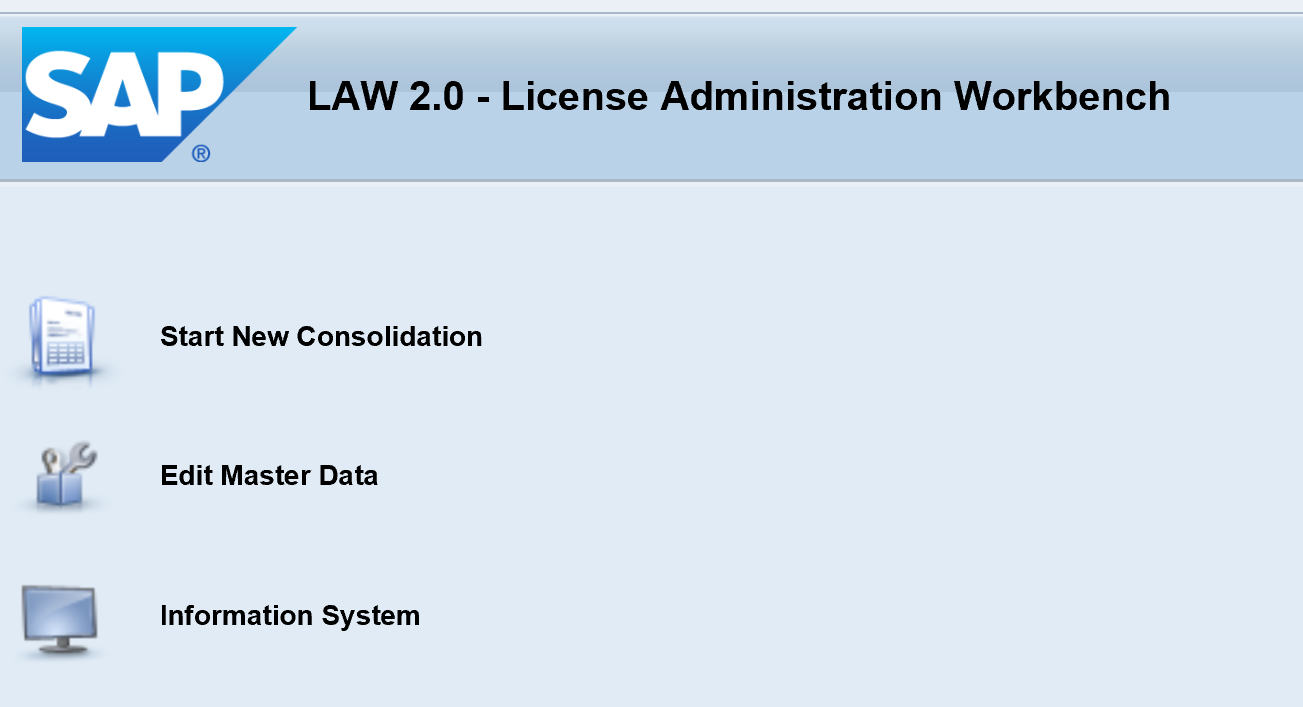
If the basic activation is done, start SLAW2 by using the transaction SLAW2. This will open the SLAW2 start screen:
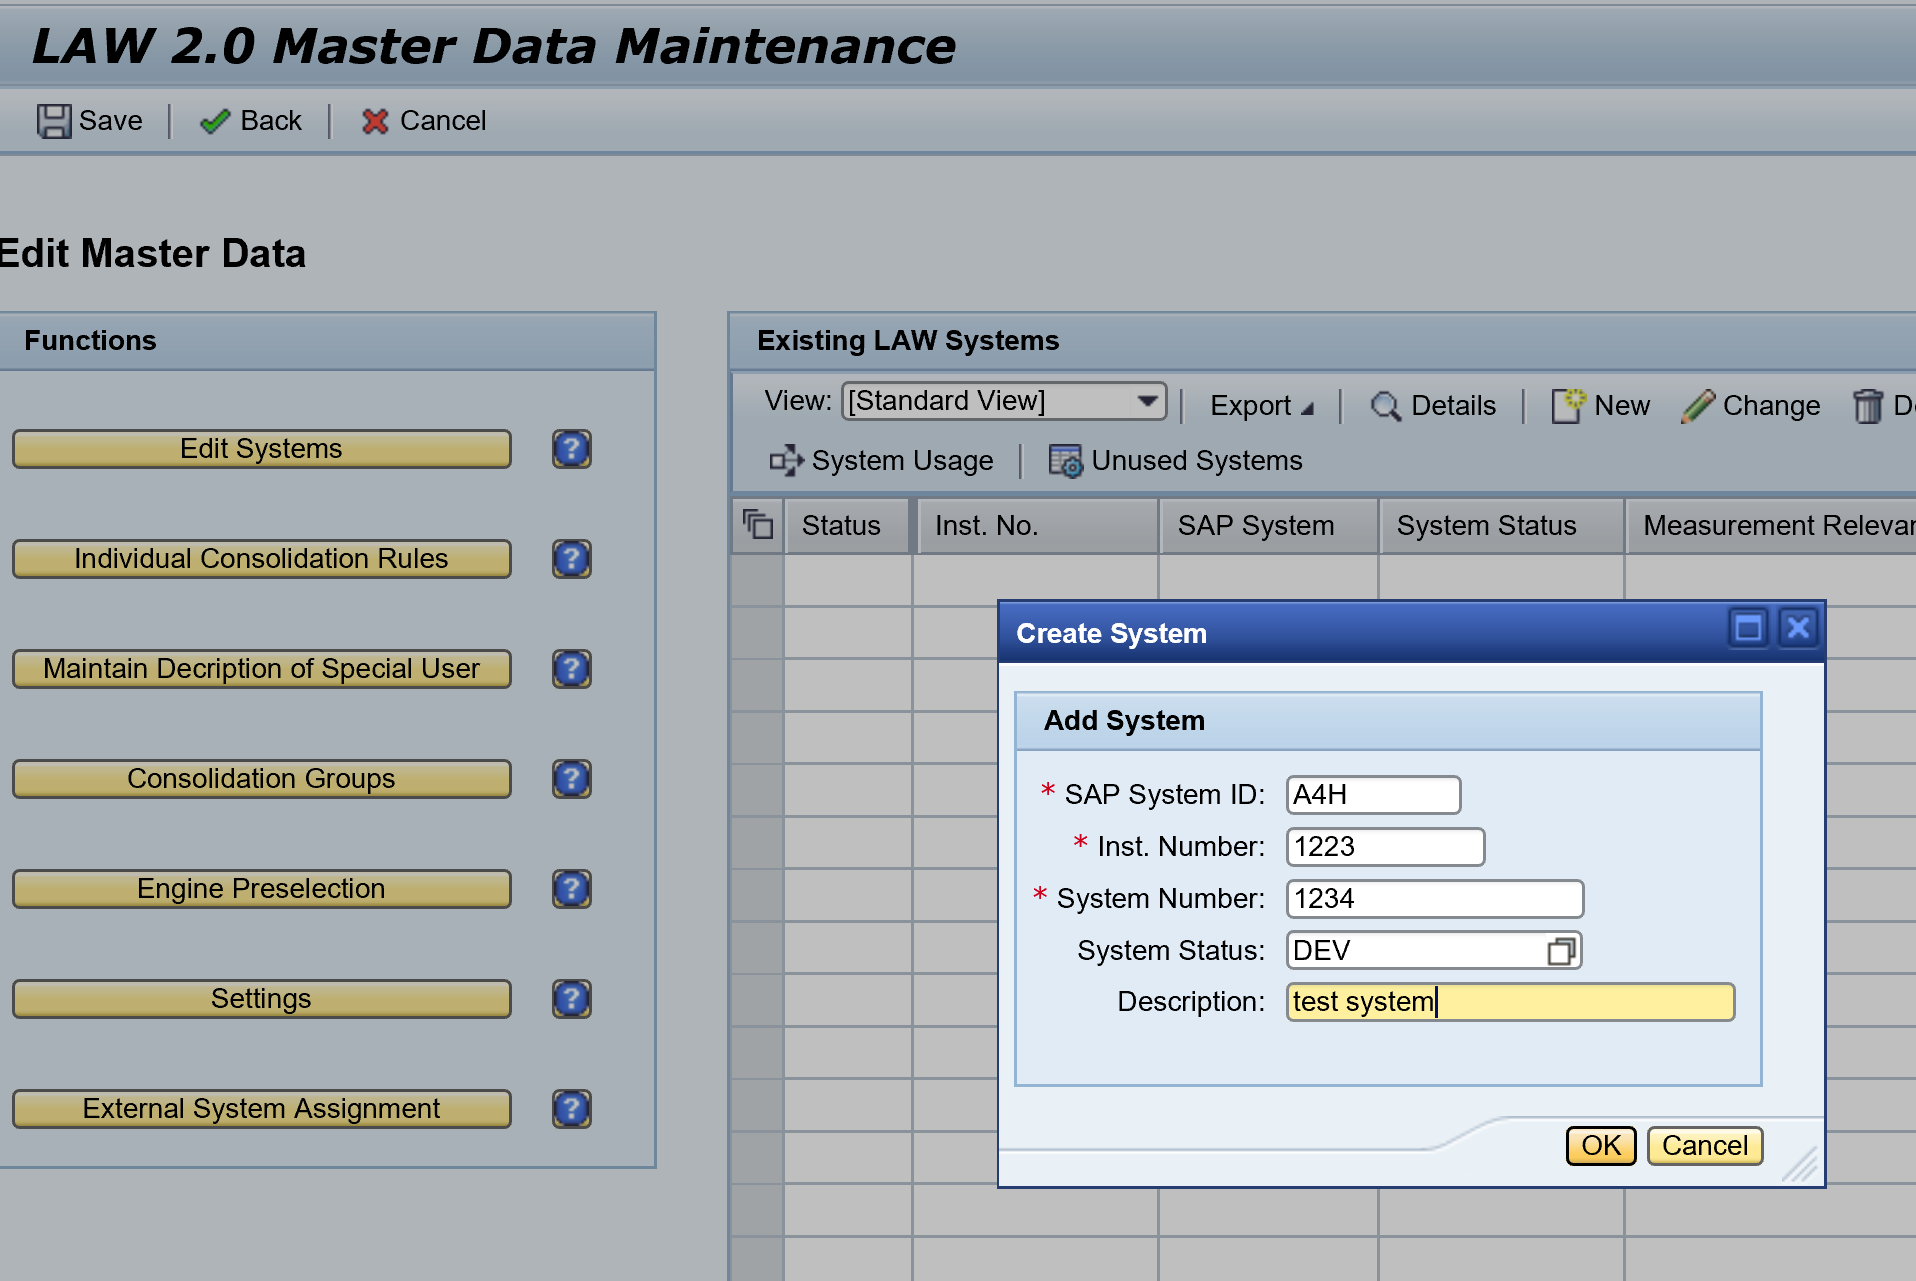
In the master data you start first with checking the already present systems (if you were using SLAW before) or adding a new system.
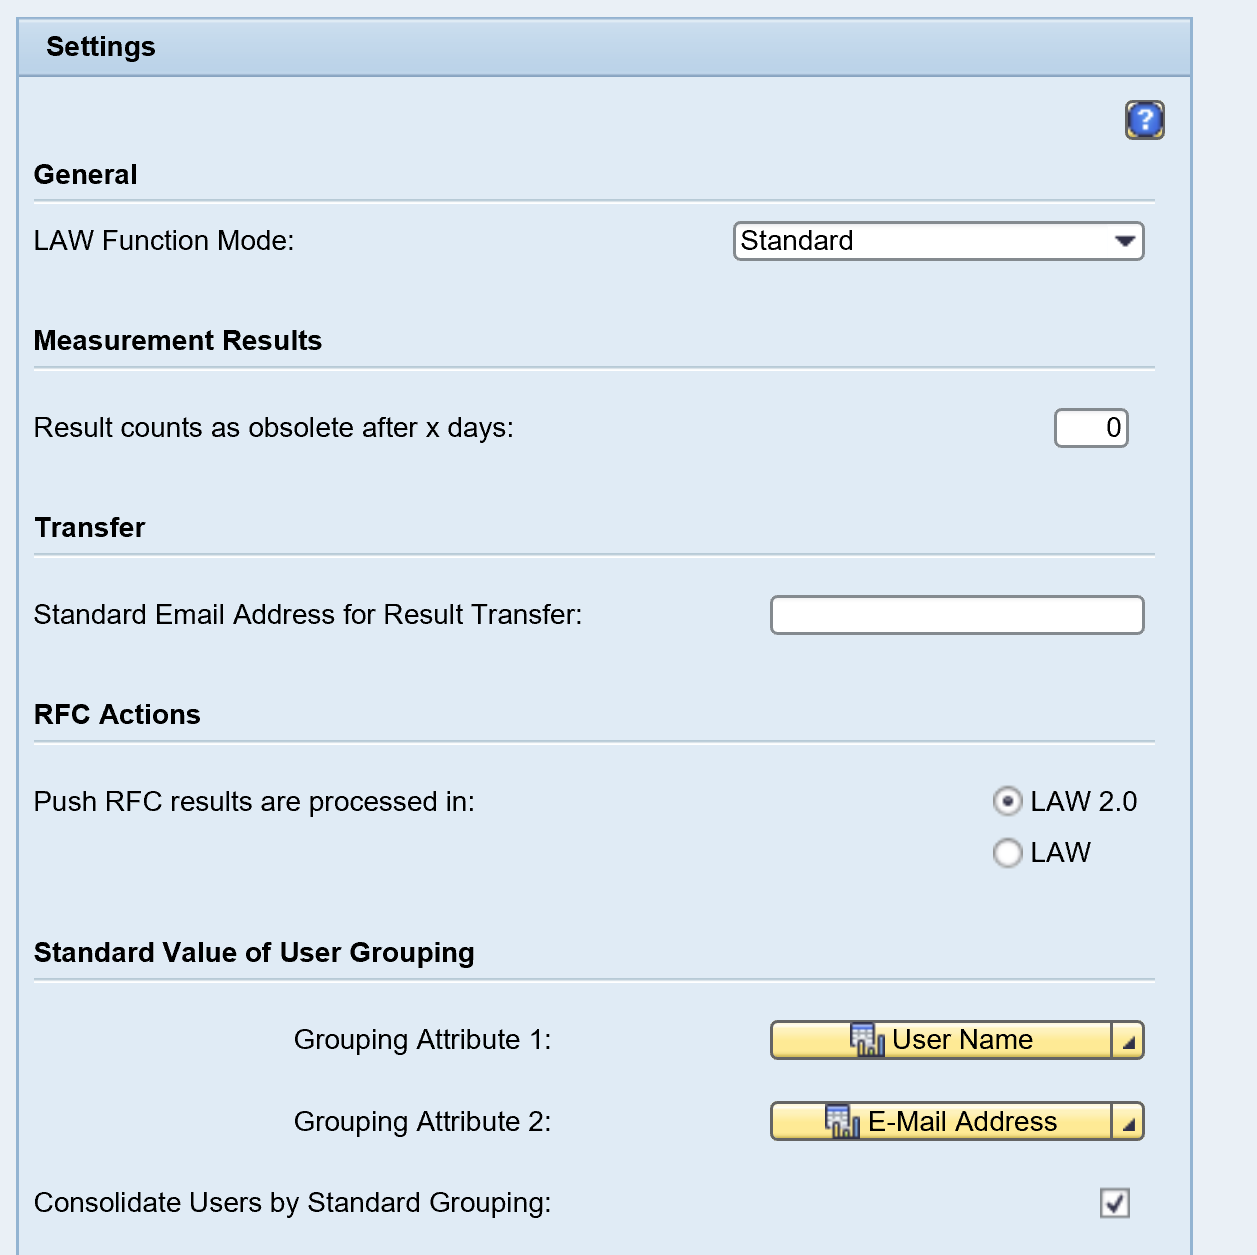
In this screen you can also go to the general SLAW2.0 settings:
Running the consolidation in SLAW2
The basic principle of SLAW2 and SLAW are the same. The buttons are in different place. SLAW2 is helping you in bit more fancy roadmap style.
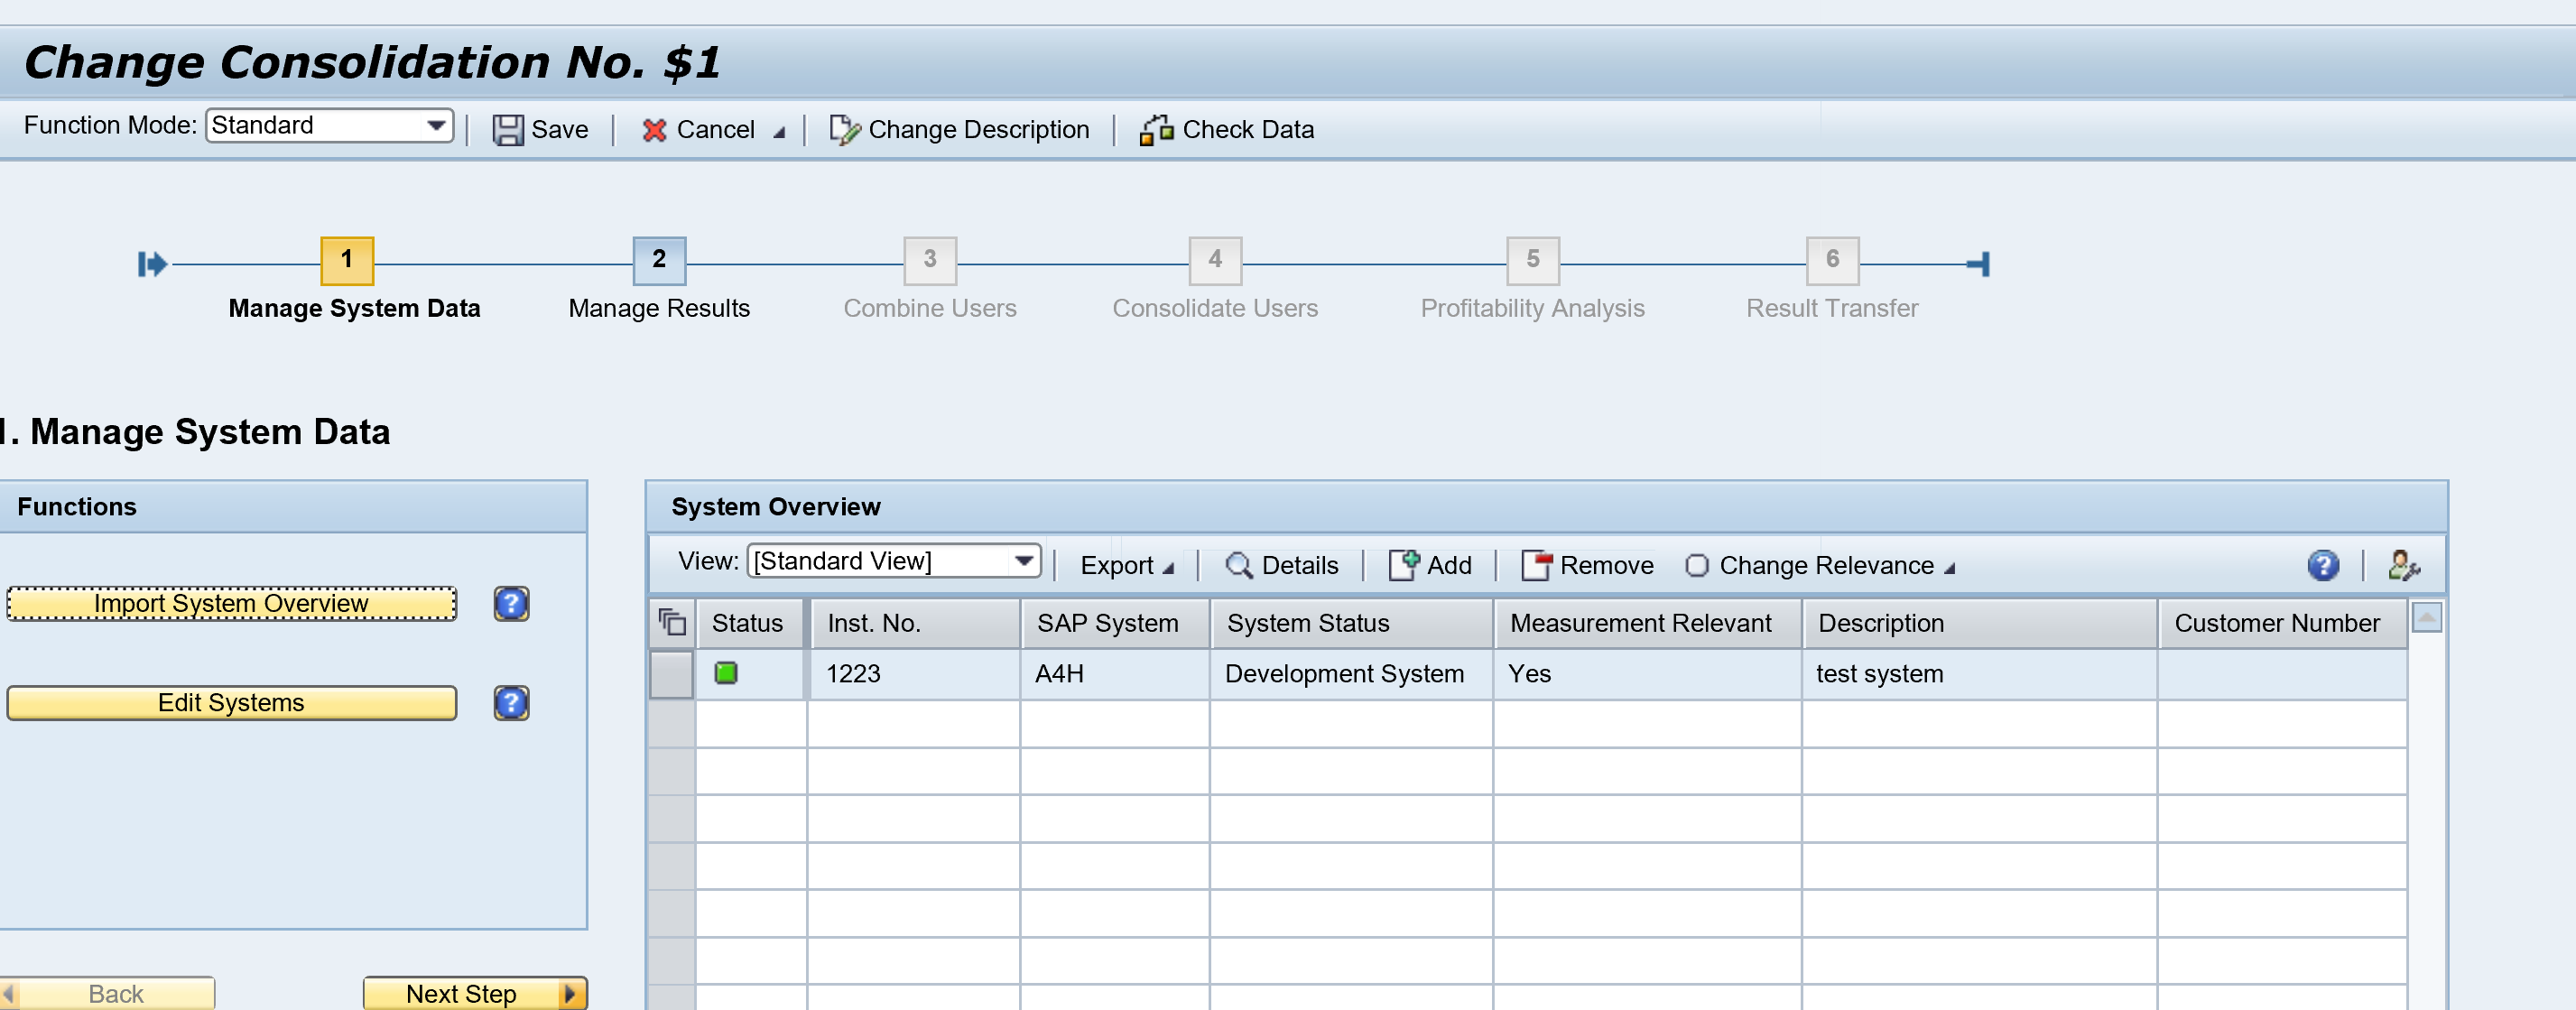
If your system data is properly set up, you can select the Start new or Change Consolidation button in the start screen:
The roadmap on top shows in which part of the process you are.
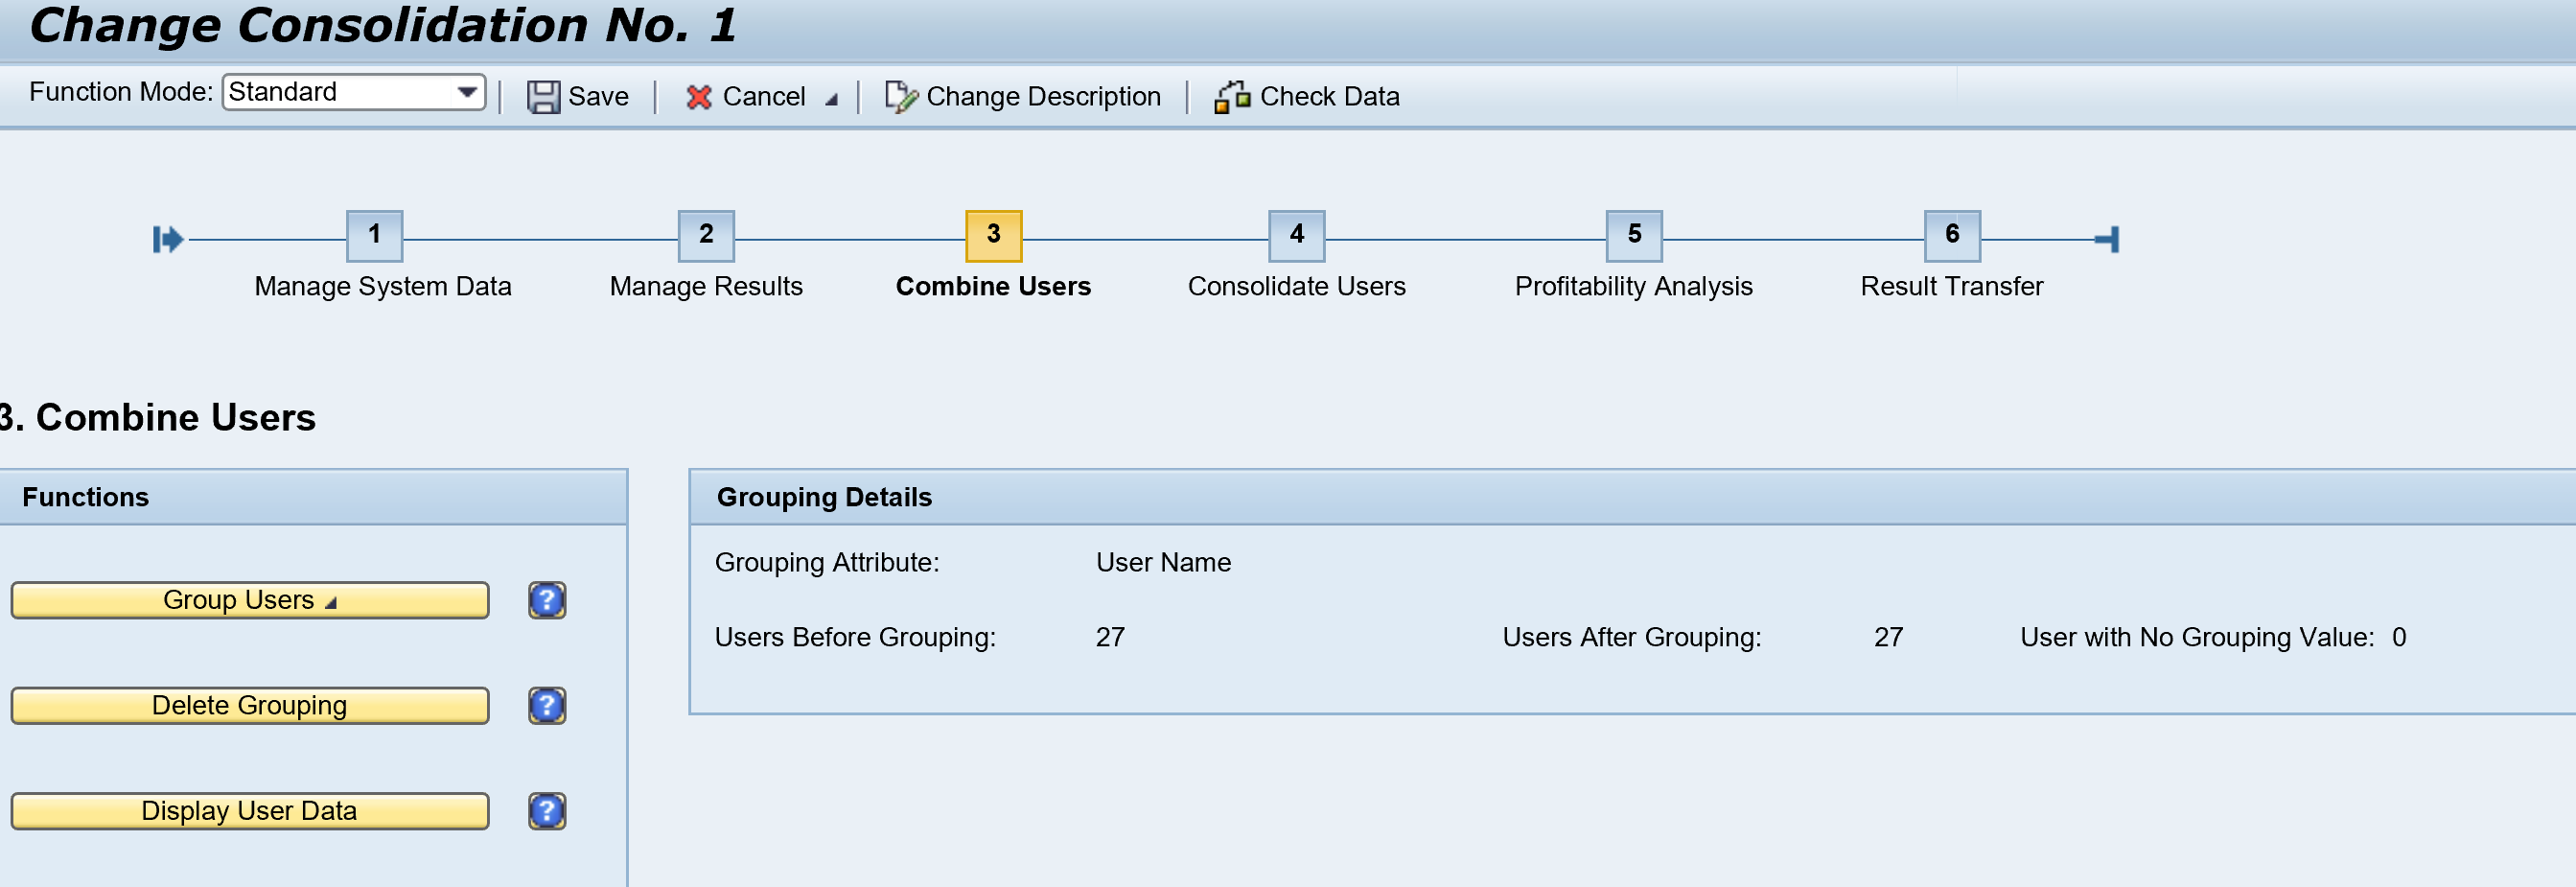
You can show the results and start the Combine Users process.
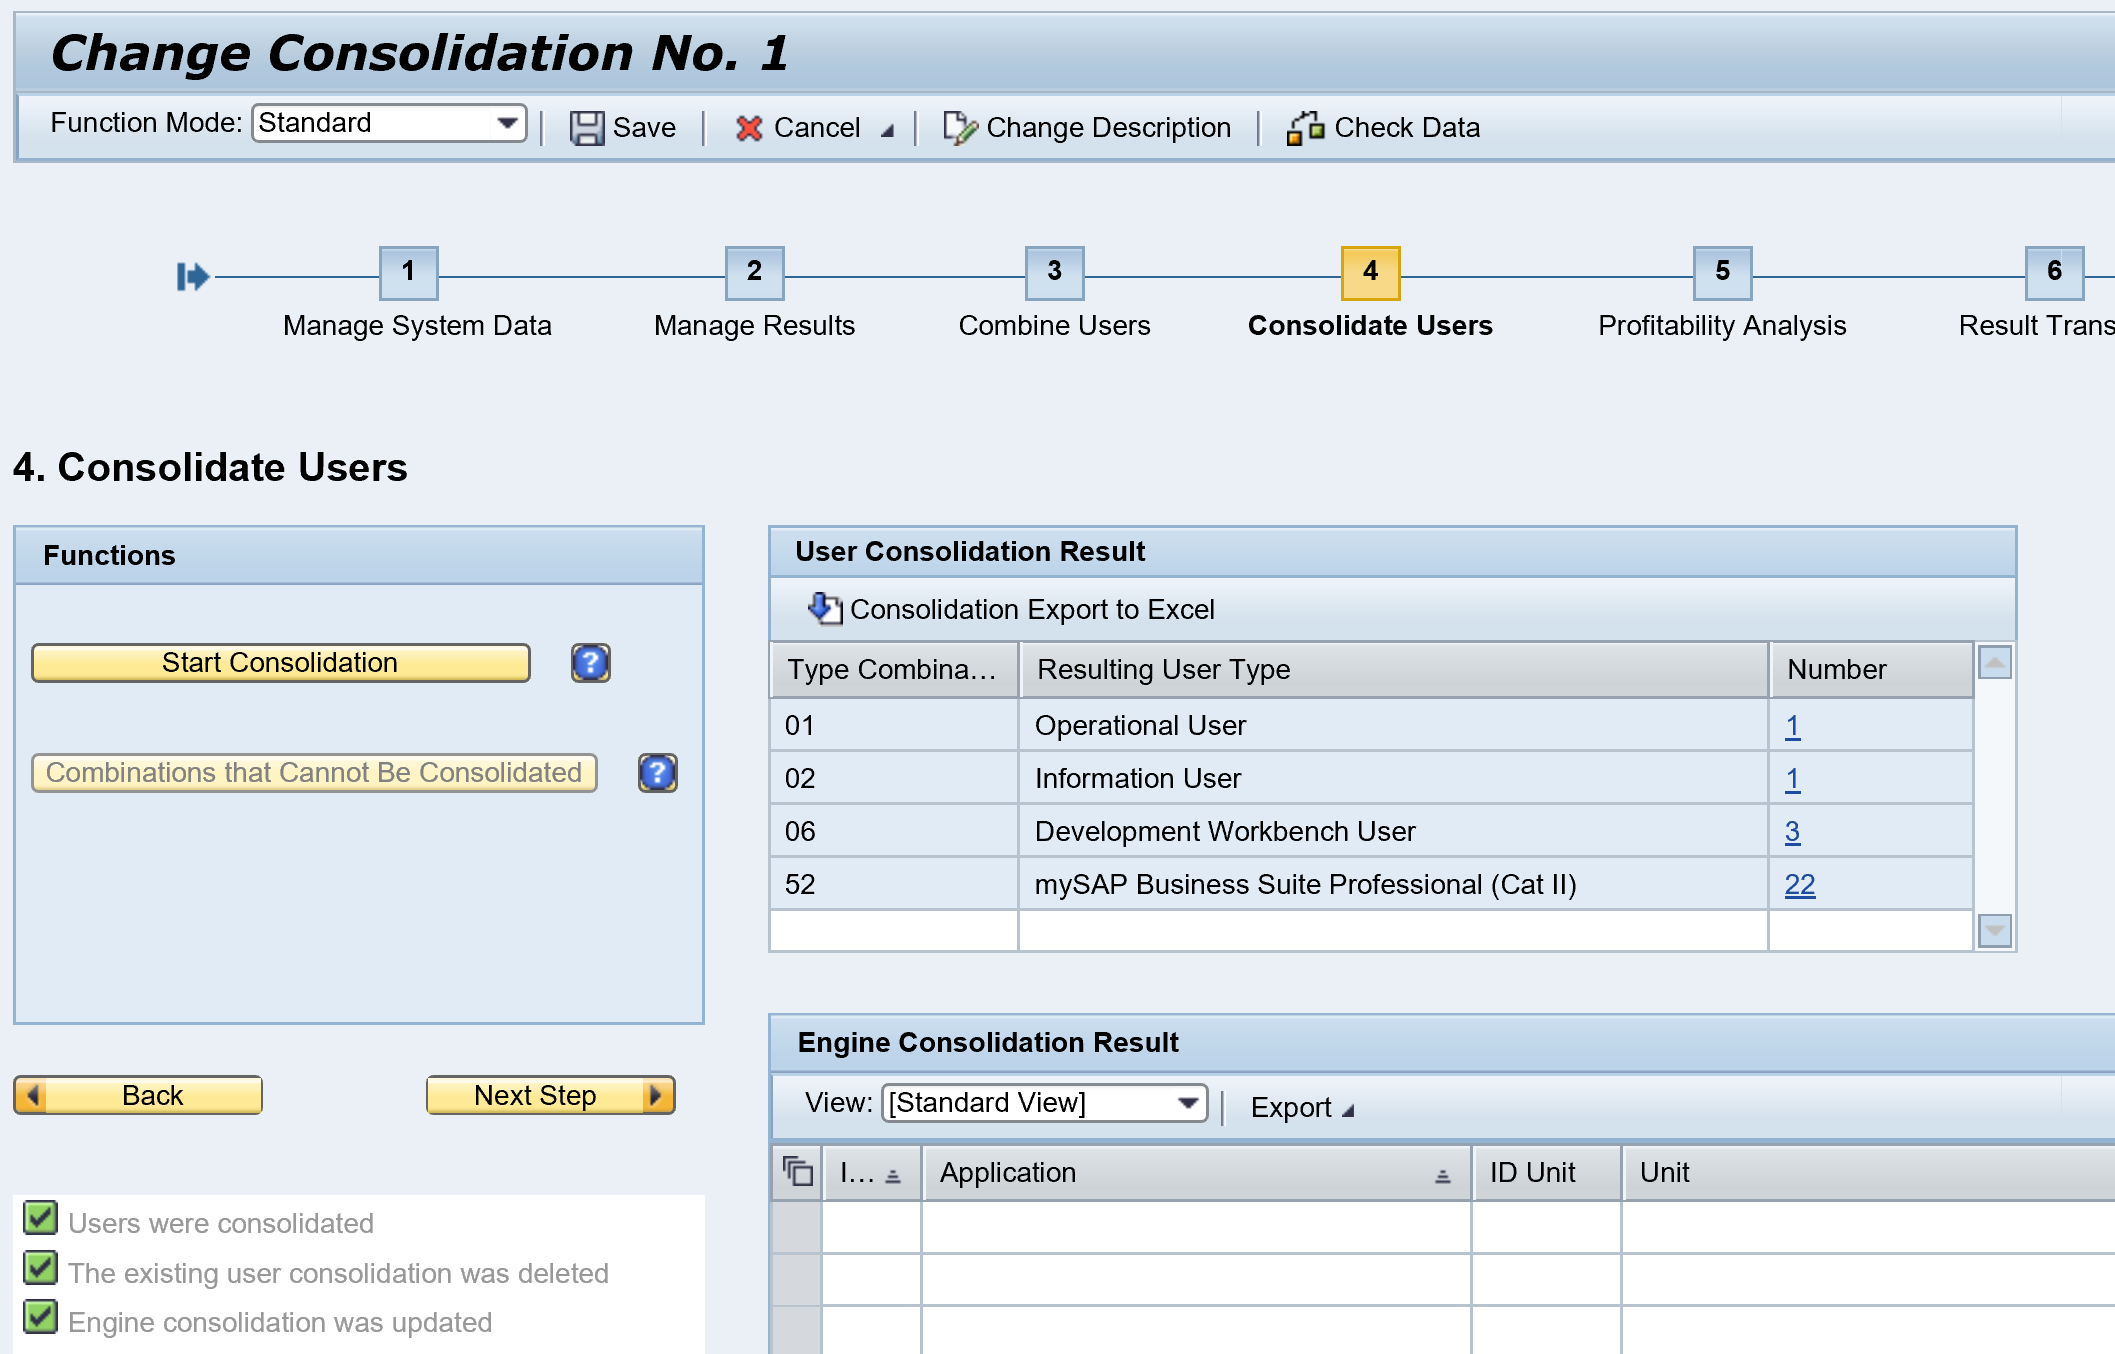
Next step is the Consolidate users step:
As last step you can see the results and submit to SAP.
In contrast to the old SLAW, the consolidation is done. If you want to repeat, you have to create a new consolidation.
SLAW2 information system
On the start screen of SLAW2 you can go to the LAW2.0 information system.
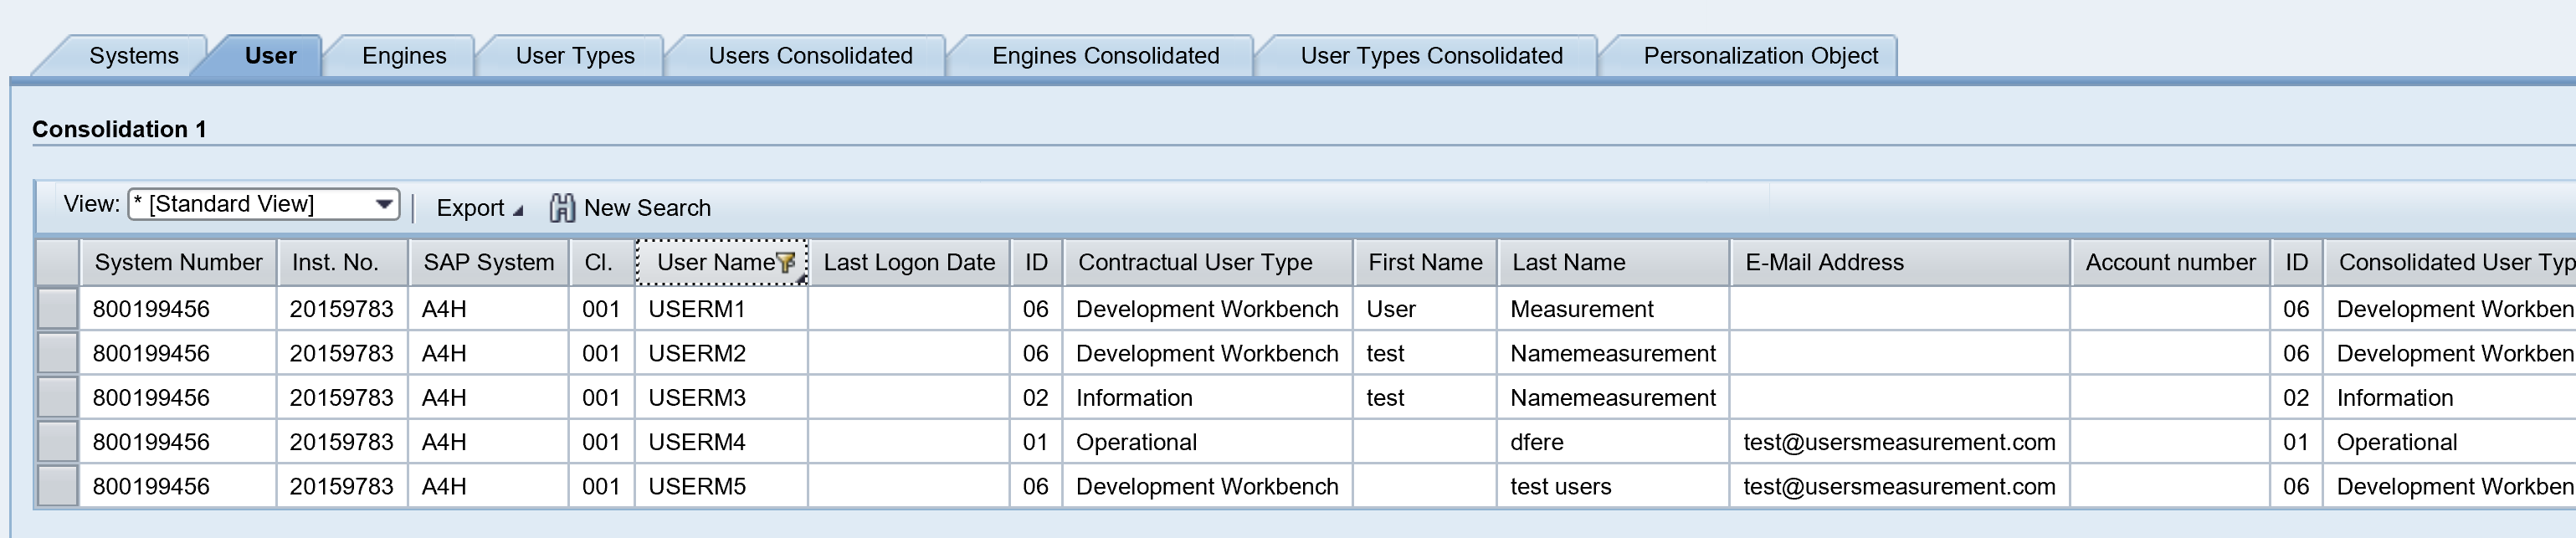
From here you can create lists and filter them. The results can be exported to excel for further processing, analysis and clean up.
SLAW versus SLAW2.0
The features in SLAW2.0 and SLAW are basically the same. The positives of SLAW2.0 are the information system and roadmap support. The old SLAW is easier if you have more iterations in cleanup.
As said before, depending on your version, SAP forces you to use SLAW2.0.
License measurement tips & tricks
For license measurement tips and tricks, read this dedicated blog.
LUI License utilization information
The LUI (license utilization information) tool is an online SAP tool that has all the information on your on premise and cloud licenses information combined. For cloud the usage is automatically visible. For on premise systems you can upload the usage via the SLAW files. This can give you insights into under-consumption and over-consumption of licenses. Read more in this blog.
Relevant OSS notes
If you are facing bugs or issues, you can check these OSS notes:
This blog will explain how to consolidate multiple SAP user measurements into 1 combined measurement using the SLAW tool.
Questions that will be answered are:
How to use the SLAW tool?
Which options and help does it bring for consolidation of user measurement?
How to consolidate if users have different user ID’s across the systems?
SLAW2
The SLAW tool has a successor in the SLAW2 tool. See this blog to see how SLAW2 works.
Preparation of consolidation
In each of the systems where you have run USMM user measurement, you have to export the data in the LAW file format. To do this go to USMM and select menu option System Measurement and Export to LAW file:
Save as local file is the most common and easy option. Repeat this for all your systems.
LAW consolidation
You need to select one system for consolidation. This can be your main ECC productive server or for example your solution manager system.
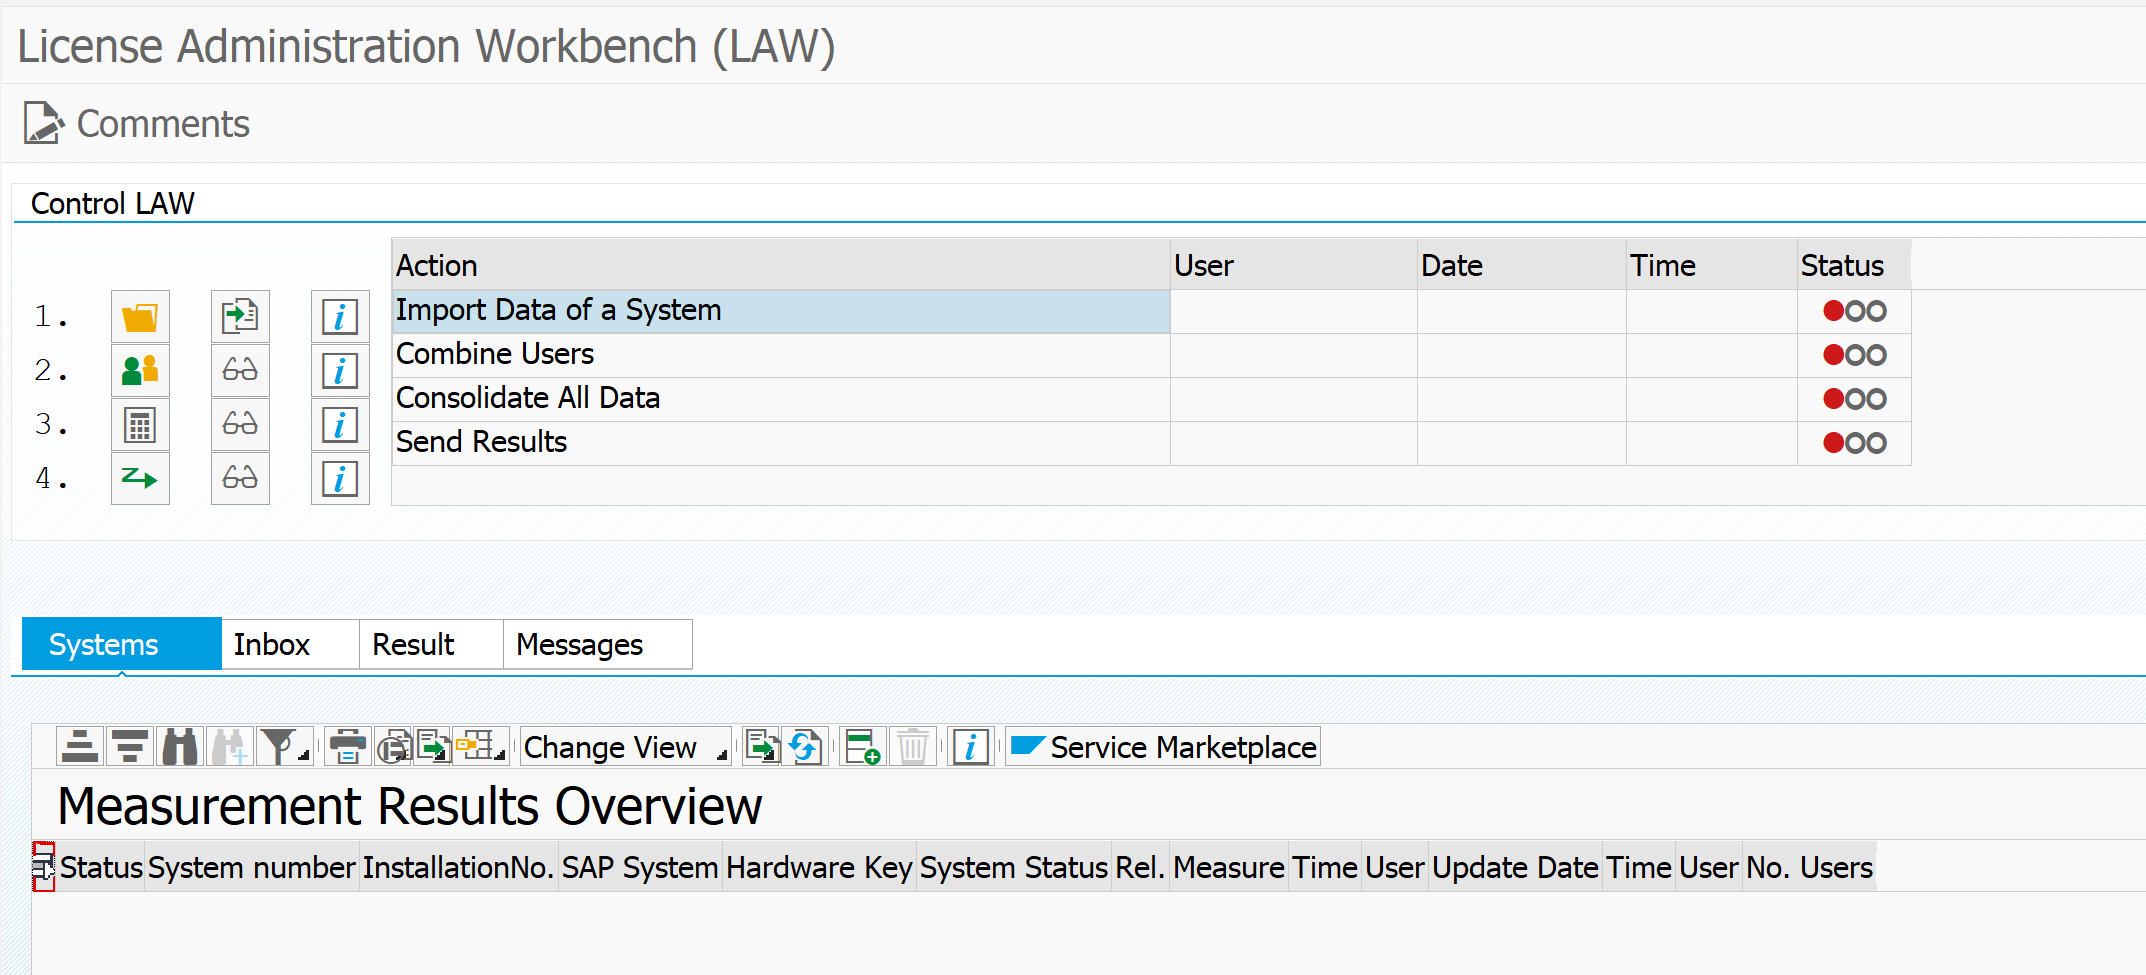
In the consolidation system start transaction SLAW:
The consolidation process consists of 4 steps:
Load all the LAW files
Combine the users
Consolidate
Send consolidated results
First load all of your LAW files, before going to the user combination.
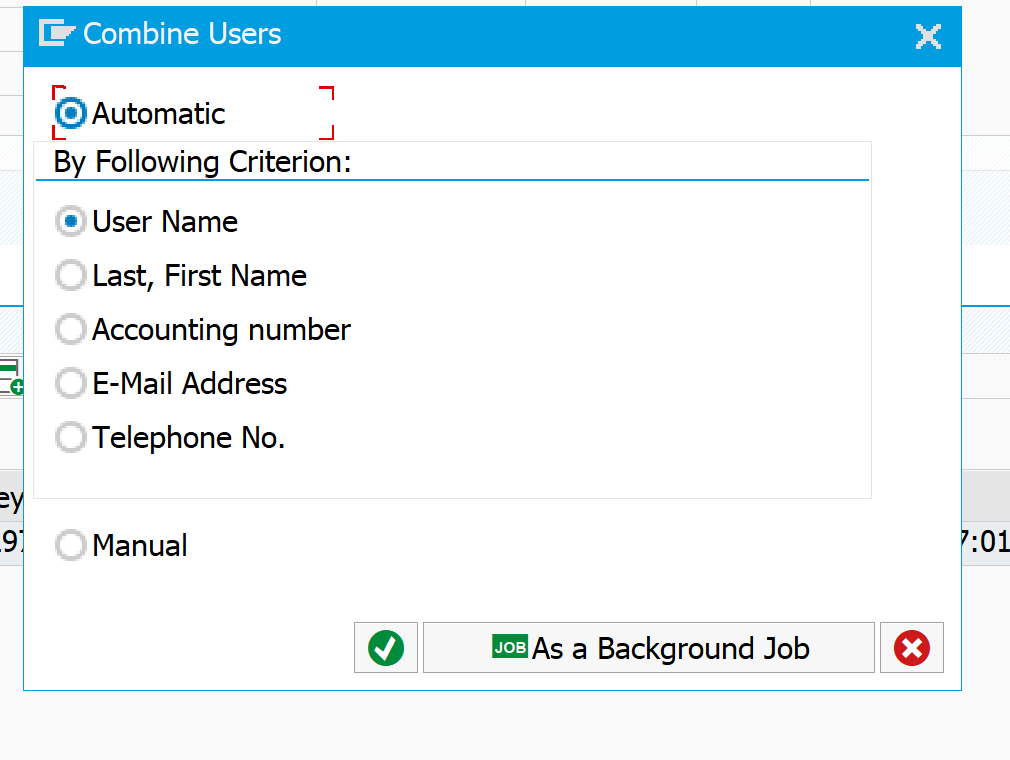
In the step Combine Users you have several options to combine the users:
The best option for your consolidation is dependent on the differences per system. If you user name is the same per system, then this is good option. If the username is different per system, but your email is kept consistent per system, then this is a better option. Last resort is to do by name.
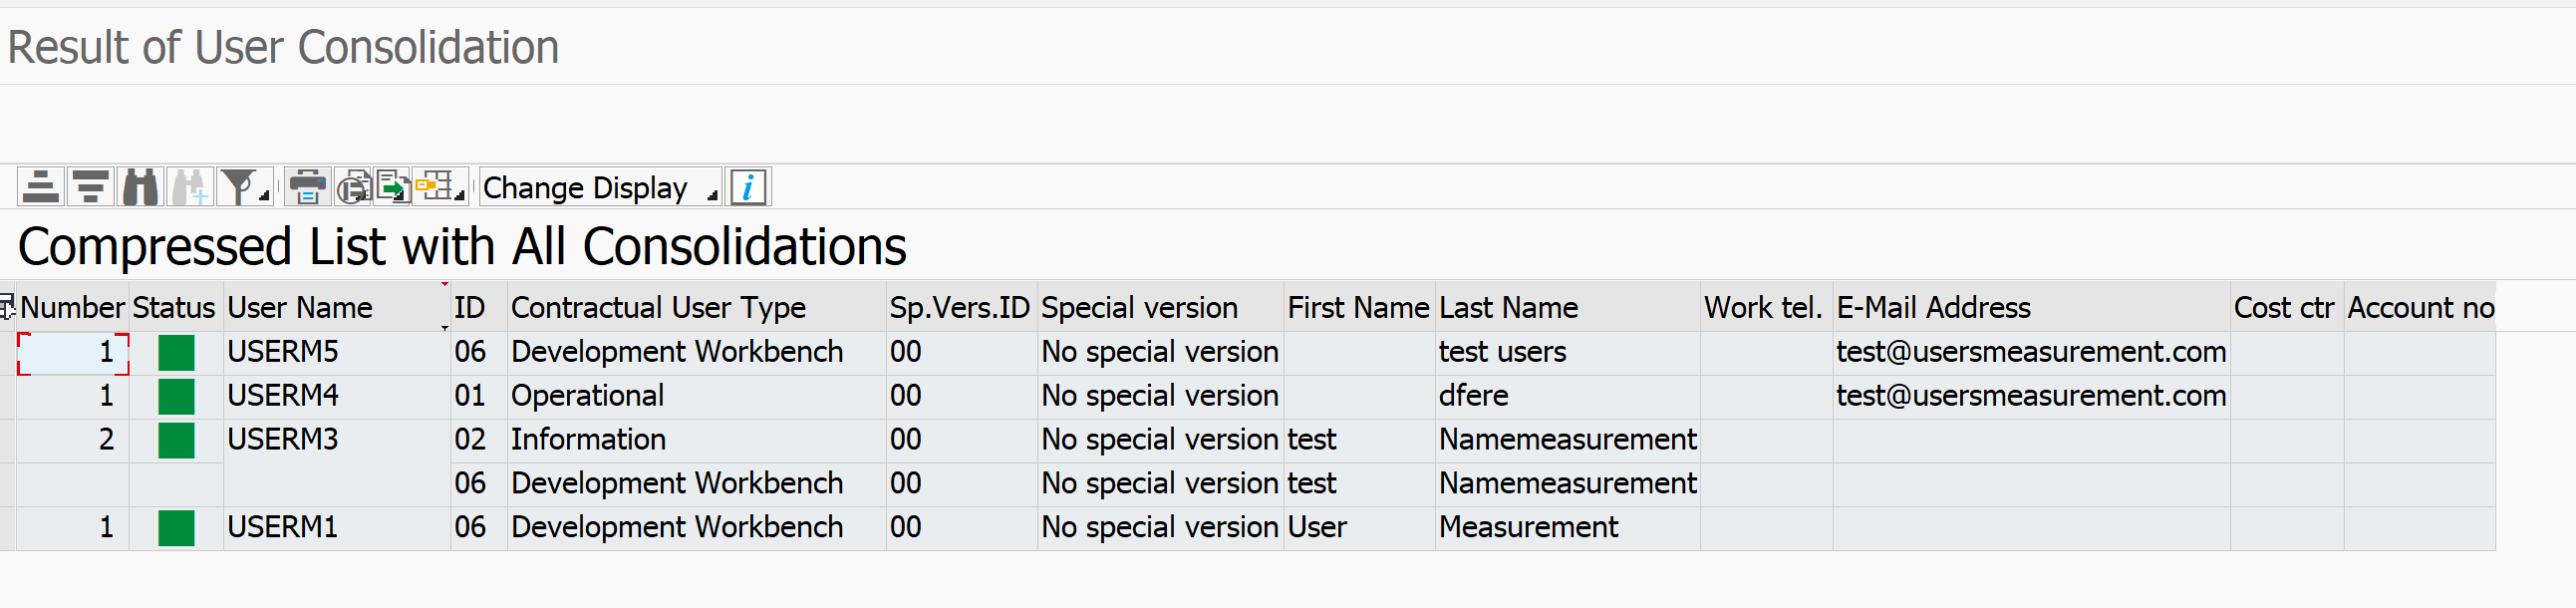
After the combination you can start the consolidation. Result of the consolidation for test users on name looks as follows:
If you see cleansing opportunities, do use them. After the cleansing start USMM again, export LAW file and rerun the consolidation.
Tips & tricks for license measurement
For tips and tricks for license measurement read this dedicated blog.
This blog will explain about SAP user license measurement.
Important: this blog will explain in general terms. Your own company might have bit different agreements in their contract! Especially for larger companies no SAP contract is ever the same.
Questions that will be answered in this blog are:
How to measure users in the SAP system?
How can the USMM tool help in the clean up?
How does it work when I have same user in multiple productive system?
General tips and tricks on user measurements can be found in this blog.
USMM2
In newer systems USMM is replaced by USMM2. For more information on USMM2 see this blog.
USMM user measurement tool
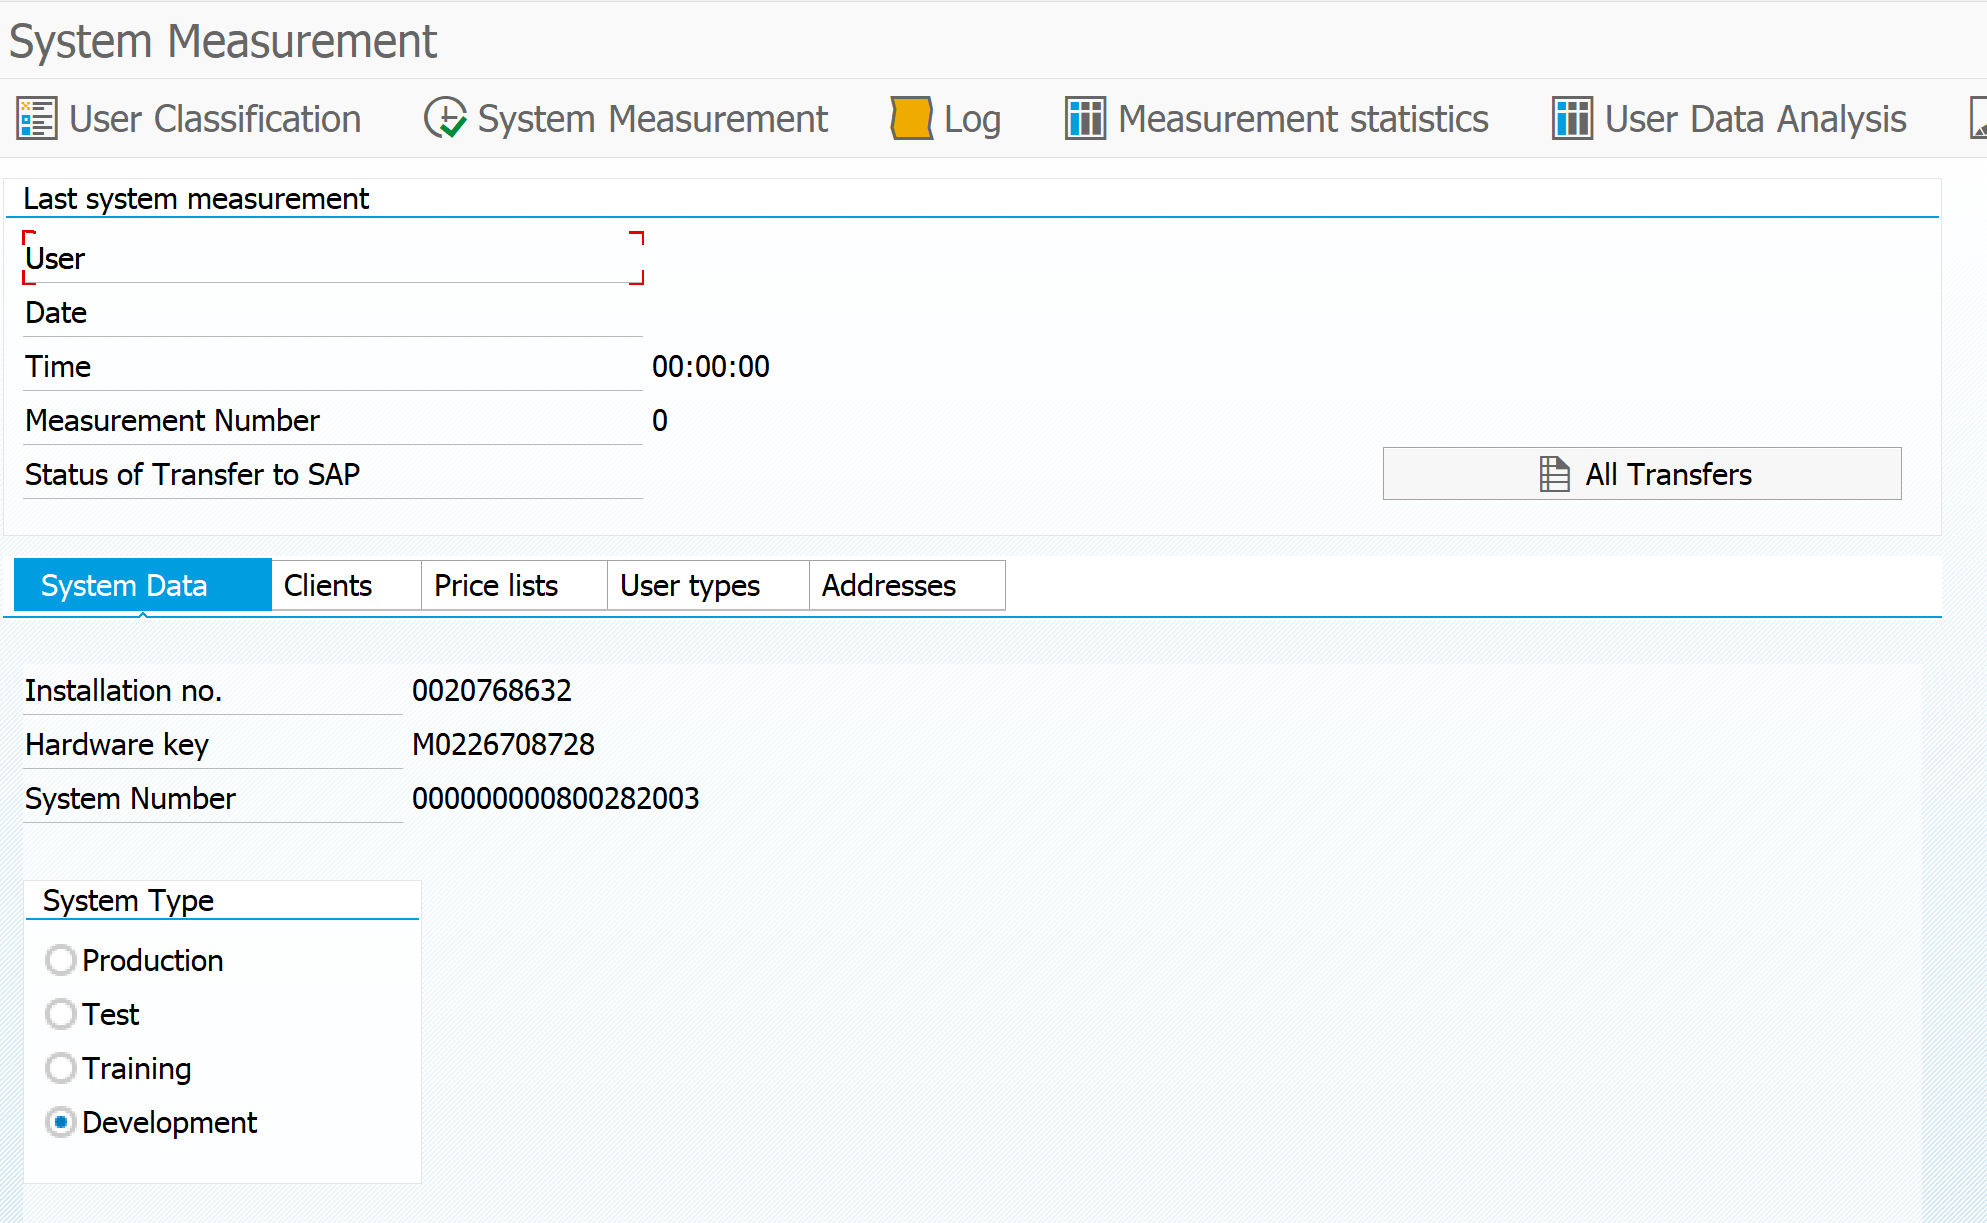
The user measurement tool USMM is the starting point. Start transaction USMM and you will come to the tool launch page:
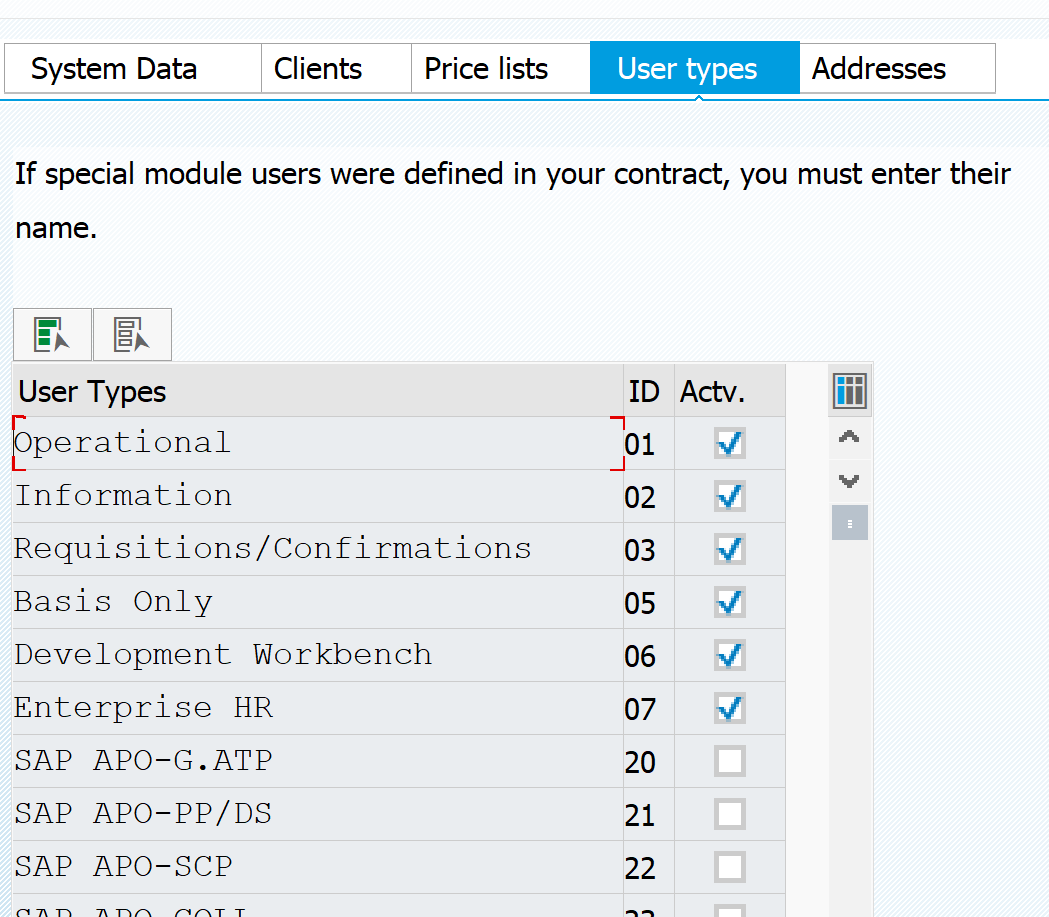
Important first step is to go to the tab User Types and activate the types according to your contract:
Reminder: these types can be different company depending on the contract.
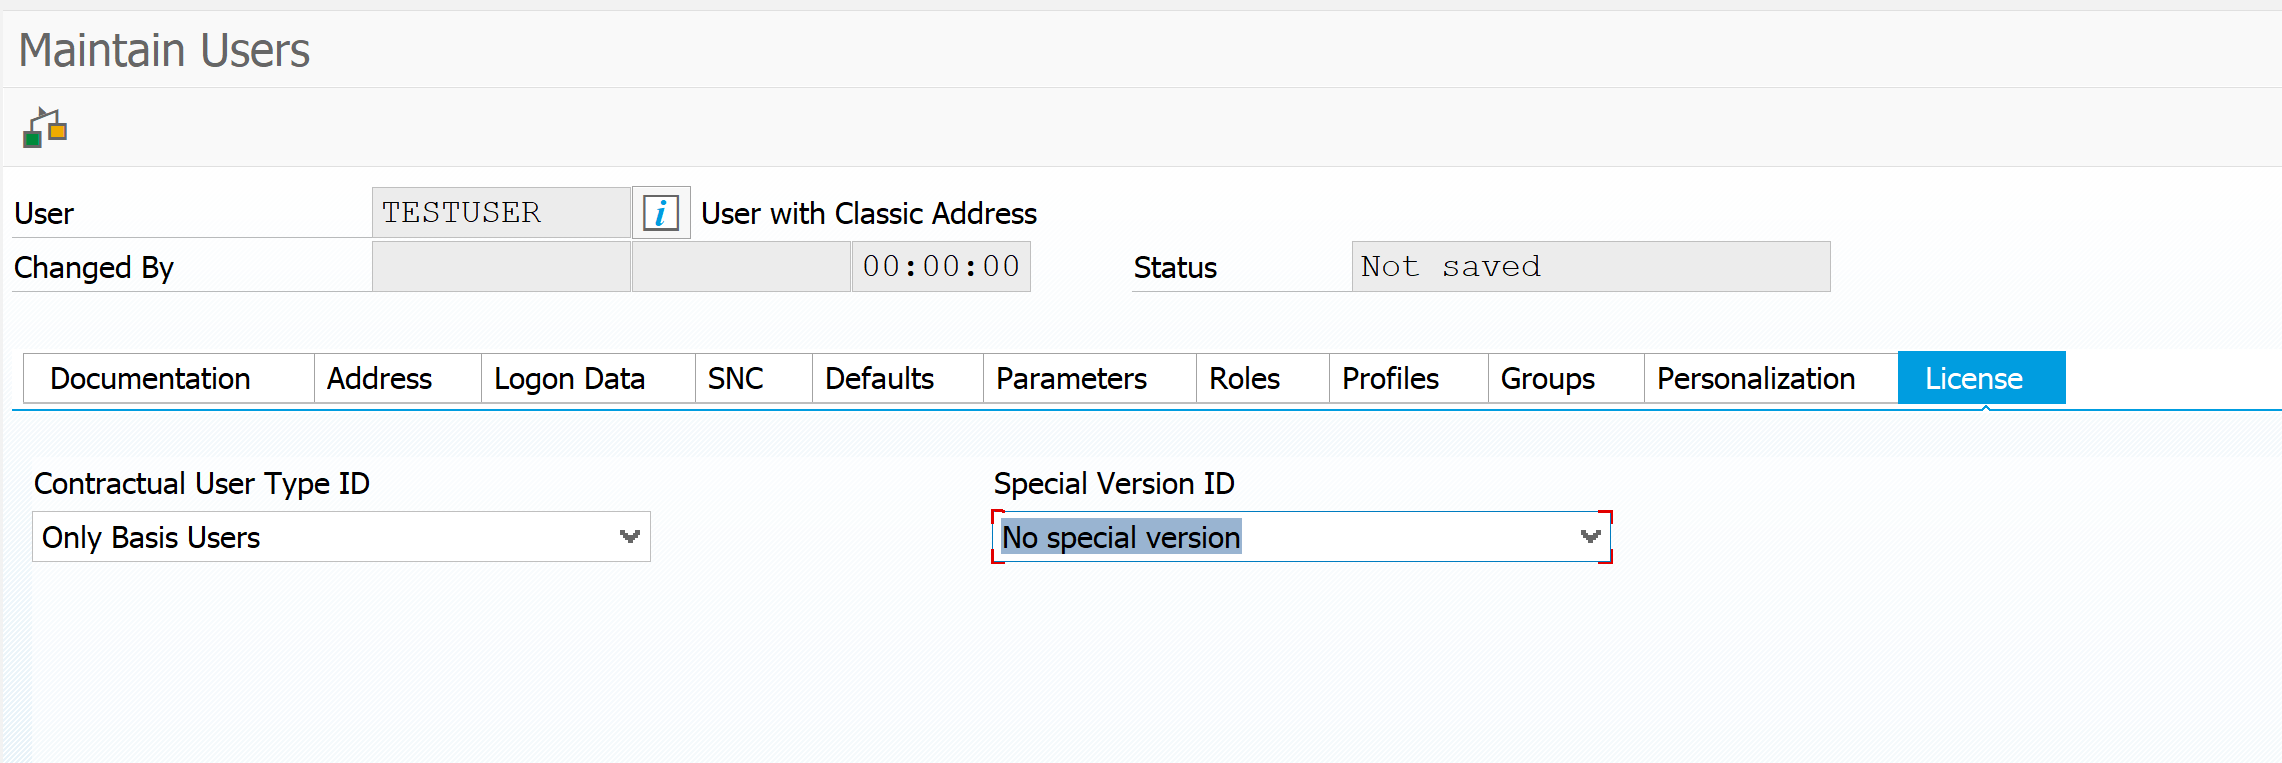
These activated types will now be visible in the SU01 License tab:
User classification check
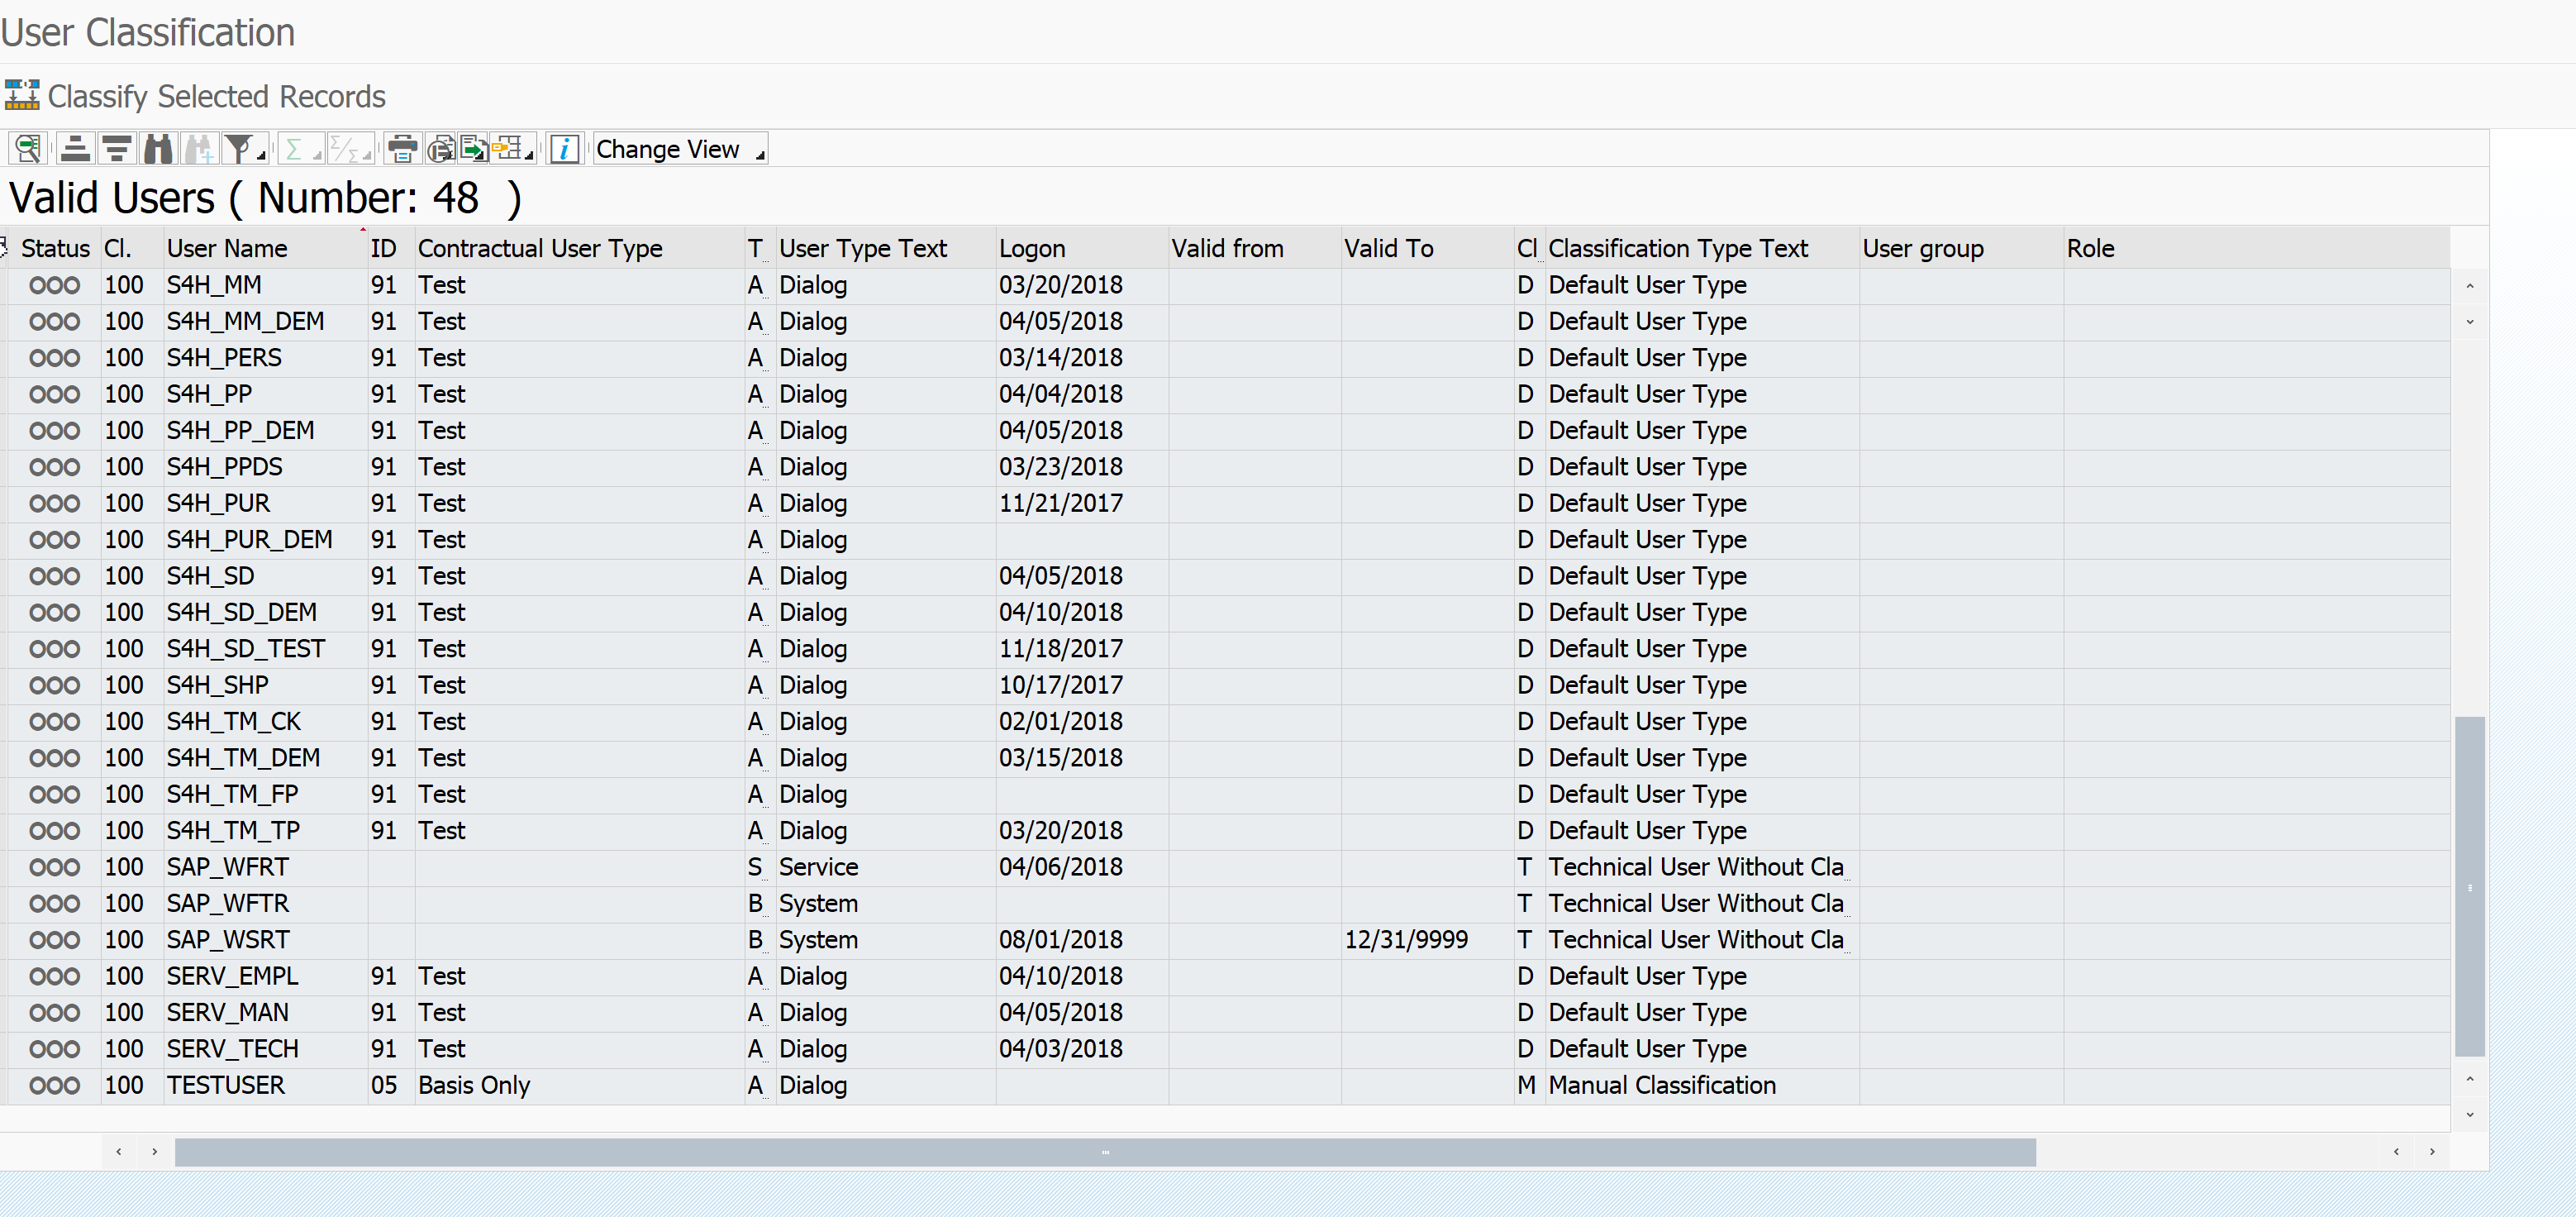
In the USMM tool the first thing to do before running the measurement is to validate the user classification. From the USMM start screen click the user classification button. This will now list all the users in your system and the assigned or determined user classification:
If you want to change a classification you can do that in SU01 license tab, or directly from this screen by selection of the record(s) and pressing the Classify Selected Records button.
General rules for classification:
Background users (type B and S) typically count as Technical users
Non-classified dialog users will be set to Default (meaning SAP will count them as the most expensive type of users)
Locked users will be counted as well
Users outside of validity period will not be counted in the measurement
Deleted users and users outside of validity date will not be counted in the measurement, but the statistics of these actions will be!
If you execute regular clean up (every month or quarter) this will be seen in the statistics. If you do clean up just before the measurement it will be seen as well, and might lead to discussion. If you do monthly clean up discussions will end fast.
Executing the user measurement
After you have classified and checked all the users,you can start the user measurement in USMM by hitting the System Measurement button.
The USMM tool will now run by firing a huge amount of SM37 jobs. Wait until the jobs are finished (typically max 10 min runtime). Then you can see in USMM the result of the run in the log:
The USMM tool will both do the user and automated engine measurement.
The USMM tool can be run as frequently as you want. The Send to SAP button is a real send and cannot be reverted.
Improving the USMM results
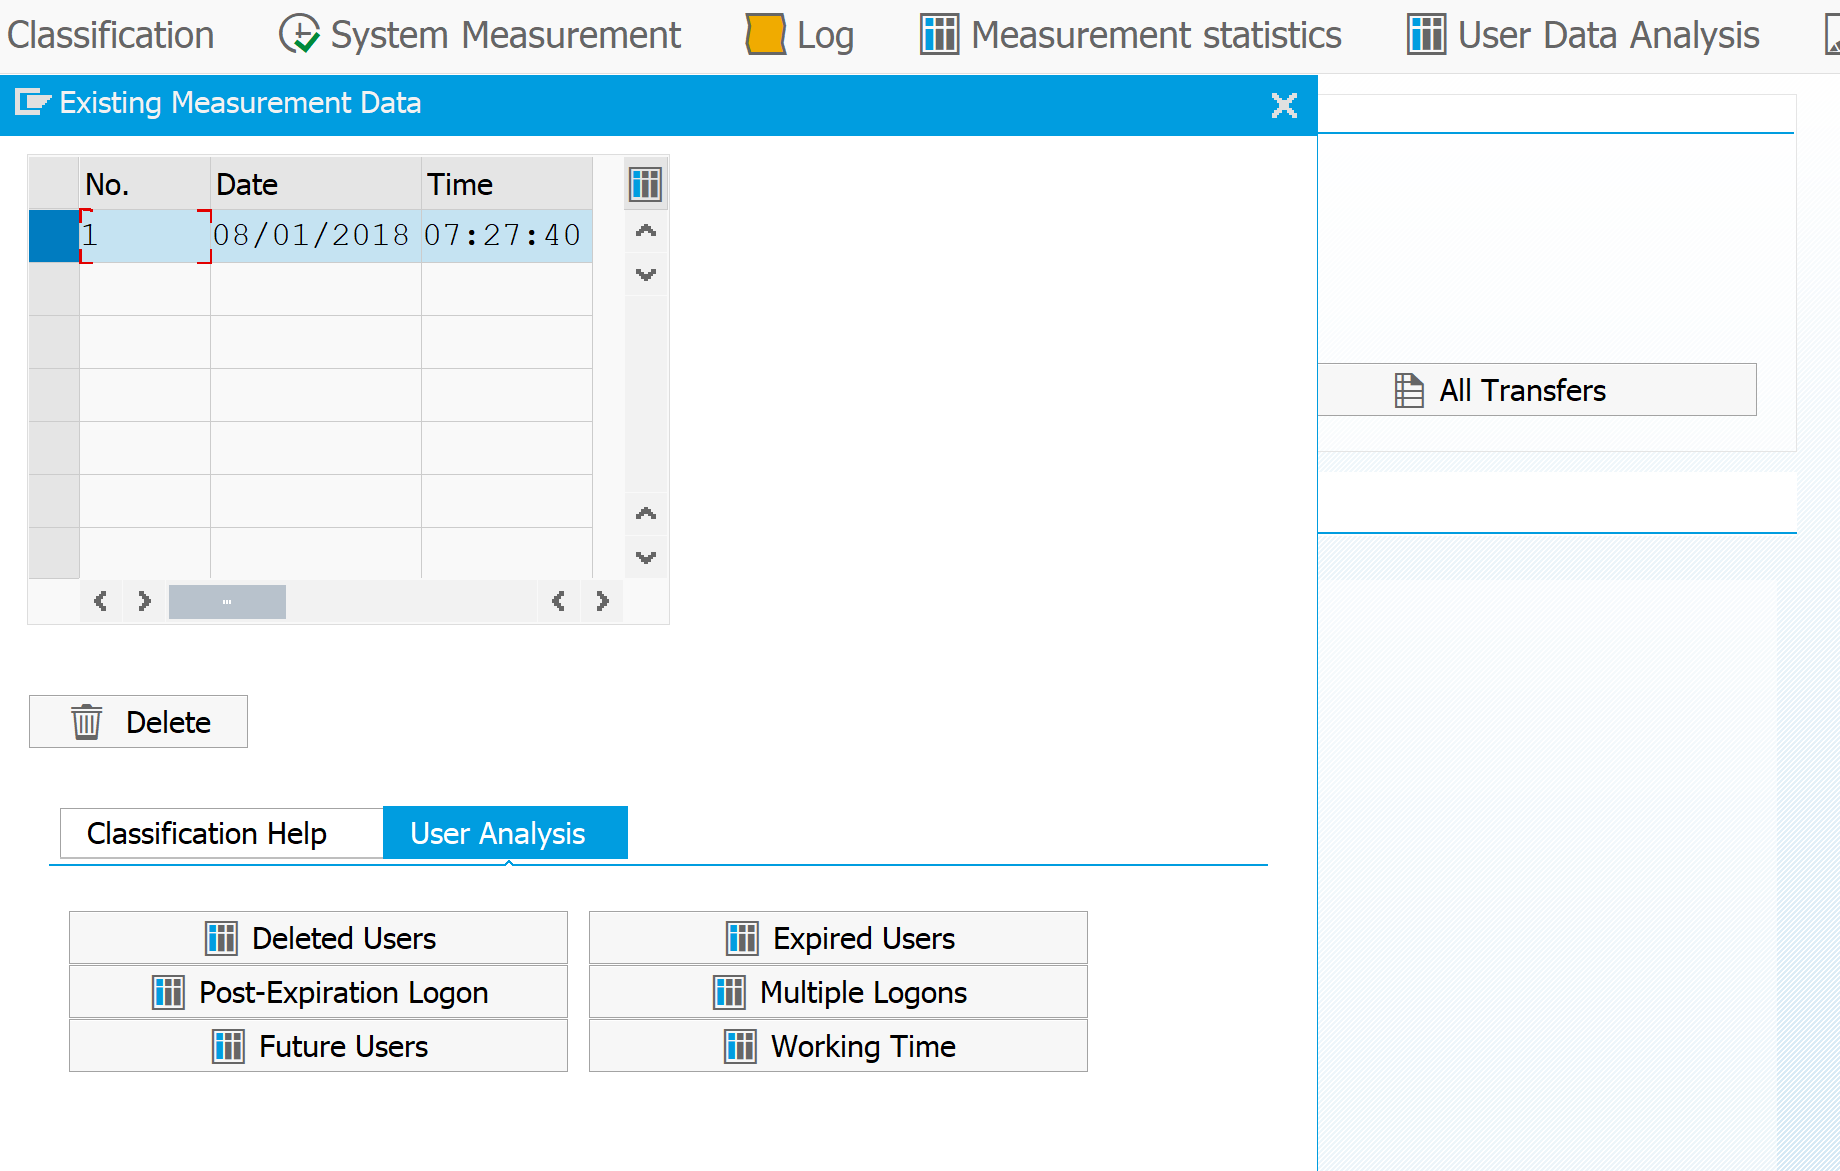
You can improve the USMM results via the User Data Analysis button:
Here there are several lists to help you find why certain elements are reported.
You can use this lists to find errors in the classification and do extra cleanup. Then you can rerun USMM before you submit the data to SAP.
Multiple productive systems
If you have multiple productive systems a lot of users will be present in both systems. Example: user is present in the core ECC system and runs reports in the BI system.
For the SAP user measurement you want to count the user only once.
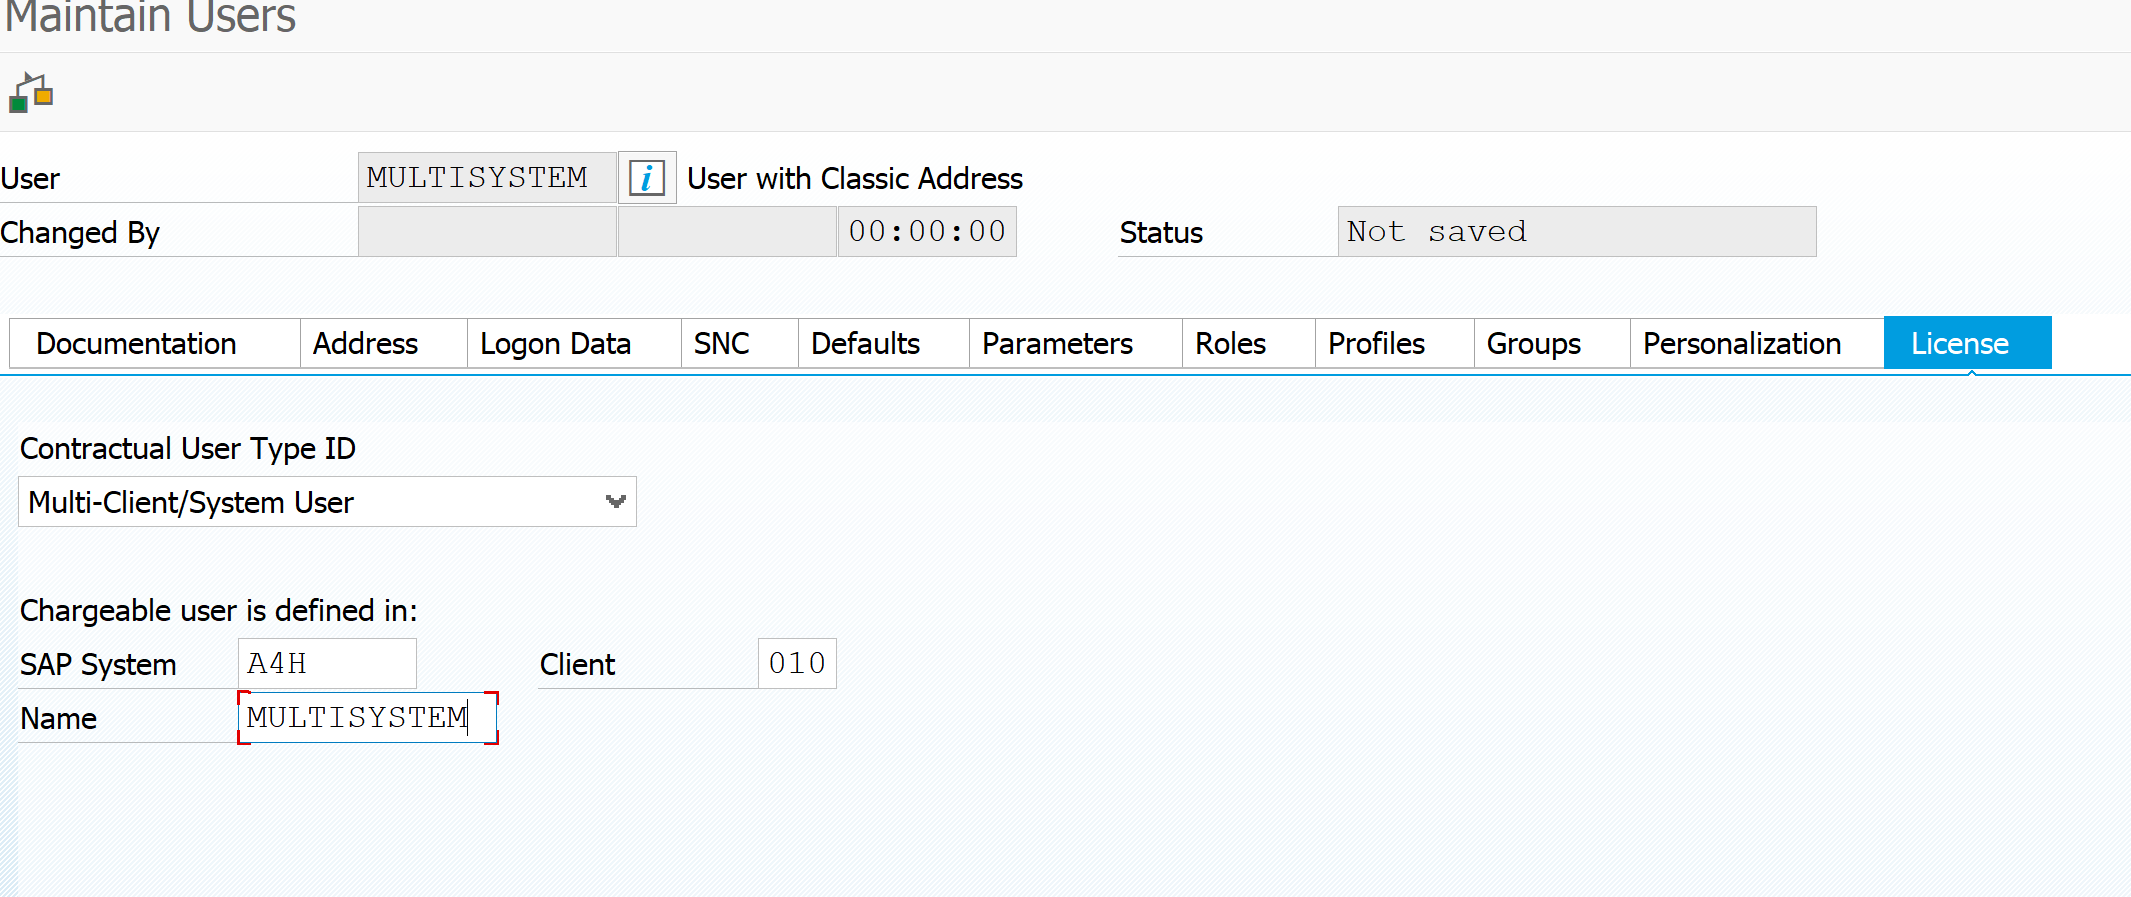
To help you in this administration activate in USMM the Multi-Client/System type:
In SU01 license tab you can now refer to this type, and set the main system for user measurement:
The LUI (license utilization information) tool is an online SAP tool that has all the information on your on premise and cloud licenses information combined. For cloud the usage is automatically visible. For on premise systems you can upload the usage via the SLAW files. This can give you insights into under-consumption and over-consumption of licenses. Read more in this blog.
This blog will explain how to activate the SOAP runtime inside the ABAP stack. This is a mandatory step before you can set up web services in transaction SOAMANAGER.
Questions that will be answered are:
What steps are required for the setup?
How can I check if the setup is done properly?
What are potential issue solving actions?
What other tools are available?
Setting up the SOAP runtime
Setting up the SOAP runtime is extensively explained in OSS note 1043195 – Configuration of Web service runtime. The basic steps below have to be repeated twice: first you execute the actions in client 000, then in the main data client again.
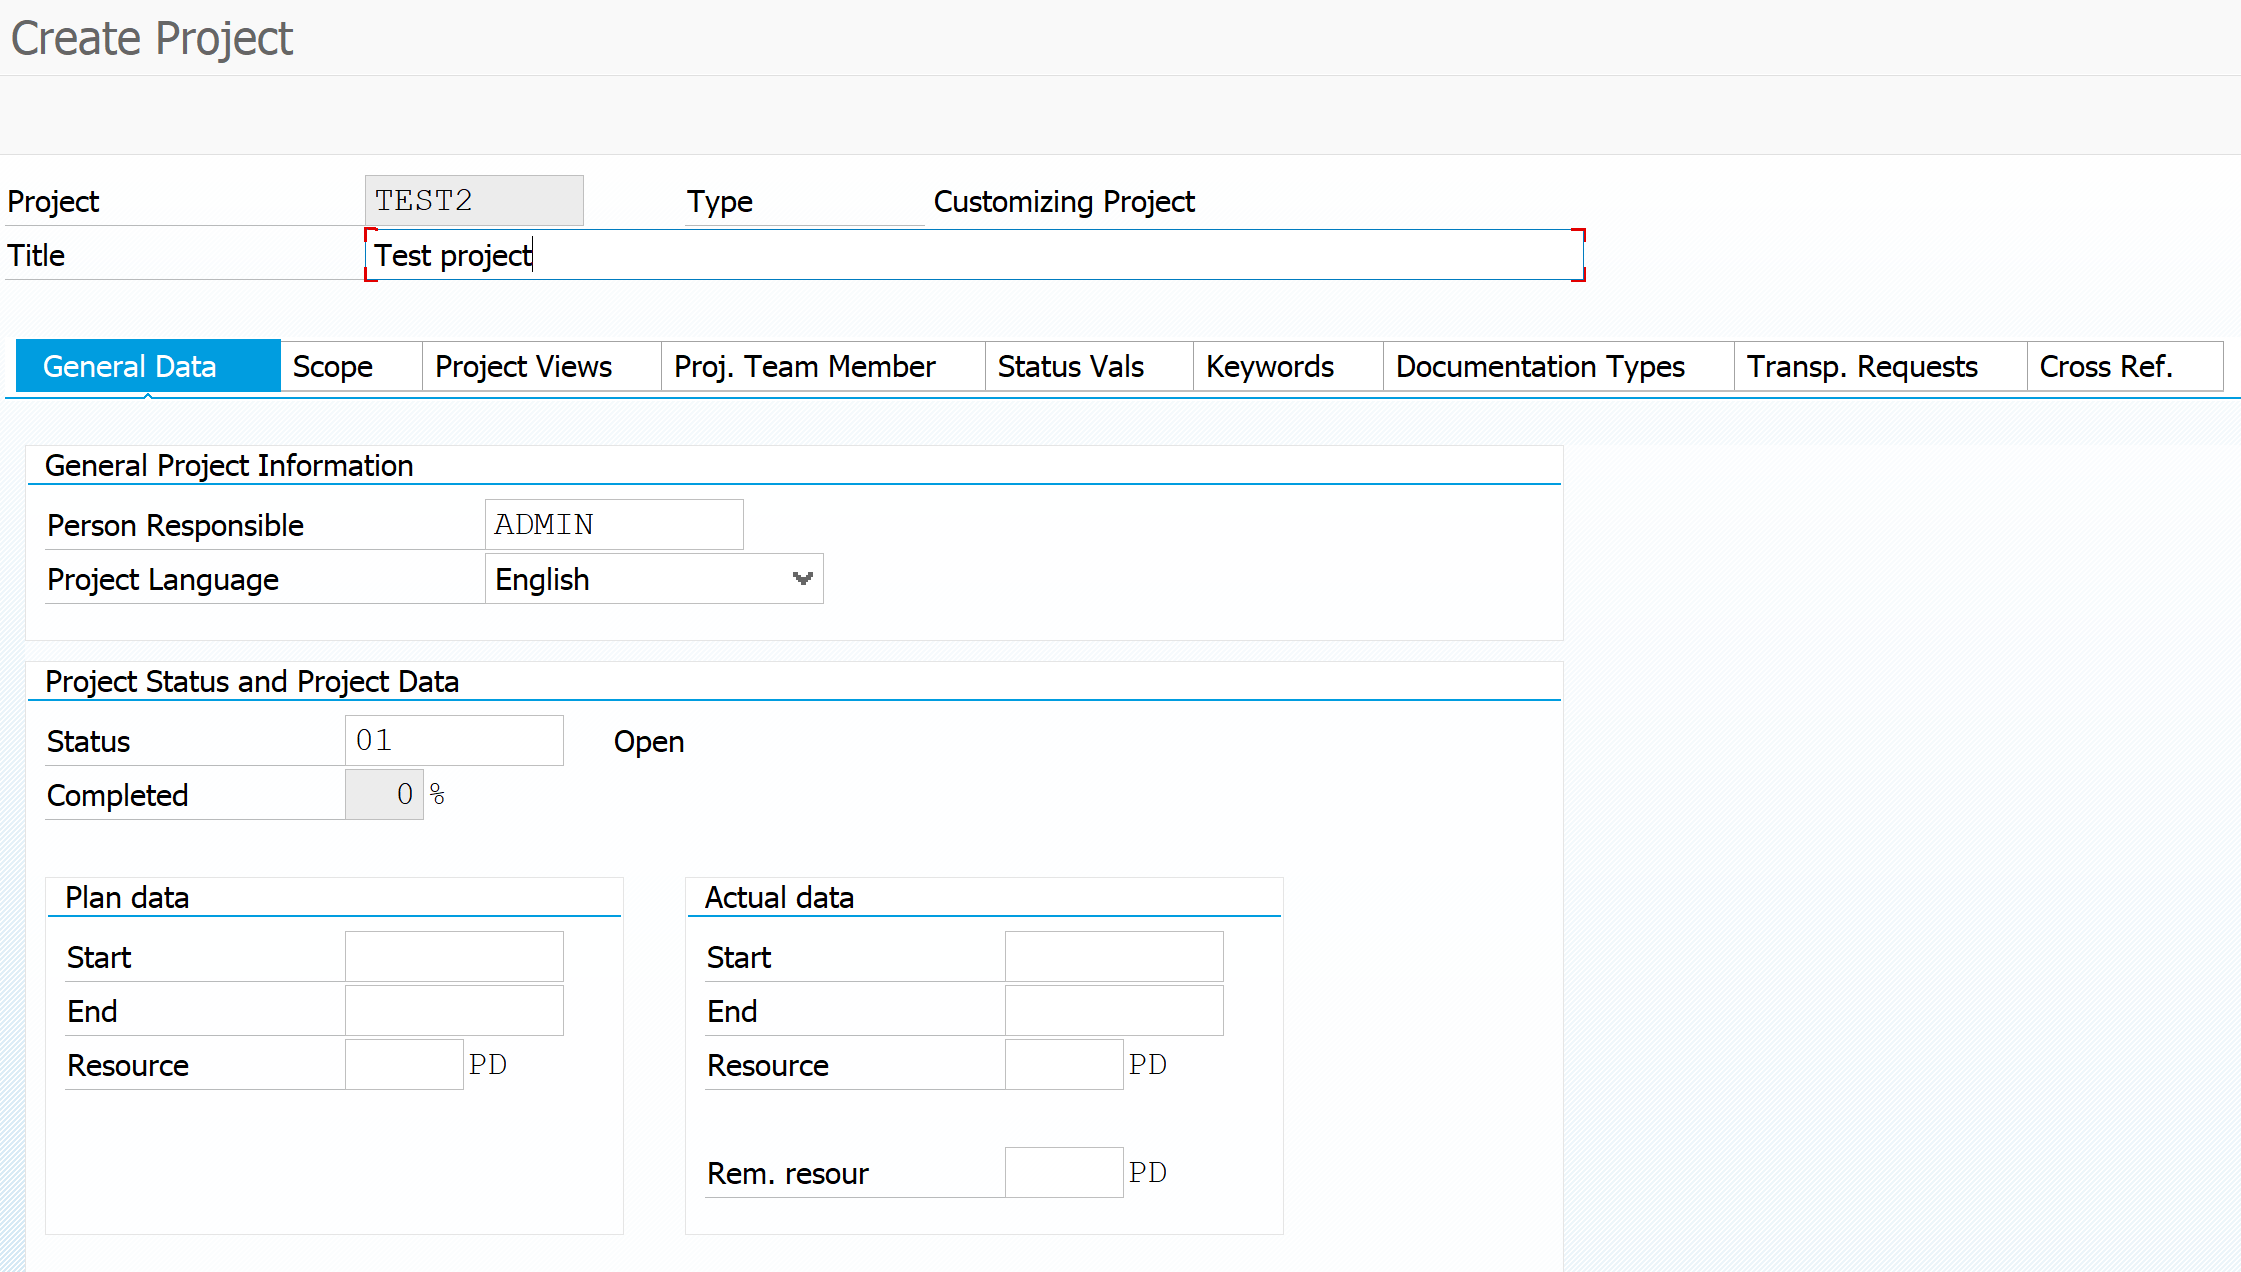
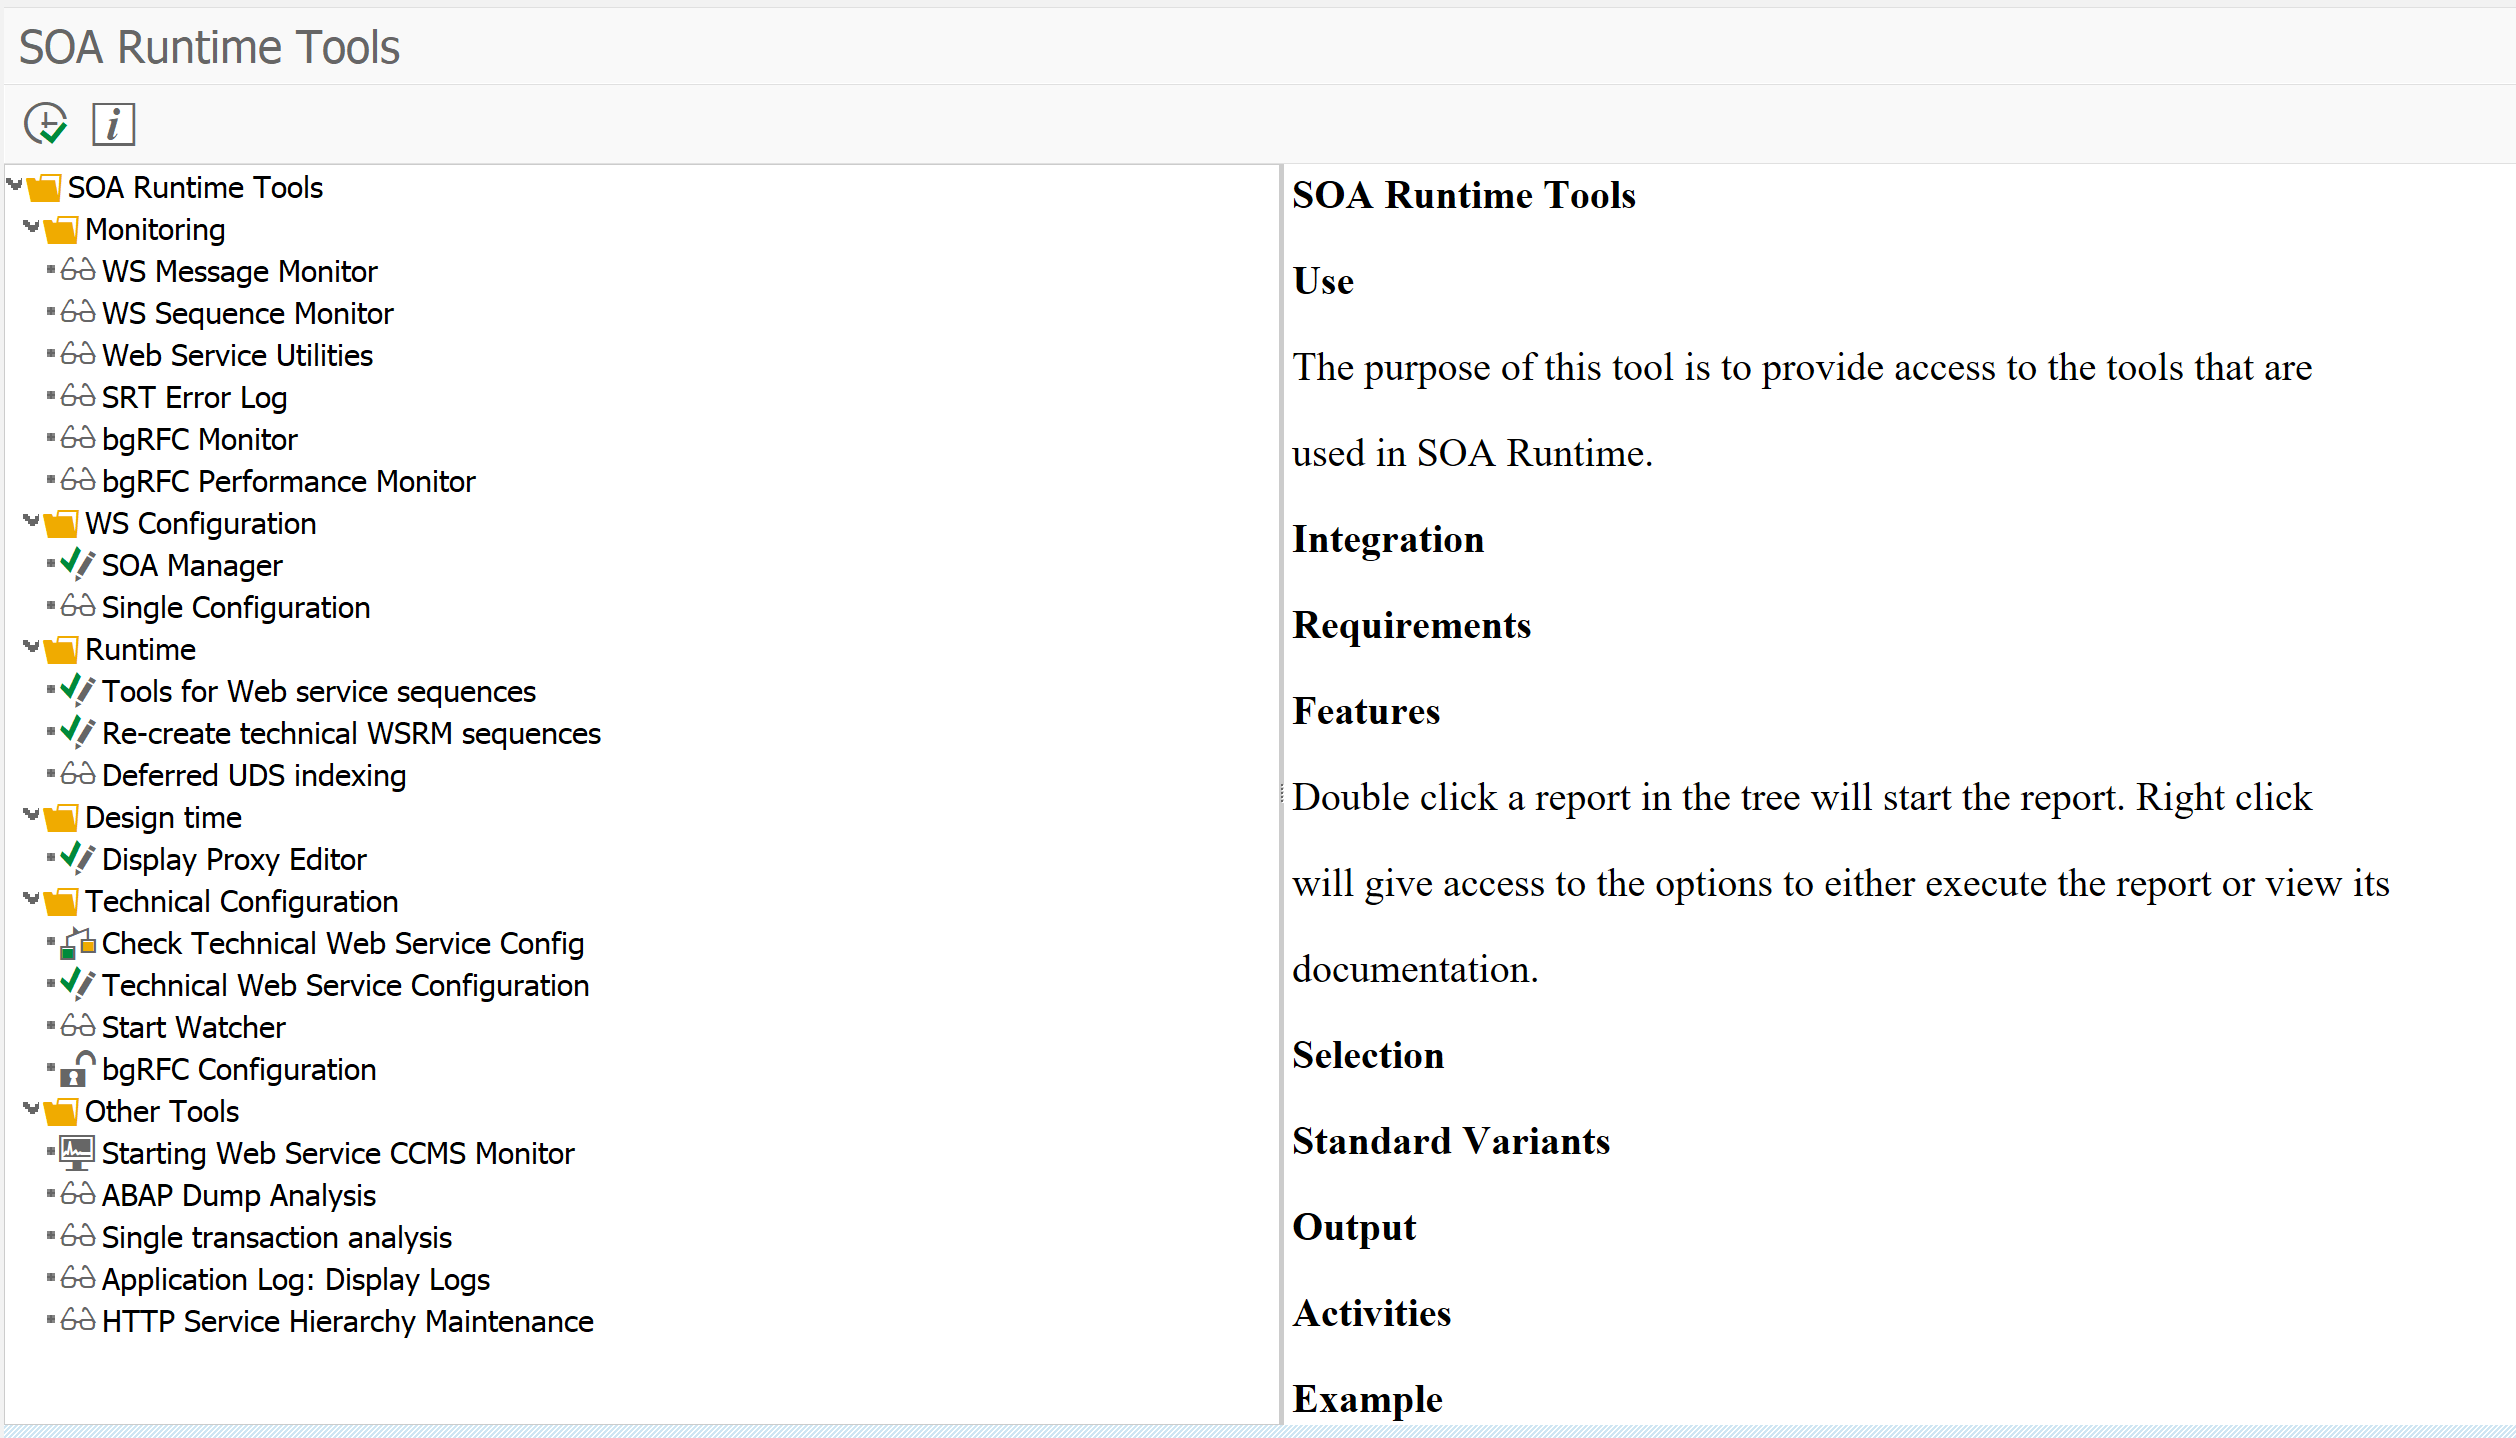
Start transaction SRT_TOOLS for reaching the main tool set:
In the Technical Configuration section select the tool for Technical Web Service Configuration. This will bring you to the main activation program:
During setup things might go wrong. If you run without SAP_ALL, please check the notes that you have sufficient authorization. In the process both a background user (SAP_WSRT and DELAY_LOGON) and RFC (BGRFC_SUPERVISOR) are created. If you don’t have authorization for that, issues will happen.
Use transaction code SU01D to see if the users are created properly with the correct roles.
Use transaction code SBGRFCCONF and check the last tab that the supervisor destination is assigned. In systems with CUA there might be an issue with creating the supervisor destination. In this case follow the steps of OSS note 2775490 – Error in customizing while creating supervisor destination.
Issue solving program (run in SE38): WSS_SETUP.
Issue solving transaction: WSIDPADMIN.
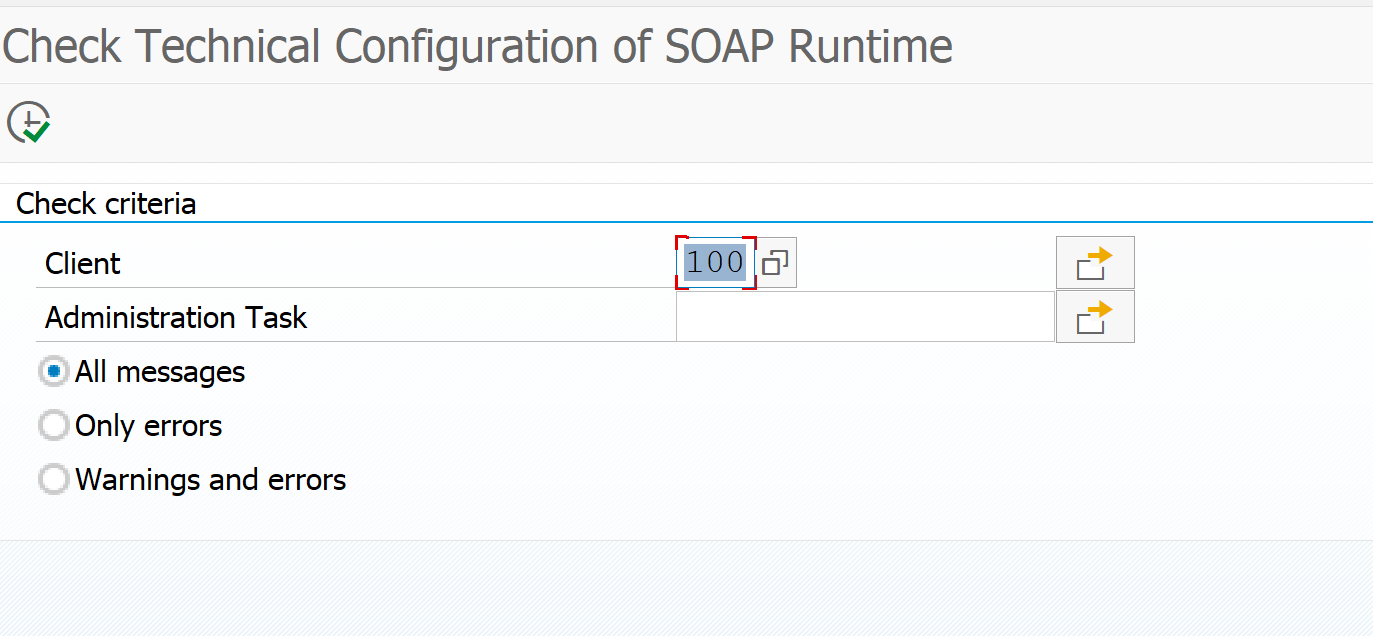
Issue solving after setup
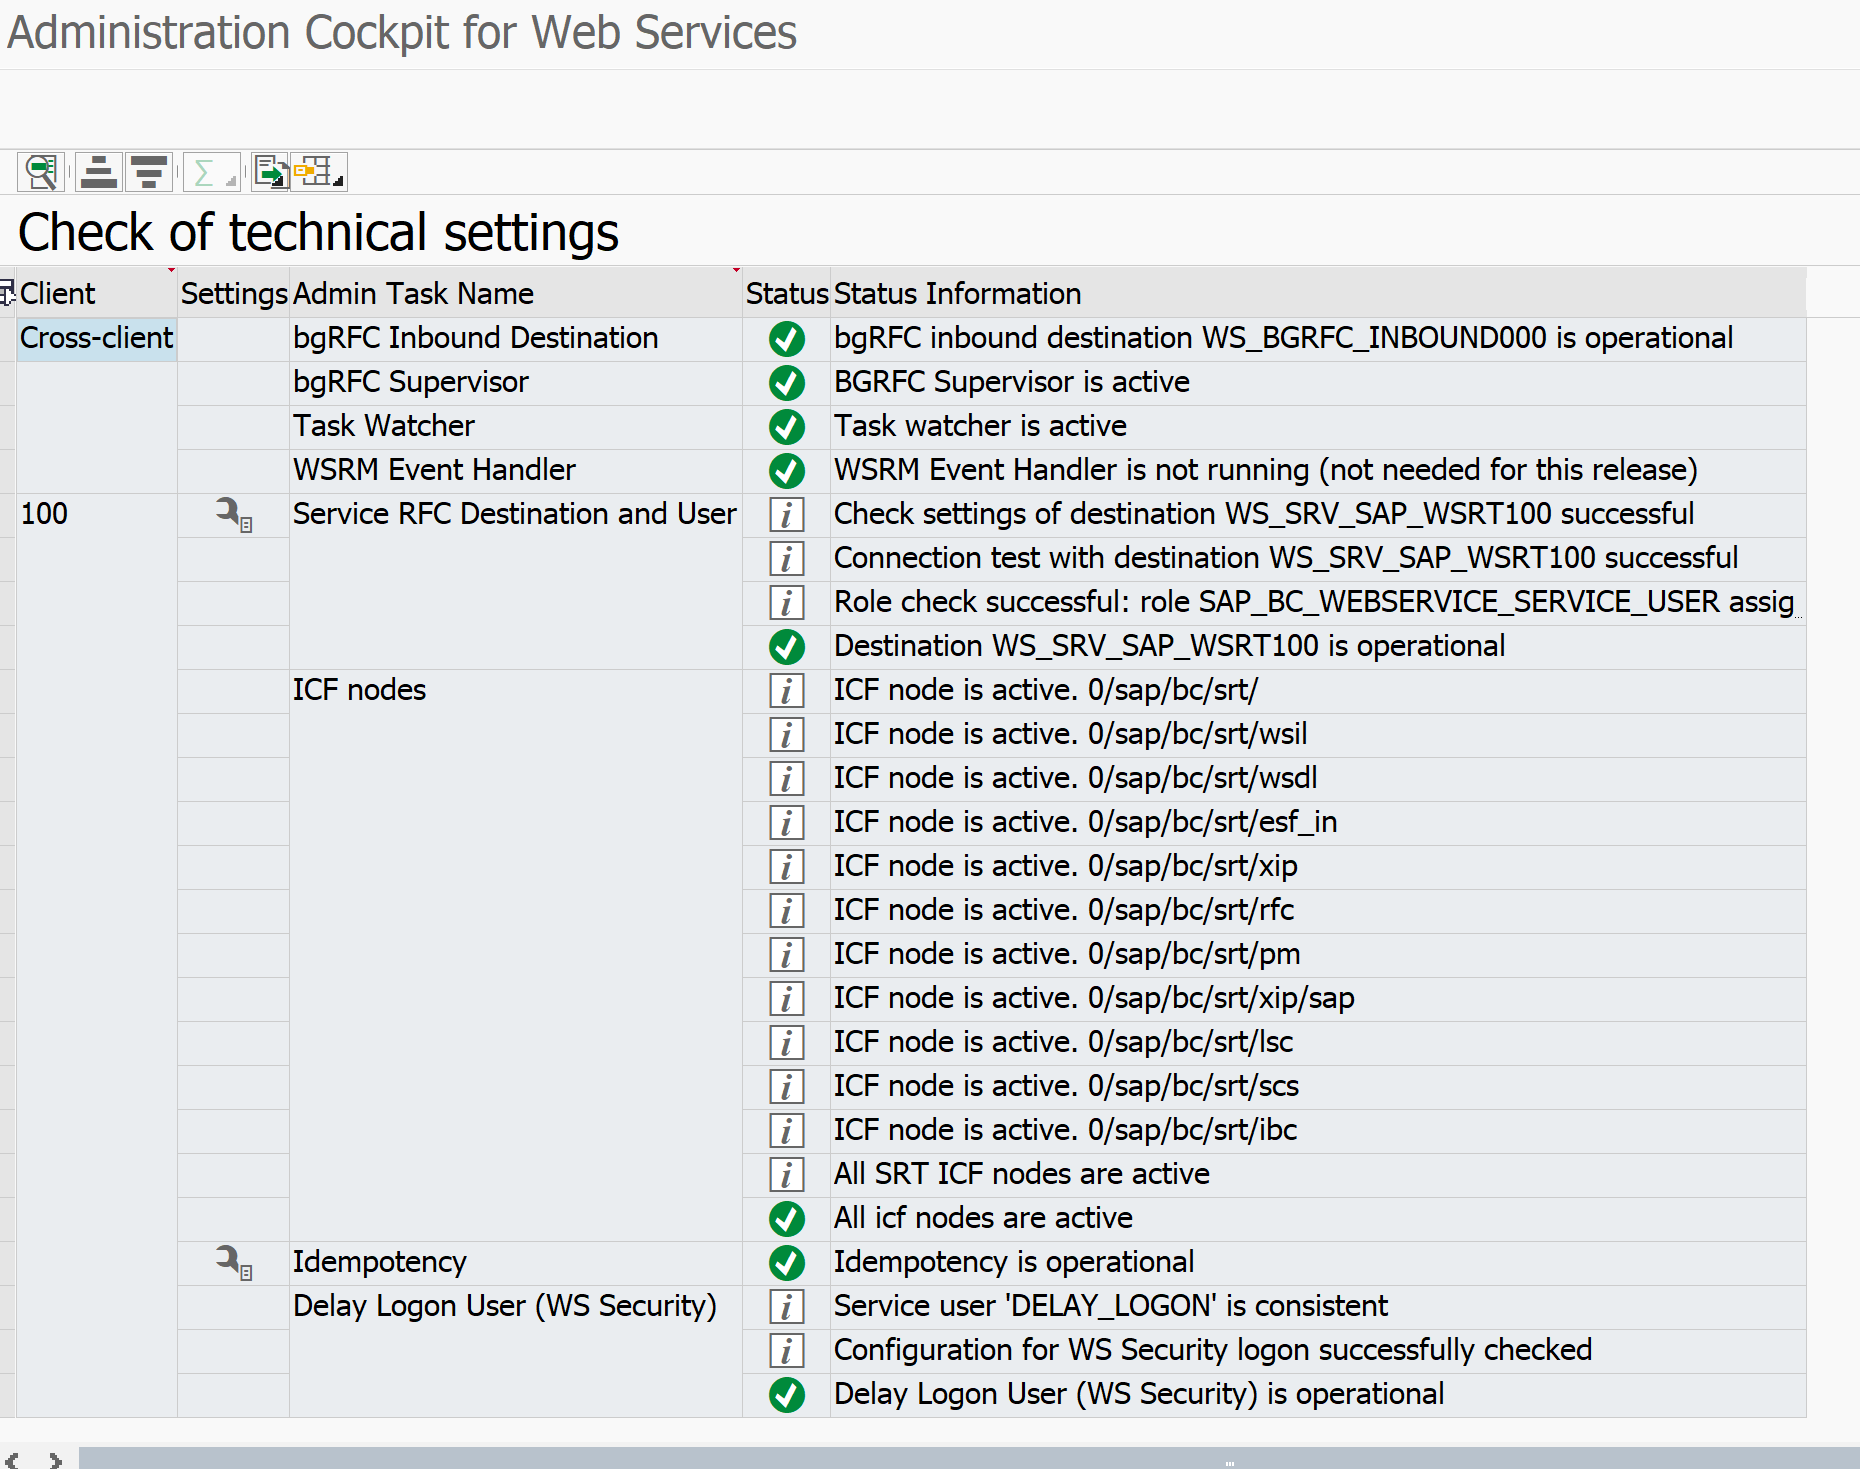
If you have issues after setup, run the above check tool via SRT_TOOLS, or directly via program SRT_ADMIN_CHECK.
Common root causes: changes in authorization, overzealous user admin deleted SAP_WSRT or DELAY_LOGON user, or somebody deleted the supervisor RFC destination, etc.
The SRT_TOOLS transaction also lets you jump to other useful tools such as the WS message monitor and the web services utilities tool.
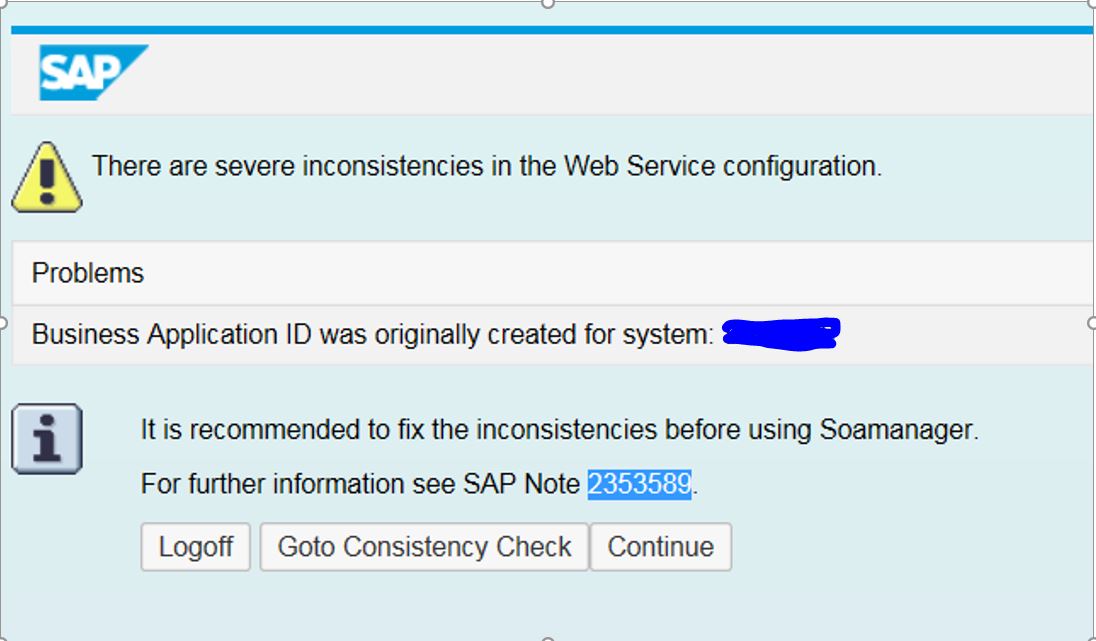
Webservice issues after system copy and other system changes
After a system copy you might be confronted with data inconsistencies. Upon start of SOAMANAGER you might get this screen:
Follow the instructions from OSS note 2353589 – Consistency Check for Soamanager. It might mean you need to run program SRT_WSP_INITIALIZE_WS_CFG to re-initialize the complete setup and reconfigure all the webservices again.
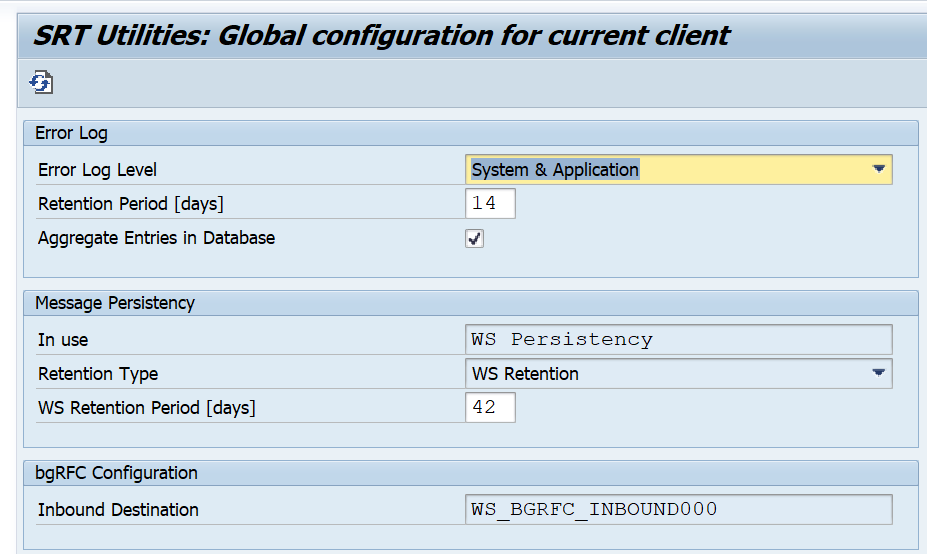
Start transaction SRT_UTIL to go to the Web Service Utilities screen. From the menu now select the option Tools, Global Configuration. Here you can set the retention times (in days) to keep the SOAP messages:
Some web services will use idocs. To use this feature basis first needs to enable this option by registering this service. This registration is performed via transaction SRTIDOC.
If you are running a global system you want to see the usage of the system round the clock. Unfortunately the standard delivery of SAP is summing up the early morning and night hours in the ST03N time profiling.
This blog will explain you how to change this to 24 hours statistics recording.
Questions that will be answered in this blog are:
How to switch to 24 hour time profiling?
How does the result look like?
General information on ST03N can be found in this blog.
Switching to 24 hour time profiling
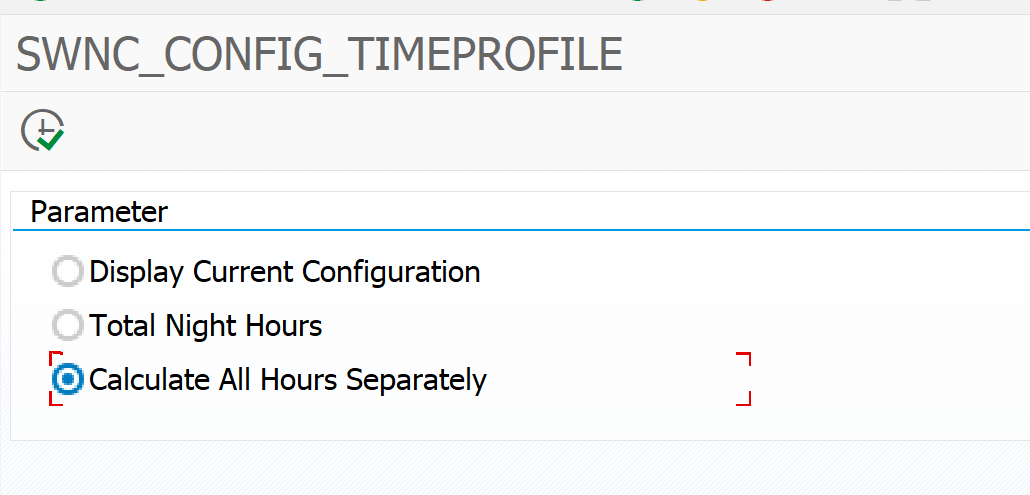
To switch to 24 hour time profiling start program SWNC_CONFIG_TIMEPROFILE:
Select the Calculate All Hours Separately option and hit the execute button. Done.
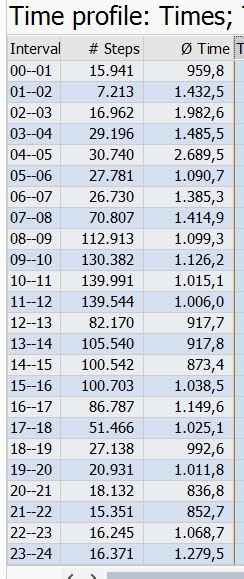
The end result
Before you can see the end result you best wait one week for the changed statistics to record.
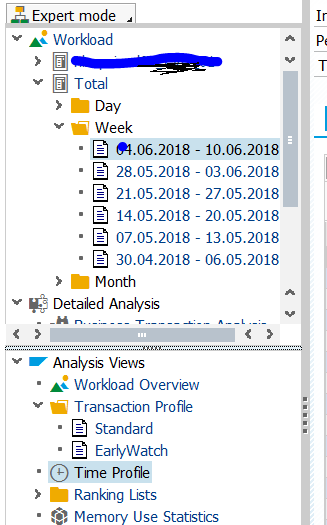
After 1 week go to transaction ST03N and select the Time Profile option in the expert section: