Every year SAP measures the licenses. The developer licenses are the most expensive licenses and also the ones which are under continuous debate with SAP.
Questions that will be answered in this blog are:
- What is a developer and why is it so hard to measure?
- How can I go back to the DEVACCESS measurement on my non-S4HANA systems?
- What are the complexities on S4HANA with measuring developers?
Developer definition
Most likely the definition in your contract clearly states developer is only for creation and changing custom code (Z code). And not for applying OSS notes. The measurement should follow the definition.
Developer measurement on non-S4HANA system
On a non-S4HANA based system, the developer key concept still exists. This means a developer key needs to be called off at sap support site for keys. This mechanism is hackable, but in the end in the system table DEVACCESS is filled with everybody who has filled in the keys.
SAP has given update notes on the USSM user measurement programs that use the S4HANA logic, which is described below.
By applying OSS note 3225435 – USMM2: Development Workbench check – Restore old version, you can revert back to the original way of working that measures entries in DEVACCESS table and changes to REPOSRC.
The measurement of developers has to run on the development system. For security reasons, you should delete all entries in DEVACCESS table in all non-development systems.
When a developer is leaving, you should also delete the corresponding entry in DEVACCESS table to avoid it from being counted in the license measurement.
Read this blog on the deletions of entries in DEVACCESS table.
S4HANA logic (or better no logic)
In S4HANA SAP removed the developer key (see this blog). In the USMM measurement program SAP has put in logic to measure a developer as everybody who creates a transport entry of type Workbench. Text from the word document attached to note 3038370 – USMM2: Development Workbench Check alte Version wieder herstellen:
"In the current version of the check all users are shown that have made an entry of type K (workbench request) or S (development/correction) in the field TRFUNCTION in the table E070 within the last year."
Note 3038370 is now obsolete and replaced with OSS note 3225435 – USMM2: Development Workbench check – Restore old version.
This means also the following actions are counted as developer:
- Basis team applying OSS note
- Consultant making a client independent customizing
- Many more actions that lead to entries in workbench request
This logic of SAP does not make any sense. As customer you can have big debates with SAP on this.
It is really unclear why SAP is not simply checking the REPOSRC changes on S4HANA system done on Z code last year. This will simply give list of real changes done on custom code by whom. That would be fair measurement.
SAP, if you read this, you can take over this idea.
OSS notes with or without manual instructions
Some OSS notes have manual instructions to create SAP Z programs or to alter SAP objects. To avoid discussions with SAP, it is best if you carry out these instructions by an ABAP developers, rather than a basis consultant. Not only does the ABAP developer has a better clue on what the impact is, it also makes sure that the Z coding and changes to standard SAP are registered in the system and transport on the ABAP developers name. This will avoid discussions on developer licenses.
If basis applies the automatic OSS notes, these are not core custom developments. Check if these are counted by the measurement program. Then check the definition in your contract. Most likely the definition in your contract clearly states developer is only for custom code (Z code). And not for applying OSS notes.
SSCR key listing and developer license
You can run program RSUVM080 to quickly get overview of developer SSCR keys in development system or view in table DEVACCESS. More on RSUVM080 in this blog.
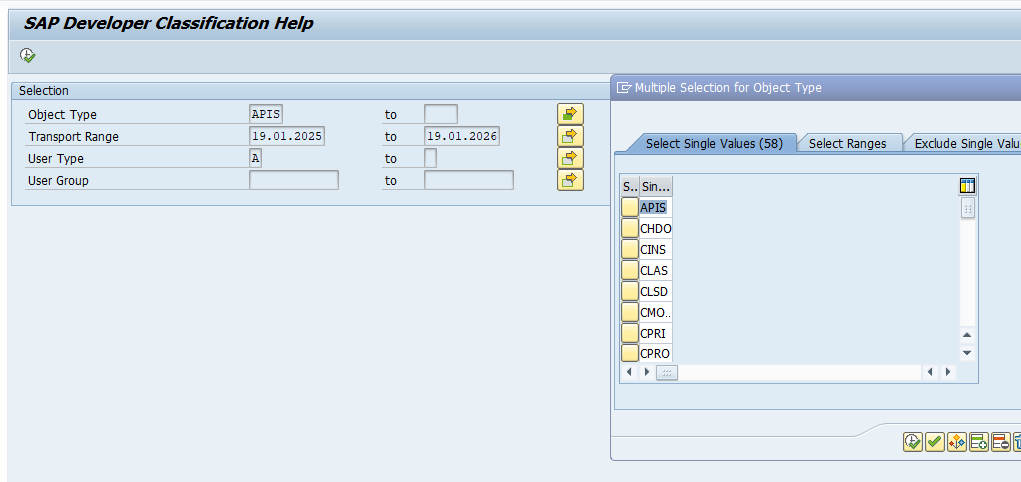
Developer classification help
See OSS note 3333812 – SAP Developer User Classification Help. This note installs program SLIM_DEV_CLF_HELP and transaction SLIM_DCH:
This will read from the transports in the given timeframe the list of users who created one of the listed development objects.
The note above also links to the formal developer measurement guide. The end of the guide contains a long list of use cases.